Diese Version enthält möglicherweise inkorrekte Änderungen. Wechsle zur letzten geprüften Version.
Was du brauchst
-
Dieser Schritt ist noch nicht übersetzt. Hilf mit, ihn zu übersetzen!
-
Slide both of the latches to the outside to release the battery.
-
-
Dieser Schritt ist noch nicht übersetzt. Hilf mit, ihn zu übersetzen!
-
Pull the battery out by lifting the battery cover away from the laptop.
-
-
Dieser Schritt ist noch nicht übersetzt. Hilf mit, ihn zu übersetzen!
-
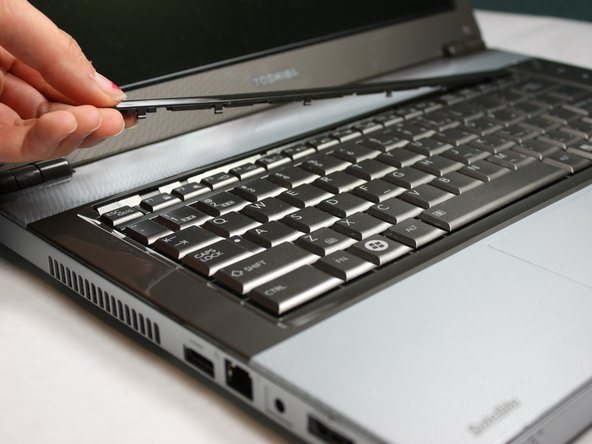
Flip the computer over and insert the plastic opening tool under the plastic strip at the top of the keyboard.
-
Pry the top plastic strip from the top of the keyboard.
-
Peel the strip completely away from the keyboard.
-
-
Dieser Schritt ist noch nicht übersetzt. Hilf mit, ihn zu übersetzen!
-
Using your Phillips #00, unscrew the two 4.80mm screws at the top of the keyboard.
-
-
Dieser Schritt ist noch nicht übersetzt. Hilf mit, ihn zu übersetzen!
-
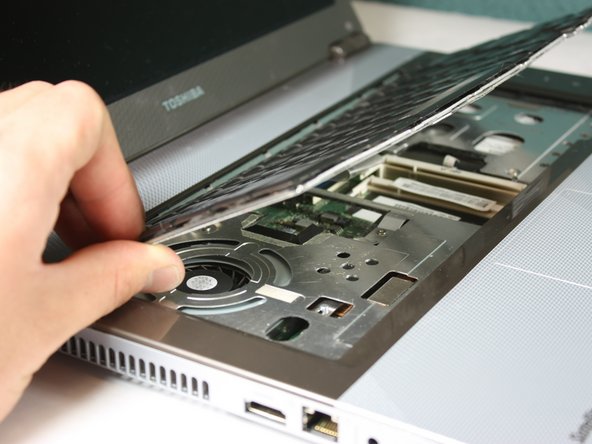
Flip the keyboard up from the bottom in order to see the two ribbons connecting it to the motherboard.
-
-
Dieser Schritt ist noch nicht übersetzt. Hilf mit, ihn zu übersetzen!
-
Using the plastic opening tools, pop out the ribbon cable from the rest of the computer.
-
-
-
Dieser Schritt ist noch nicht übersetzt. Hilf mit, ihn zu übersetzen!
-
Using the plastic opening tools, pop out the second ribbon cable from the rest of the computer.
-
-
Dieser Schritt ist noch nicht übersetzt. Hilf mit, ihn zu übersetzen!
-
Completely remove the keyboard from the laptop by lifting up the part closest to the screen, and then gently pulling out the bottom half.
-
-
Dieser Schritt ist noch nicht übersetzt. Hilf mit, ihn zu übersetzen!
-
Locate the four silver screws on the front panel.
-
Using the Phillips #0, unscrew to remove all four 2.95mm silver screws.
-
-
Dieser Schritt ist noch nicht übersetzt. Hilf mit, ihn zu übersetzen!
-
Flip the laptop over and locate all seven screws on the bottom of the laptop.
-
Unscrew all seven Philips#00 7.70mm screws.
-
-
Dieser Schritt ist noch nicht übersetzt. Hilf mit, ihn zu übersetzen!
-
Locate and unscrew the three silver Philips #00 2.85mm screws inside the battery compartment.
-
Locate and unscrew the five black Philips #00 3.25mm screws inside the battery compartment.
-
-
Dieser Schritt ist noch nicht übersetzt. Hilf mit, ihn zu übersetzen!
-
Rotate the laptop so the back faces you.
-
Locate the two black Philips #00 7.65 screws, one by each hinge, and remove.
-
-
Dieser Schritt ist noch nicht übersetzt. Hilf mit, ihn zu übersetzen!
-
Use the plastic opening tool to pry the top panel up from the base of the computer.
-
Slowly work your way around the computer with the plastic removing tool to make it easier to lift the top panel away from the base.
-
Disconnect ribbons, and slowly lift the top panel up, away from the base.
-
-
Dieser Schritt ist noch nicht übersetzt. Hilf mit, ihn zu übersetzen!
-
Locate the ribbon cable from the motherboard.
-
Using plastic removing tools, pop the ribbon base from the motherboard.
-
-
Dieser Schritt ist noch nicht übersetzt. Hilf mit, ihn zu übersetzen!
-
Locate the two plugs from the motherboard.
-
Using plastic opening tools, remove each plug from the motherboard.
-
-
Dieser Schritt ist noch nicht übersetzt. Hilf mit, ihn zu übersetzen!
-
Locate the ribbon cable partially hidden under the front panel.
-
Using plastic opening tools, pop out the ribbon cable from the motherboard.
-
-
Dieser Schritt ist noch nicht übersetzt. Hilf mit, ihn zu übersetzen!
-
Slowly lift the top panel away from the base of the computer.
-
Place the top panel away from the computer and keep in a flat non-metallic surface until needed.
-


