Diese Version enthält möglicherweise inkorrekte Änderungen. Wechsle zur letzten geprüften Version.
Was du brauchst
-
Dieser Schritt ist noch nicht übersetzt. Hilf mit, ihn zu übersetzen!
-
Flip the laptop over so the bottom is facing upward and the battery is on top.
-
Slide the tab below the battery to the left.
-
-
Dieser Schritt ist noch nicht übersetzt. Hilf mit, ihn zu übersetzen!
-
Slide and hold the tab on the right side of the battery to the right.
-
While holding the right tab, slide the battery upward and out its socket.
-
-
-
Dieser Schritt ist noch nicht übersetzt. Hilf mit, ihn zu übersetzen!
-
Place the head of a plastic opening tool underneath the plastic strip lining the top of the keyboard, right above the "PGUP" button.
-
Next, pull the strip up using a plastic opening tool with a light force, until it pops off.
-
-
Dieser Schritt ist noch nicht übersetzt. Hilf mit, ihn zu übersetzen!
-
Lightly lift from the side that was popped up earlier in order to pop the rest of the strip off of the laptop.
-
-
Dieser Schritt ist noch nicht übersetzt. Hilf mit, ihn zu übersetzen!
-
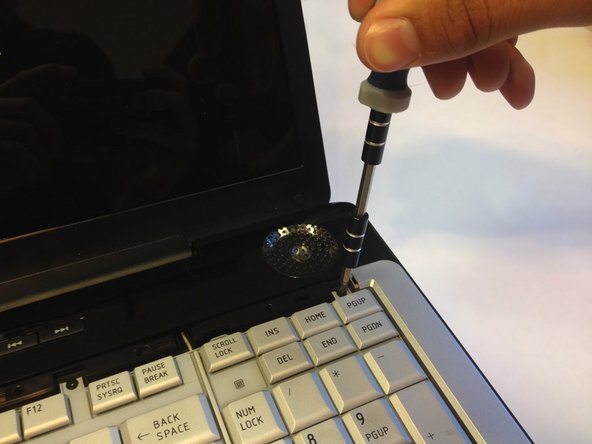
Use a #1 Phillips screwdriver to take out the four 4mm Phillips #1 screws that were underneath the plastic strip.
-
-
Dieser Schritt ist noch nicht übersetzt. Hilf mit, ihn zu übersetzen!
-
Lightly lift up on the keyboard from one of its top corners and pull it towards the screen so you can safely remove the ribbon cable.
-
At the base of the ribbon cable, there is a tiny tab that runs across the width of the connector. Flip it up. You can now pull the ribbon cable free with no resistance towards the monitor.
-
With the cable unplugged, the keyboard can be lifted away from the laptop.
-


