Zum Hauptinhalt wechseln

Upgrading your 2.0 GHz 13" Aluminum Unibody MacBook to a Backlit Keyboard

Was du brauchst

  1. Upgrading your 2.0 GHz 13" Aluminum Unibody MacBook to a Backlit Keyboard, Upper Case: Schritt 1, Bild 1 von 2 Upgrading your 2.0 GHz 13" Aluminum Unibody MacBook to a Backlit Keyboard, Upper Case: Schritt 1, Bild 2 von 2
    • Some 2.0 GHz A1278 MacBook Unibody logic boards do not have the necessary socket installed to accept the keyboard backlight ribbon cable attached to the upper case. The first and second pictures show logic boards with and without the socket installed, respectively. If your logic board does not have the backlight ribbon cable socket installed, the keyboard will work but the keys will not light up.

    • If your logic board does not have the socket installed to accept the keyboard backlight ribbon cable and you are installing a backlit upper case, simply tuck the keyboard backlight ribbon cable out of the way when you reinstall the logic board into the upper case.

    is it still possible to have a backlight keyboard, even if theres no socket installed?

    nightwalkerosfp - Antwort

    I would like to know as well. Can a socket be soldered to the board in this spot?

    metalman141 - Antwort

    I dont think so coz if apple havent soldered necessary driver chip and circuit for backlight, there is no need to solder that socket. That chip has to be on other side of the board

    Oleg R -

    Yes I believe it can as that is just power for the backlight I believe.... but I have never done this mod to a macbook without the socket.

    Nathanael - Antwort

    The socket for the backlight was snap off when I was removing the ribbon cable. Does anyone know where can I get a replacement for the socket?

    Ryan Lim - Antwort

    If you have the skill to solder a new connector on, the best option would probably be to look for a donor motherboard.

    Bagel -

  2. Upgrading your 2.0 GHz 13" Aluminum Unibody MacBook to a Backlit Keyboard: Schritt 2, Bild 1 von 1
    • Remove the single Phillips screw securing the hard drive bracket to the chassis.

    • This screw is captive to the hard drive bracket.

  3. Upgrading your 2.0 GHz 13" Aluminum Unibody MacBook to a Backlit Keyboard: Schritt 3, Bild 1 von 1
    • Lift the hard drive by its pull tab enough to grab and remove the retaining bracket.

    • Lift the hard drive out of the chassis, minding the cable attaching it to the computer.

  4. Upgrading your 2.0 GHz 13" Aluminum Unibody MacBook to a Backlit Keyboard: Schritt 4, Bild 1 von 1
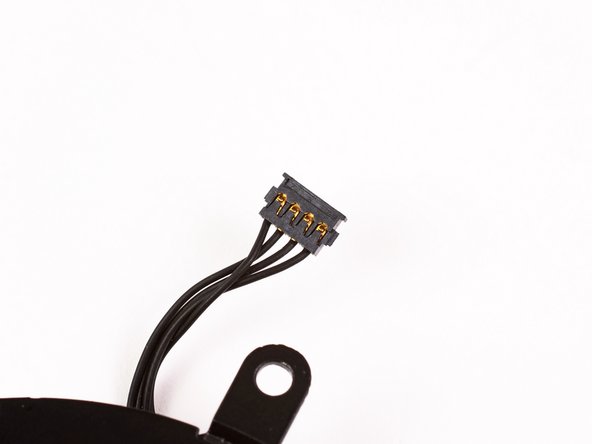
    • Remove the hard drive from its cable by pulling the cable connector straight away from the drive.

  5. Upgrading your 2.0 GHz 13" Aluminum Unibody MacBook to a Backlit Keyboard: Schritt 5, Bild 1 von 1
    • Remove the four 10.3 mm Phillips screws securing the mid wall to the upper case.

    Need to add a step above this to remove the bottom cover.

    Daniel Zimble - Antwort

  6. Upgrading your 2.0 GHz 13" Aluminum Unibody MacBook to a Backlit Keyboard: Schritt 6, Bild 1 von 1
    • Lift the mid wall out of the upper case.

  7. Upgrading your 2.0 GHz 13" Aluminum Unibody MacBook to a Backlit Keyboard: Schritt 7, Bild 1 von 1
    • Remove the following three screws securing the fan to the upper case:

    • Two 5 mm Phillips screws.

    • One 7 mm Phillips screw.

  8. Upgrading your 2.0 GHz 13" Aluminum Unibody MacBook to a Backlit Keyboard: Schritt 8, Bild 1 von 3 Upgrading your 2.0 GHz 13" Aluminum Unibody MacBook to a Backlit Keyboard: Schritt 8, Bild 2 von 3 Upgrading your 2.0 GHz 13" Aluminum Unibody MacBook to a Backlit Keyboard: Schritt 8, Bild 3 von 3
    • Use a spudger to pry the fan connector straight up and out of its socket on the logic board.

    • It is useful to twist the spudger axially from beneath the fan cable wires to release the connector.

    • The fan socket and the fan connector can be seen in the second and third pictures. Be careful not to break the plastic fan socket off the logic board as you use your spudger to lift the fan connector straight up and out of its socket. The layout of the logic board shown in the second picture may look slightly different than your machine but the fan socket is the same.

  9. Upgrading your 2.0 GHz 13" Aluminum Unibody MacBook to a Backlit Keyboard: Schritt 9, Bild 1 von 1
    • Lift the fan out of the upper case.

  10. Upgrading your 2.0 GHz 13" Aluminum Unibody MacBook to a Backlit Keyboard: Schritt 10, Bild 1 von 1
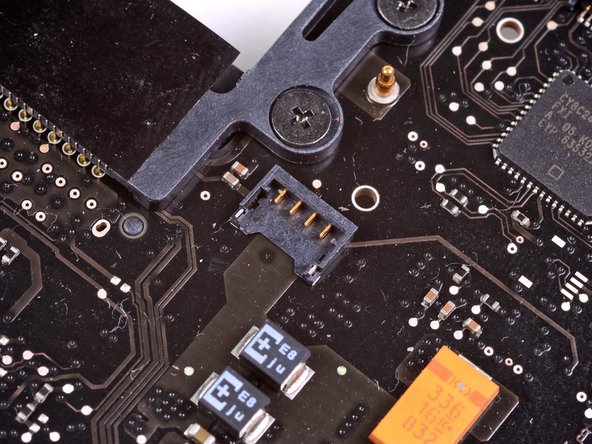
    • Using the flat end of a spudger, pry the subwoofer connector straight up off the logic board.

  11. Upgrading your 2.0 GHz 13" Aluminum Unibody MacBook to a Backlit Keyboard: Schritt 11, Bild 1 von 1
    • Remove the single Phillips screw securing the subwoofer to the upper case.

    My subwoofer has two screws

    Arbera Barbera - Antwort

  12. Upgrading your 2.0 GHz 13" Aluminum Unibody MacBook to a Backlit Keyboard: Schritt 12, Bild 1 von 1
    • The subwoofer is still connected to the right speaker, so don't completely remove it just yet.

    • Lift the subwoofer off the optical drive, and set it above the computer.

  13. Upgrading your 2.0 GHz 13" Aluminum Unibody MacBook to a Backlit Keyboard: Schritt 13, Bild 1 von 1
    • Use a spudger to pry the optical drive connector straight up off the logic board.

  14. Upgrading your 2.0 GHz 13" Aluminum Unibody MacBook to a Backlit Keyboard: Schritt 14, Bild 1 von 1
    • Use the flat end of a spudger to pry the hard drive cable connector straight up off the logic board.

  15. Upgrading your 2.0 GHz 13" Aluminum Unibody MacBook to a Backlit Keyboard: Schritt 15, Bild 1 von 2 Upgrading your 2.0 GHz 13" Aluminum Unibody MacBook to a Backlit Keyboard: Schritt 15, Bild 2 von 2
    • Remove the three 2.5 mm Phillips screws securing the optical drive to the upper case.

  16. Upgrading your 2.0 GHz 13" Aluminum Unibody MacBook to a Backlit Keyboard: Schritt 16, Bild 1 von 1
    • Lift the optical drive from its right edge and pull it out of the computer.

  17. Upgrading your 2.0 GHz 13" Aluminum Unibody MacBook to a Backlit Keyboard: Schritt 17, Bild 1 von 2 Upgrading your 2.0 GHz 13" Aluminum Unibody MacBook to a Backlit Keyboard: Schritt 17, Bild 2 von 2
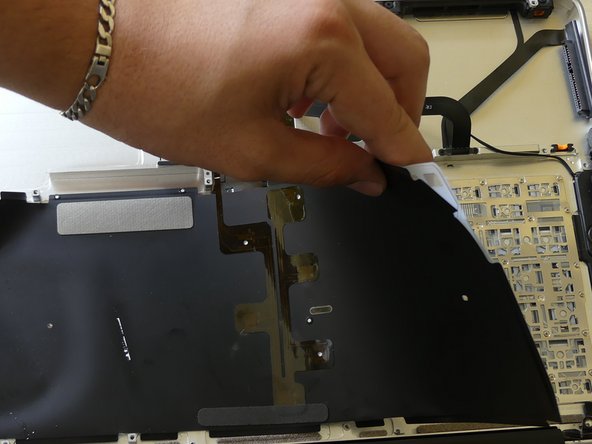
    • Peel the hard drive cable from the adhesive securing it to the upper case, and maneuver the plastic retaining block out of the upper case.

    • The hard drive cable and the plastic retaining block are attached together.

  18. Upgrading your 2.0 GHz 13" Aluminum Unibody MacBook to a Backlit Keyboard: Schritt 18, Bild 1 von 3 Upgrading your 2.0 GHz 13" Aluminum Unibody MacBook to a Backlit Keyboard: Schritt 18, Bild 2 von 3 Upgrading your 2.0 GHz 13" Aluminum Unibody MacBook to a Backlit Keyboard: Schritt 18, Bild 3 von 3
    • Peel back the small piece of black tape covering the right speaker cable.

    • Use the tip of a spudger to pry the right speaker up off the adhesive securing it to the upper case.

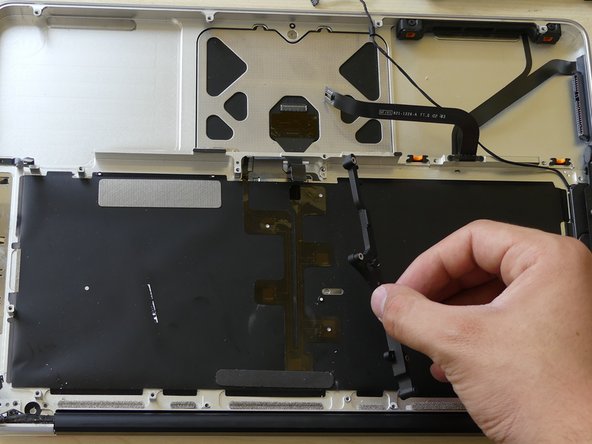
    • Lift the subwoofer and right speaker assembly out of the upper case.

    I left it in place. It was not necessary to remove it for replacement of the keyboard.

    Arbera Barbera - Antwort

  19. Upgrading your 2.0 GHz 13" Aluminum Unibody MacBook to a Backlit Keyboard: Schritt 19, Bild 1 von 2 Upgrading your 2.0 GHz 13" Aluminum Unibody MacBook to a Backlit Keyboard: Schritt 19, Bild 2 von 2
    • Use the tip of a spudger to flip up the locking lever to release the IR sensor ribbon cable from its socket.

    • Pull the IR sensor ribbon cable straight away from the logic board.

    Pull the IR sensor ribbon cable straight away from the logic board.

    Could be useful with a comma

    Vamos Goo - Antwort

  20. Upgrading your 2.0 GHz 13" Aluminum Unibody MacBook to a Backlit Keyboard: Schritt 20, Bild 1 von 1
    • Use the flat end of a spudger to pry the trackpad connector straight up off the logic board.

  21. Upgrading your 2.0 GHz 13" Aluminum Unibody MacBook to a Backlit Keyboard: Schritt 21, Bild 1 von 2 Upgrading your 2.0 GHz 13" Aluminum Unibody MacBook to a Backlit Keyboard: Schritt 21, Bild 2 von 2
    • Using the tip of a spudger, flip up the keyboard ribbon cable retaining flap.

    • Pull the keyboard ribbon cable straight out of its socket.

    When you are on the way back, this is where you can connect the keyboard lighting. You put the flat cable from the new keyboard into the connector directly to the right of the one for the keyboard ribbon cable. It shows itself!

    Arbera Barbera - Antwort

  22. Upgrading your 2.0 GHz 13" Aluminum Unibody MacBook to a Backlit Keyboard: Schritt 22, Bild 1 von 2 Upgrading your 2.0 GHz 13" Aluminum Unibody MacBook to a Backlit Keyboard: Schritt 22, Bild 2 von 2
    • Remove the two 5 mm Phillips screws securing the keyboard flex bracket to the upper case.

    • Lift the keyboard flex bracket out of the upper case.

  23. Upgrading your 2.0 GHz 13" Aluminum Unibody MacBook to a Backlit Keyboard: Schritt 23, Bild 1 von 2 Upgrading your 2.0 GHz 13" Aluminum Unibody MacBook to a Backlit Keyboard: Schritt 23, Bild 2 von 2
    • Remove the single Phillips screw securing the battery cable cover to the upper case.

    • Remove the battery cable cover from the upper case.

  24. Upgrading your 2.0 GHz 13" Aluminum Unibody MacBook to a Backlit Keyboard: Schritt 24, Bild 1 von 1
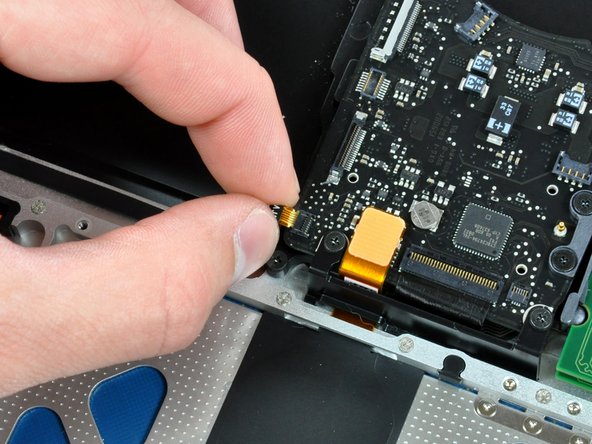
    • Use a spudger to pry the battery level indicator cable connector straight up off the logic board.

  25. Upgrading your 2.0 GHz 13" Aluminum Unibody MacBook to a Backlit Keyboard: Schritt 25, Bild 1 von 1
    • Disconnect the battery cable connector by pulling it straight away from the logic board.

    • If you cannot grasp the cable with your fingers, a spudger and tweezers may be helpful for removal.

  26. Upgrading your 2.0 GHz 13" Aluminum Unibody MacBook to a Backlit Keyboard: Schritt 26, Bild 1 von 2 Upgrading your 2.0 GHz 13" Aluminum Unibody MacBook to a Backlit Keyboard: Schritt 26, Bild 2 von 2
    • Remove the two 4mm Phillips screws securing the bottom case clip to the upper case.

    • Lift the bottom case clip out of the upper case.

    I didn't have that part in my MB at all

    grze - Antwort

    Yup me either

    Nick MG - Antwort

    AOL. E..g. mine was lacking this part (and its mounting holes) too.

    Edgar Fuß - Antwort

    I think this is the wrong photo. The part you have to remove is a bridge above the microphone.

    Roel Hoek - Antwort

  27. Upgrading your 2.0 GHz 13" Aluminum Unibody MacBook to a Backlit Keyboard: Schritt 27, Bild 1 von 1
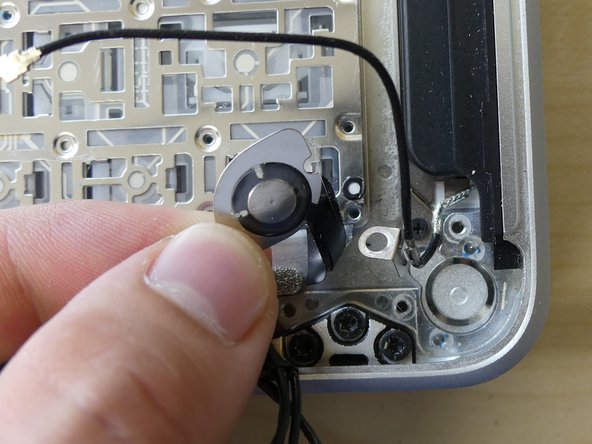
    • Use the tip of a spudger to release the microphone from the upper case.

    It might be worth noting the microphone is glued to the Upper Case.

    Edgar Fuß - Antwort

  28. Upgrading your 2.0 GHz 13" Aluminum Unibody MacBook to a Backlit Keyboard: Schritt 28, Bild 1 von 2 Upgrading your 2.0 GHz 13" Aluminum Unibody MacBook to a Backlit Keyboard: Schritt 28, Bild 2 von 2
    • Remove the following five screws securing the logic board to the upper case:

    • Four 3 mm Phillips screws.

    • One 3.5 mm Phillips screw.

    • Remove the two 7 mm Phillips screws securing the DC-in board to the upper case.

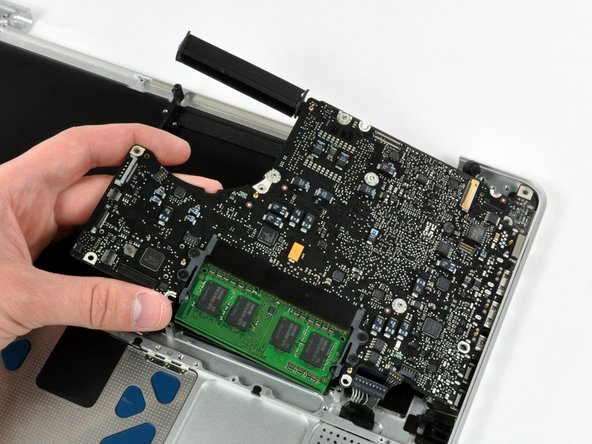
    • Lift the logic board from its left edge and pull it out of the upper case.

    Note to Step 41: the 3.5 mm Phillips screw and the 3 mm Phillips screw directly opposite were swapped in my MacBook. I believe the screws as indicated in the iFixIt guide are currently incorrect as it seems that the location in my MacBook would be correct as all 3 mm screws engage directly into the top case while the one 3.5 mm screw engages into the black bracket.

    wintermute - Antwort

    With my MacBook, the left screw (near the fan) was 5mm (not 3), the other “red” screws were 3mm (as indicated) and the “orange” one was 3.8mm (not 3.5).

    Edgar Fuß - Antwort

  29. Upgrading your 2.0 GHz 13" Aluminum Unibody MacBook to a Backlit Keyboard: Schritt 29, Bild 1 von 2 Upgrading your 2.0 GHz 13" Aluminum Unibody MacBook to a Backlit Keyboard: Schritt 29, Bild 2 von 2
    • If you are buying a new upper case from us, the next two steps are not necessary. Your upper case will come with these parts preinstalled.

    • Remove the following screws securing the battery connector cover to the upper case:

    • One 2.5 mm Phillips screw.

    • Two 1.5 mm Phillips screws.

    • Lift the battery connector cover out of the upper case.

  30. Upgrading your 2.0 GHz 13" Aluminum Unibody MacBook to a Backlit Keyboard: Schritt 30, Bild 1 von 1
    • De-route the battery connector cable through the gap in the upper case and remove it from the computer.

    • If you are installing an Upper Case that is missing the black bracket in the middle then transfer it from the old case to the replacement.

    During your checkout of your hard work, make sure in System Preferences that the (use all F1, F2 etc. keys as standard function keys) box is unchecked.

    ChasCam580 - Antwort

    It was not necessary to remove this item for me. I could remove the keyboard with it in place

    Arbera Barbera - Antwort

  31. Upgrading your 2.0 GHz 13" Aluminum Unibody MacBook to a Backlit Keyboard, Installing the Backlit Keyboard: Schritt 31, Bild 1 von 1
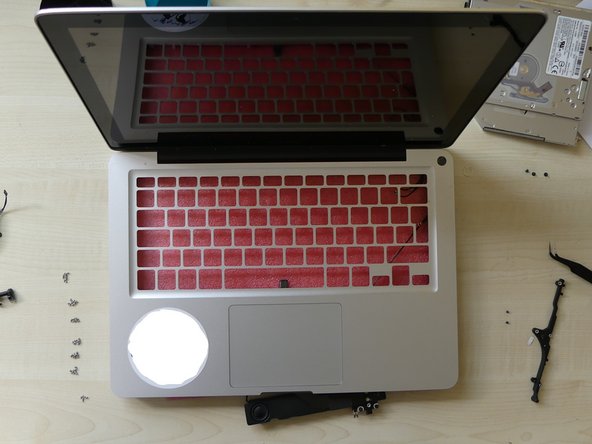
    • Now that you have removed the display (only required if a new top case is used to replace the keyboard), logic board, optical drive, and various other components from the upper case (or top case), you should have something that looks like this.

    • We are ready to begin!

    Pictures missing fix it please

    altjonpreci - Antwort

    The photo is missing for lots of these steps

    Henry Collingridge - Antwort

    More picture for whats?

    Clodoaldo Castro - Antwort

  32. Upgrading your 2.0 GHz 13" Aluminum Unibody MacBook to a Backlit Keyboard: Schritt 32, Bild 1 von 2 Upgrading your 2.0 GHz 13" Aluminum Unibody MacBook to a Backlit Keyboard: Schritt 32, Bild 2 von 2
    • You have to remove these two screws from the bracket.

  33. Upgrading your 2.0 GHz 13" Aluminum Unibody MacBook to a Backlit Keyboard: Schritt 33, Bild 1 von 2 Upgrading your 2.0 GHz 13" Aluminum Unibody MacBook to a Backlit Keyboard: Schritt 33, Bild 2 von 2
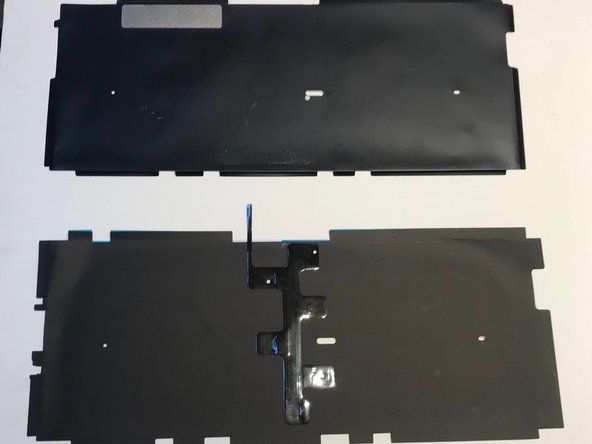
    • First, you'll notice the large black piece of plastic over the back of the keyboard.

    • You will need to use a spudger or a small straight edge screwdriver to carefully unstick the the edges of the plastic from the upper case.

    • Be careful not to tear the plastic as it is very thin.

  34. Upgrading your 2.0 GHz 13" Aluminum Unibody MacBook to a Backlit Keyboard: Schritt 34, Bild 1 von 1
    • Now you will see a large clear plastic wafer stuck to the back of the keyboard.

    • You can remove this easily buy peeling it up slowly.

    Listings on ebay offer only this part as a backlight component. Is that enough just to replace this wafer to have a backlight?

    Semir Teskeredzic - Antwort

  35. Upgrading your 2.0 GHz 13" Aluminum Unibody MacBook to a Backlit Keyboard: Schritt 35, Bild 1 von 2 Upgrading your 2.0 GHz 13" Aluminum Unibody MacBook to a Backlit Keyboard: Schritt 35, Bild 2 von 2
    • Now that you can see the back of the individual keys, stop there.

    • You now need to unscrew the 2 small, black Philips screws from the back of the power button assembly. Failing to do this will tear the the power button's ribbon cable when you try to remove the keyboard.

    • After you do this, remove the power button by pressing on the power button from the top of the upper case. The power button and a small metal ring (spring) will come out.

  36. Upgrading your 2.0 GHz 13" Aluminum Unibody MacBook to a Backlit Keyboard: Schritt 36, Bild 1 von 1
    • Now you have all probably noticed the horde of tiny black screws that cover the back of your keyboard. Yes, unfortunately we have to to take 'em out!

    • Be very careful here as you don't want to strip the small screw heads and you also don't want to lose any. I've found that having a magnet to pick up the screws is helpful. A small container to put them in is also useful for keeping them out of the carpet.

    • There are a total of 66 screws.

    I had only 59 screws, still it seems OK..

    Arbera Barbera - Antwort

    I count 68 screws

    Kerry Carroll - Antwort

    Yikes, I only counted 49. If you include the power button as well, 51. But, I could have easily miss counted, and the keyboard isn't going anywhere.

    lyonmissions - Antwort

  37. Upgrading your 2.0 GHz 13" Aluminum Unibody MacBook to a Backlit Keyboard: Schritt 37, Bild 1 von 2 Upgrading your 2.0 GHz 13" Aluminum Unibody MacBook to a Backlit Keyboard: Schritt 37, Bild 2 von 2
    • Now that you have removed all of the screws, you can gently press on the face side of the keyboard and it will come right out. (If you have removed all the screws.)

    • Here is an image of the top case without its keyboard. I hope you're not winded yet. We're only half way there!

    48 screws on the KBD and 2 holding the PSU switch

    SEA Tech Evolution - Antwort

  38. Upgrading your 2.0 GHz 13" Aluminum Unibody MacBook to a Backlit Keyboard: Schritt 38, Bild 1 von 2 Upgrading your 2.0 GHz 13" Aluminum Unibody MacBook to a Backlit Keyboard: Schritt 38, Bild 2 von 2
    • Now you are going to install that new backlit keyboard you've always wanted!

Abschluss

To reassemble your device, follow these instructions in reverse order.

33 weitere Nutzer:innen haben diese Anleitung absolviert.

Nathanael

Mitglied seit: 02/11/10

1.514 Reputation

1 Anleitung geschrieben

16 Kommentare

The photos which show how to install the backlit aren't showing. Is there maybe another thread which shows them because I can't really figure it out .

julianbugejacoster - Antwort

The photos aren't failing to show up, there just aren't any photos - no one ever uploaded any, even though the text of the guide talks about the pictures. As you're doing the upgrade yourself though, snap some pictures, edit the steps here, and upload your pictures!

Taylor Arnicar -

just a question. Where exactly do I put the backlight? Because I have a black film, then a thick plastic sheet, then the metal. then the silicon layer with the components inside, and then the front black sheet, and above that you mount the keys. In between which layer do I put the backlight?

Kevin Zygmunt - Antwort

Remove black film and put your backlit

Clodoaldo Castro -

I realize that this guide is getting a bit old, but I bought just the backlight part off Ebay. It's essentially a black film with couple of leds, a clear plastic sheet and a black matte layer. It goes on top (if you look at the MB from the bottom, as in this guide) the metal layer. So it replaces the parts you remove in steps 32 and 33, after which you can start reassembling.

NDE - Antwort

Got a back light of eBay, just going to add it to the key already in my 2GHz 2008 Macbook. I testes it first, the back showed up in system preferences > keyboard. It showed up but the light aren't on? Do i have to reset my power settings to get this to work?

David - Antwort

I did this last night and steps 29 and 30 aren't required if this is just a guide to replace the keyboard with a backlit keyboard, and not a new top case. Also, the steps to remove two small brackets on either side of the case near the display to allow access to the mic and to remove cable held down by them, are missing. They should be part of step 18 and 27.

Also, step 31 should read:

Now that you have removed the display(not required if just the keyboard is replaced), logic board, optical drive, and various other components from the upper case (or top case) You should have something that looks like this!

Patrick Gorman - Antwort

PLEASE NOTE- You MUST reset the SMC after upgrading to the backlit keyboard in order for the MacBook to recognize the new keyboard. See how to do it here:

https://support.apple.com/en-us/HT201295

Scott Mowrey - Antwort

Hello everyone. I apologise for my bad english in advance.

I own a MacBook late 2008 with the NON backlit keyboard.

I just got a new topcase with backlit.

I just wanted to ask, is it somehow possible to have backlight works when my logic board doesnt has the necessary socket to accept the keyboard backlight ribbon cable?

And if yes, how?

Thanks in advance.

Greetings from Greece.

Nick

nightwalkerosfp - Antwort

probably not, I'm sorry

Zaim -

I did, thaks for tutorials. It's work!

Asep Supriyatna - Antwort

you are welcome

Zaim -

wow, so many steps only for get a backlit..why apple's not just make it as easy as thinkpad keyboard.....? ck..ck..ck

Adi Abri Ganjar Utama - Antwort

Hi to everyone, I have some problem with replacement. After installation and reseting SMC and NVRAM, my backlight still doesn't work. After reseting NVRAM it flash 1 time and it's all. on pressing F5 or F6 it shows me backlight error popup.

Борис Санамянц - Antwort

After installing the backlight I cleared the Nvram but that did not enable the backlight; i was still getting the ‘non functioning’ symbol when clicking F5 or F6.

I then went to System Preferences -> Keyboard and unticked ‘Adjust keyboard brightness in low light’. Then it worked.

Aidan Killian - Antwort

Thanks for the tutorial, it worked perfectly for me too!

Daniel Zimble - Antwort

Kommentar hinzufügen

Seitenaufrufe:

Letzte 24 Stunden: 7

Letzte 7 Tage: 18

Letzte 30 Tage: 38

Insgesamt: 37,690