Zum Hauptinhalt wechseln

Velocity Micro Cruz T301 Motherboard Replacement

Was du brauchst

  1. Velocity Micro Cruz T301 Motherboard  Replacement, Motherboard: Schritt 1, Bild 1 von 1
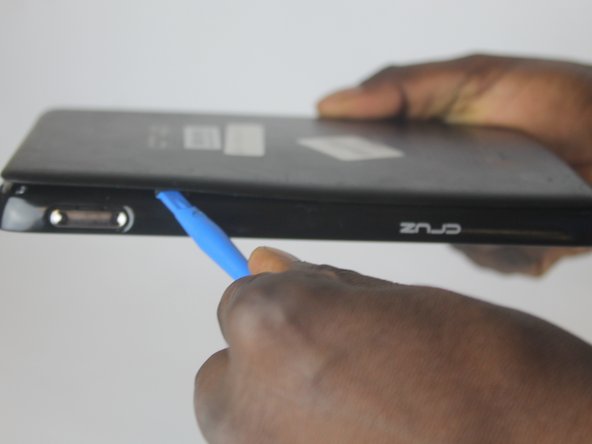
    • Insert the plastic opening tool in the SD port. The edge point should be pointed towards the rear panel.

  2. Velocity Micro Cruz T301 Motherboard  Replacement: Schritt 2, Bild 1 von 1
    • Insert a small opening tool between the rear panel and the tablet.

  3. Velocity Micro Cruz T301 Motherboard  Replacement: Schritt 3, Bild 1 von 1
    • The large opening tool is not needed any more.

  4. Velocity Micro Cruz T301 Motherboard  Replacement: Schritt 4, Bild 1 von 2 Velocity Micro Cruz T301 Motherboard  Replacement: Schritt 4, Bild 2 von 2
    • Move the small tool opener around the rear panel to free the 12 edges.

  5. Velocity Micro Cruz T301 Motherboard  Replacement: Schritt 5, Bild 1 von 1
    • Using PH0 Phillips Driver, remove the 4 Screws in the Metal part.

  6. Velocity Micro Cruz T301 Motherboard  Replacement: Schritt 6, Bild 1 von 1
    • Using a plastic Spudger remove the battery connector.

  7. Velocity Micro Cruz T301 Motherboard  Replacement: Schritt 7, Bild 1 von 1
    • Using PH0 Phillips Driver, remove the 12 Screws in the cover.

  8. Velocity Micro Cruz T301 Motherboard  Replacement: Schritt 8, Bild 1 von 1
    • Place a metal Spudger between the tablet and the back cover.

  9. Velocity Micro Cruz T301 Motherboard  Replacement: Schritt 9, Bild 1 von 1
    • Move the spudger around the tablet to release the clips attached to the tablet.

  10. Velocity Micro Cruz T301 Motherboard  Replacement: Schritt 10, Bild 1 von 1
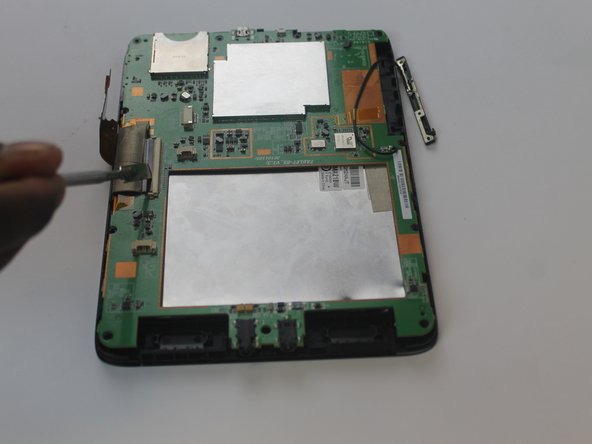
    • Use a plastic spudger to release the connection between the speakers and the motherboard as shown in the picture.

  11. Velocity Micro Cruz T301 Motherboard  Replacement: Schritt 11, Bild 1 von 1
    • This guide shows the use of incorrect tools. Always use ESD safe tools when dealing with delicate internal components.

    • Use a nylon spudger to remove the top plug connector from the motherboard.

  12. Velocity Micro Cruz T301 Motherboard  Replacement: Schritt 12, Bild 1 von 2 Velocity Micro Cruz T301 Motherboard  Replacement: Schritt 12, Bild 2 von 2
    • Use a metal spudger to remove both screen cable connectors

  13. Velocity Micro Cruz T301 Motherboard  Replacement: Schritt 13, Bild 1 von 1
    • use openning tools to remove the motherboard.

Abschluss

To reassemble your device, follow these instructions in reverse order.

Ahmed

Mitglied seit: 10/05/16

227 Reputation

1 Anleitung geschrieben

Team

USF Tampa, Team 1-6, Cagle Fall 2016 Mitglied von USF Tampa, Team 1-6, Cagle Fall 2016

USFT-CAGLE-F16S1G6

3 Mitglieder

5 Anleitungen geschrieben

0 Kommentare

Kommentar hinzufügen

Seitenaufrufe:

Letzte 24 Stunden: 1

Letzte 7 Tage: 2

Letzte 30 Tage: 7

Insgesamt: 171