Einleitung
Es ist recht einfach eine ausgebrannte Scheinwerfer-Glühbirne in einem Volkswagen Beetle auszutauschen, auch wenn es auf den ersten Blick etwas kompliziert aussieht. Anstatt das Auto zu einem Händler oder zur Werkstatt zu bringen, kannst du auch einfach Geld und Zeit sparen, indem du die Glühbirne selber wechselst. Die Glühbirne ist eine 55 Watt H7 Halogen Glühbirne, wie sie in vielen Autos verwendet wird. Das Einparklicht wird von einer 5 Watt Glühbirne, vom Typ 2825, betrieben (Ebenfalls als W5W Glühbirne bekannt).
Was du brauchst
-
-
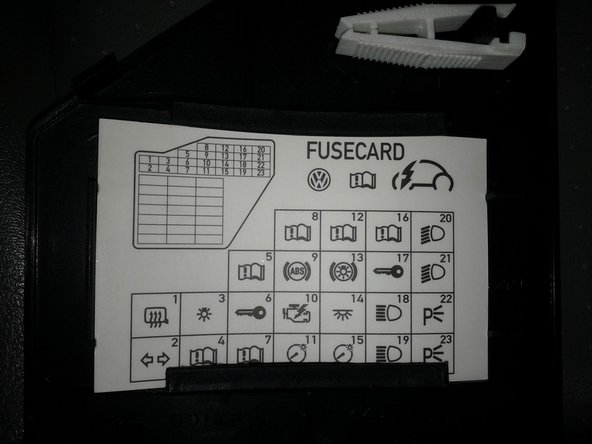
Bevor du eine ausgebrannte Glühbirne wechselst, prüfe, ob das Problem nicht an einer Sicherung liegt. Öffne dazu den Sicherungskasten, der sich links neben dem Armaturenbrett befindet. Benutze dazu ein dünnes flaches Werkzeug, wie zum Beispiel einen Schlitzschraubendreher oder einen Schlüssel, um die Abdeckung zu lösen.
-
Unter der Abdeckung findest du dann eine Anzahl farbiger Sicherungen vor.
-
Nutze den Schaltplan und die weiße Kunststoffpinzette auf der Rückseite, um die passenden Sicherungen zu finden und zu entfernen. Die Sicherungen 18 und 19 sind für das Fernlicht, die 20 und 21 für das Abblendlicht und die 22 und 23 für das Einparklicht. Ziehe die Sicherungen nur einzeln heraus, um sie nicht zu verwechseln.
-
Die Sicherungen sind halbtransparent. So kannst du von der Seite her in das Innere schauen und prüfen, ob die jeweilige Sicherungen noch in Ordnung ist.
-
-
-
Du hast nun alle Sicherungen kontrolliert und es ist die Glühbirne, die kaputt ist. Um sie zu ersetzen, musst du die gesamte Scheinwerfer-Einheit entfernen, indem du sie aus ihrem Sitz im Kotflügel herausschiebst.
-
Entsperre zuerst die Motorhaube, indem du am Hebel auf der linken Seite im Fußraum des Fahrers ziehst.
-
Öffne nun die Motorhaube, indem du den kleinen Plastikhebel zu dir ziehst und die Motorhaube hochhebst.
-
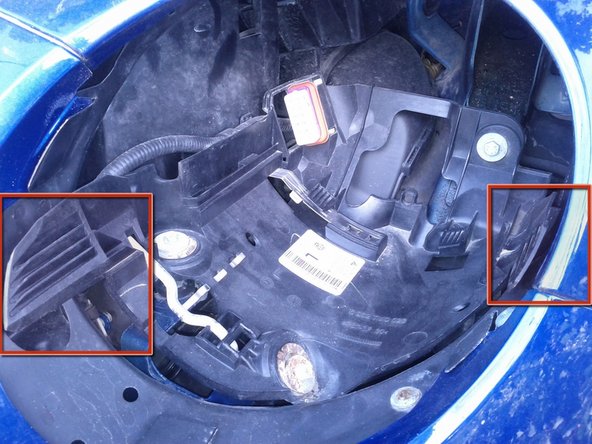
Die Scheinwerfer-Einheit auf der Beifahrerseite ist leicht zu finden, während die auf der Fahrerseite unter der Batterie versteckt ist. Es ist hilfreich die Batterieabdeckung zu entfernen, sodass du besser sehen und manövrieren kannst.
-
-
-
-
Drehe zuerst die Verschlusschraube 1/4* Umdrehung mit einer 5 mm Nuss in die angezeigte Richtung. Auf der Beifahrerseite ist der Schraubenkopf gut zu sehen, drehe ihn im Uhrzeigersinn.
-
Auf der Fahrerseite benötigst du einen langen Bithalter, damit du die Schrauben zwischen Batterie und Karroserie gegen den Uhrzeigersinn drehen kannst.
-
* Drehe die Verschlussschraube nicht mehr als 1/4 Umdrehung. Wenn du weiterdrehst, wird sie wieder schließen.
-
-
-
Wenn die Scheinwerfereinheit entsichert ist, dann drücke den hellen Verschlusshebel hinunter - du siehst ihn, wenn du direkt über dem Scheinwerfer nach unten schaust.
-
Auf der Fahrerseite ist nur ein Teil des Verschlusshebels zwischen Batterie und Luftfilter sichtbar, du kannst ihn aber mit einem langen Schraubendreher erreichen.
-
Drücke den Verschlusshebel hinunter und ziehe gleichzeitig die Scheinwerfereinheit nach vorne aus ihrem Sitz heraus. Vorsichtig - du musst schon kräftig ziehen und sie kann sich dann plötzlich lösen.
-
-
-
Finde die Lampenabdeckung auf der Rückseite der Scheinwerfereinheit. Löse die Klammer und öffne die Abdeckung, um an die Lampen zu gelangen.
-
Ziehe den Stecker ab und hole die Leuchte heraus, die ersetzt werden soll. Die Abblendleuchte (Low Beam) ist ist mit einer Klammer befestigt, die anderen Leuchten sind nur eingesteckt. Benutze eine Zange, um sie herauszuholen.
-
Setze die Ersatzleuchten ein und stecke den Stecker wieder auf. Fasse die Leuchten nicht mit ungeschütztem Finger an - das Fett am Finger bleibt auf dem Glas zurück und kann die Leuchte beschädigen.
-
Befestige die Abdeckung wieder.
My problem was that the socket was burned out. So be sure to check that. It was easy to replace. They had the socket at the autoparts store and we just spliced the wires together.
Confirming what Be Green said: the low beam bulb is the one with a clip.
Thelma, it is possible that the headlight assembly did not make solid contact with the connector when you slid it back in. The result will be that none of the lights will come on for that side. Try sliding out the assembly and slide it back in. For the driver side assembly, at least, you can also access the back side of the connector to try pressing it in tight after the assembly is seated.
Okay, so I took my Beetle to the dealer to have them replace the bulb, and I asked them to let me watch the mechanic as he replaced the bulb, which they did. He showed me how to do it, and the first thing that I noticed was that you DON'T turn the 5mm nut 1/4 turn, you turn it until it stops turning. That's why I wasn't able to get the headlight assembly out of the car. He even let me turn the nut with his ratchet, to see where it stopped turning.
-
-
-
Achte beim Einbau der Scheinwerfereinheit darauf, dass die Führungen in die entsprechenden Passungen auf beiden Seiten der Einheit gleiten.
-
Drücke die Scheinwerfereinheit in ihren Sitz hinein, bis du sie einrasten hörst.
-
Drehe die Sicherungsschrauben mit der 5 mm Nuss wieder fest.
-
Schalte die Zündung an und prüfe deine neuen Lampen. Schließe die Haube.
Danke, Danke, Danke war sehr gut beschrieben!!!
Is this a 2011+ guide or does it apply to the 2001-2010 beetle too?
That particular car was a 2007, but I expect it to be applicable to all New Beetles
-


Nachdem die Glühbirne ausgetauscht wurde, musst du darauf achten, den Verschlussmechanismus in der gekennzeichnete Richtung zu schließen, da sich sonst die Kontakte nicht exakt berühren und die Lampe somit keinen Strom erhält.
Nachdem die Glühbirne ausgetauscht wurde, musst du darauf achten, den Verschlussmechanismus in der gekennzeichnete Richtung zu schließen, da sich sonst die Kontakte nicht exakt berühren und die Lampe somit keinen Strom erhält.
Rückgängig: Ich habe diese Anleitung nicht absolviert.
55 weitere Nutzer:innen haben diese Anleitung absolviert.
Besonderer Dank geht an diese Übersetzer:innen:
100%

Diese Übersetzer:innen helfen uns, die Welt zu reparieren! Wie kann ich mithelfen?
Hier starten ›
31 Kommentare
First part of step 6 is ESSENTIAL. Be warned that the assembly will slip easily into position without the locator guides being inside the catches on the unit, and the locking lever will click into place, but the locking nut will not tighten it into position. Don't ask me how many times I repeated this before I did it properly because I will lie!
I never heard a "click"; however, I lock the hex nut ok. So the light works but seems like the car hits a bump and the light jumps out of the connector enough to stop working. Any thoughts?
Thanks for the guide, this was super easy to perform and took less than 10 minutes.
I had to squeeze the headlight assembly and holder together really hard to get the connector to seat properly - at first nothing worked when I put it back together...
Thank you, Nick, for creating this manual! My daughter has an '06 Beetle. I've had to replace the driver side headlight three times. I recently had to replace the whole assembly because when I replaced the light bulb, I evidently did not properly lock the assembly, and it vibrated loose in traffic, and disappeared. As for the click, I have never heard it click. Even with the new headlight installed, still no high or low beam. Not sure what's going on. All comments have been helpful, though. Thank you, iFixit!
I am far from handy when it comes to cars, but I was not going to pay $200 to fix a headlight ! It took about 1.5 hours of reading this site, looking under the hood and some trial and error...but it all makes sense if you follow this closely. Be sure to look closely at what they show in the red boxes above. The main problem was finding a nut driver long enough to reach the Driver's side lock for the headlight. I found one that was a 3/16 inches and it worked fine. Depressing the lever to release the assembly and pull at the same time also was tough to figure out the first time. All total I got it done for $24 bucks (new bulb, nut driver) and 90 minutes of work (will only take 30 minutes next time....) Thanks to you for putting this together.
Can anyone help troubleshoot lights not working after putting assembly back together? I've tried 5 times already and still nothing! All lights worked fine when I first replaced it but I'm thinking maybe I didn't lock it correctly and vibrates loose? Any tips would be greatly appreciated!
Have you looked at the copper leads? Do they look like they might have been burned? Volkswagens are notorious for electrical issues and they can short circuit. There should be three copper coated wires in the assembly, and if even one is burned it will cause the light to only work sometimes. You can check that. If they all look fine, make sure the connections are touching fully and going to the right places. It is also easy to put the metal clip part on backwards! Don't do that, I did that, it only goes one way. Hope I helped. There should be another guide on this. Maybe I will make one.
Marcy -
Something you don't explain is that, on the driver's side light, once you've turned the nut 1/4 turn, and as you are pushing down on the lever, how do you get the headlight assembly out? There is nothing to grab hold of from the front of the headlight, and you can't get your hands on the back of the assembly, so how do you get it out? I tried putting the handle of a pipe wrench between the back of the headlight assembly and the air filter housing and pushing as hard as I could while pushing down on the lever, and the headlight assembly wouldn't come out. After an hour, I gave up and took it to the dealer.....a 15 minute job my rear end!
I thought my bulb replacement would be a 15minute job also...... no such luck. After the bulb was replaced, I pushed the headlight assembly back into the housing until I heard it click. I did not lock the assembly down using the hex nut. I then turned on the ignition and headlights to see if it was operational. None of the bulbs would light. I diagnosed the problem and found that the electrical connector was not fully seated. Once I locked the light down with the hex nut, the electrical connector snugged into place and everything was working fine. Hopes this helps someone with the same dilemna.
I replaced the bulbs. It fixed the driver side low beam but the passenger side still doesn't work. Fuses are good. Any suggestions?
Where is the lever for the passenger side to release the light
Better than YouTube!!! Excellent work. Thank you so much!
Thank you so much for taking the time to share this information. Previous instructions had major removal of other components to complete this repair. The only issues that I had were not getting a good electrical connection. One was caused by not turning the locking screw tight enough. The second was not having the lamp housing seated correctly. I completed replacement of both head lamps in under 1/2 hour.
I replaced all 4 bulbs on my 2000 beetle and dims wouldn't work found out that each bulb has it own fuse replaced low beam fuses and lights came on ur head light fuses are top left corner of box 15 amp between 19 and 23 number fuse for headlights
Sorry it's top
I’m 67 years old and a woman last time I took my car to VW dealership costed 200.00 for a 10.00 bulb so I got on you tube and the man said use this nut with a long handle and then push this gold level down but he didn’t show how or what size nut but this is step by step with pictures on how to did it love it save a lot of money thank you
I have a 99 better, the high beams work fine. Only one of the low beams work. I checked the fuse and replaced the headlights,and the low beams on one side still don't work. I'm homeless right now a trying to save what money I have. My question is if I switch the high and low beam connectors around will that screw up everything.
I had to replace bulb in wife’s 2006 bug but it didn’t work. After searching these sites I and seeing what others were doing I tried drilling a hole and putting a short 3/4 shim with screw between the plastic that holds the headlight socket and the inner fender. This helped keep the socket from flexing when the headlight assembly was reinserted. Also, and this is important, after all was together, from inside engine compartment I pushed the socket even harder with a large screwdriver and heard a ‘click’. I knew all was right with the world then.
Great guide, there is no way I would have figured this out on my own. Sadly, it didn't fix my driver side light. Neither the hi or low beams work, the fuses are all good, replaced the low beam as a test and put the headlight back in even heard the click but still no lights. Any suggestions what else to check, is there a way to test that power is going to the pins?
What happens when you find that the lever (passenger side) was broken by te former owner and badly glued back?
This how-to was great. I removed both headlight assemblies, replaced the bulbs, and re-installed the assemblies in about 10 minutes. Great job of describing the procedure.
Very generous of you to share your knowledge. Your awesome
I don't see any 21 fuses for the low beams. Should I? Don't see them in your picture either.
John Malcolmson - Antwort