Zum Hauptinhalt wechseln

Wen 2307 Power Cable Replacement

Was du brauchst

  1. Wen 2307 Power Cable Replacement, Front Panel: Schritt 1, Bild 1 von 1
    • Unscrew the locking sleeve.

  2. Wen 2307 Power Cable Replacement: Schritt 2, Bild 1 von 1
    • Remove the hanging clip.

  3. Wen 2307 Power Cable Replacement: Schritt 3, Bild 1 von 2 Wen 2307 Power Cable Replacement: Schritt 3, Bild 2 von 2
    • Unscrew the six 8mm PH2 screws.

  4. Wen 2307 Power Cable Replacement: Schritt 4, Bild 1 von 1
    • While pressing the spindle lock button, unscrew the collet nut and remove it along with the brass collet.

  5. Wen 2307 Power Cable Replacement: Schritt 5, Bild 1 von 1
    • To remove the front panel, pry the device apart while holding the device with the other hand.

    • The front panel should come out easily.

  6. Wen 2307 Power Cable Replacement, Power Cable: Schritt 6, Bild 1 von 2 Wen 2307 Power Cable Replacement, Power Cable: Schritt 6, Bild 2 von 2
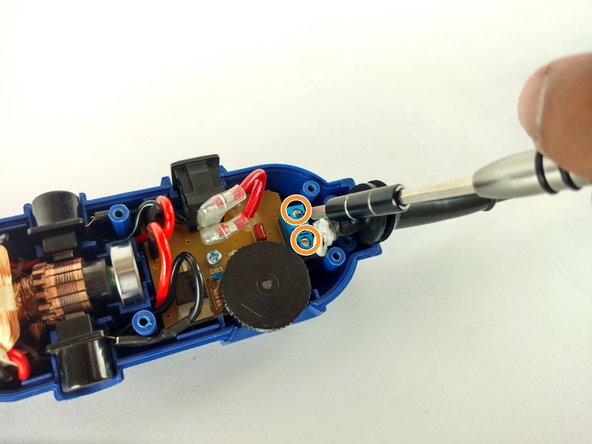
    • Identify the screws.

    • Unscrew the two 3mm phillips PH2.

    • Don't forget to put them appart from the ones unscrewed before.

    • Don't forget to put them appart from the ones unscrewed before.

    • Phillips PH2

    • Flathead 2.5mm

  7. Wen 2307 Power Cable Replacement: Schritt 7, Bild 1 von 1
    • Remove the place boar carefully.

  8. Wen 2307 Power Cable Replacement: Schritt 8, Bild 1 von 1
    • Pull out the power cable connectors.

  9. Wen 2307 Power Cable Replacement: Schritt 9, Bild 1 von 1
    • Pull out the cord sleve for the new cable replacement.

Abschluss

To reassemble your device, follow these instructions in reverse order.

Team

USF Tampa, Team 12-1, Eyestone Spring 2016 Mitglied von USF Tampa, Team 12-1, Eyestone Spring 2016

USFT-EYESTONE-S16S12G1

4 Mitglieder

6 Anleitungen geschrieben

0 Kommentare

Kommentar hinzufügen

Seitenaufrufe:

Letzte 24 Stunden: 0

Letzte 7 Tage: 0

Letzte 30 Tage: 3

Insgesamt: 481