Einleitung
Zeigt dein Instant Pot den gefürchteten C6 Fehler, während er alarmierende Töne von sich gibt? Folge dieser Anleitung um festzustellen, was der Fehler ist, und wie man ihn beheben kann!
Die C6, C6L und C6H Fehler bedeuten, dass einer der Drucksensoren nicht funktioniert. Typischerweise liegt dies an einer Ansammlung auf den Sensorkontakten. Wenn man diese reinigt ist, das Problem oft schon behoben.
Diese Anleitung wurde mit einem Instant Pot DUO80 geschrieben, aber die allgemeine Vorgehensweise kann auf viele elektrische Schnellkochtöpfe angewandt werden, da die meisten ähnliche Elektronik und Sensoren nutzen.
Was du brauchst
-
-
Drehe den Instant Pot auf den Kopf.
-
Benutze einen T15 Schraubendreher, um die Schrauben zu entfernen, mit der die untere Platte befestigt ist.
-
Drehe und entferne die untere Platte.
-
-
-
Der T6L (niedrig Druck) Sensor und sein Stecker. Bei manchen Modellen nicht vorhanden.
-
Der T6H (hoch Druck) Sensor und seine Stecker.
-
Die Schrauben unterhalb des weißen Harzes sind die Kalibrierungsschrauben.
-
-
-
Nutze einen Spudger oder einen Finger, um fest oben auf einen Sensor zu drücken. Du solltest ein lautes Klicken hören, welches andeutet, dass sich die Metallstreifen im Sensor ordnungsgemäß biegen.
-
Wiederhole dies für den zweiten Sensor.
-
Manchmal wird das Problem durch einfaches Biegen der Sensoren behoben. Baue den Instant Pot vorsichtig wieder zusammen und prüfe, ob er funktioniert.
-
Wenn der Instant Pot nicht funktioniert, trenne das Gerät vom Stromnetz und befolge die nachfolgenden Schritte, um das Problem weiter zu diagnostizieren.
If I replace the sensor with the same model one that was originally in the instant pot, do I need to recalibrate or is it just install the new one and good to go?
Thank you
I dont really know but i'll say that to avoid any problem, just re calibrate it, like that you are sure
Clet -
True. Thank you!
Hi Arthur,
I am facing C6L error , as mentioned i have check the sensor its clicking well. When the Instant pot is turn on without the internal steel pot it doesn't show any error ,once the internal steel pot is kept it show's error C6L.
Need your suggestion how to resolve the same
Hi Lucas,
That's a peculiar situation. What happens if you disconnect the low pressure sensor's connector (step 7), reassembled the Instant Pot, plugged it in, and put the pot in? If it doesn't show C6L error, then there's something wrong with the sensor or wire.
my high pressure sensor isn't clicking as well, I'm ordering this part off amazon https://www.amazon.com/dp/B09FSRDGDD
I’m just a mom. How do I calibrate the replacement sensor? It is my high pressure sensor that’s bad, No click.
Hi Cindi! I've added some additional steps on how to calibrate a new sensor. You can find it here.
Ok, so my sensors seem to operate as should, showing continuity in resting state and open loop when depressed. However the C6L error is still there, goes off as soon as I plug in the pot, all lights blinking and beeping. I've used sandpaper on contacts just in case, but both sensors seem to look and operate as new.
Is there any way I could bypass the low pressure sensor? when does it get activated anyway?
Hi Vaidas,
It sounds like the sensor continuity is not the problem, so bypassing the low pressure sensor likely won't fix the problem. There may be a broken solder joint or trace on the board.
Some preset modes will automatically use the low pressure setting, and you can choose to use the low pressure setting in the manual mode.
Hi! My Duo gave a C6H error. I followed your instructions till step 3 and found that the high pressure sensor was not clicking. I unscrewed the sensor assembly and closely observed the contacts with a cellphone camera in macro mode. I found that contact point was heavily worn out and in bad shape (pictures attached - link below). It clearly showed that I need to replace the sensor assembly altogether.
I would appreciate if you could add some directions on where a replacement sensor can be purchased and what would be a good price point.
Thanks alot for bringing me this far with very clear and lucid instructions. C6H Error Issue
Hello! Thank you so much for posting these instructions. My 2016 Blutooth Smart IP that has served me well daily gave a C6 error. Your Test 3 instructions appears to have fixed the problem! I am very appreciative that you posted these instructions!
I replaced the sensors but still get the error code. What should I do?
You have no idea how thankful we are for this, as we are at sea for another 2 months and use the pressure cooker frequently! Your tip worked!
-
-
-
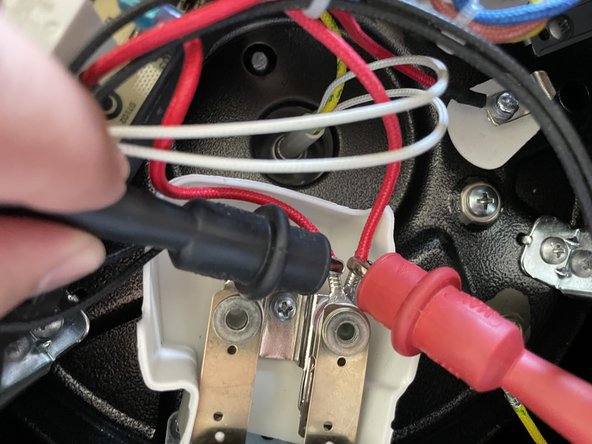
Nutze eine Zangen oder deine Finger, um einen der Flachstecker des Sensors von der Platine abzuheben und zu trennen.
-
Diese Stecker können fest sitzen. Wackele beim Ziehen vorsichtig am Stecker, um ihn zu lockern.
Thank you much for the time spent to show how to work on the insta pot. When I tried to remove the spade connectors they were way harder than I thought they should be to remove. So I slid the insulating cap back onto the wire and noticed that there is a lock pin that if it's pushed back the plug comes off very easy. Thanks again for your work!
Wonderful
It fixed the problem for me
Also took this opportunity to clean up on the insides
I did have to attempt twice, pressed the metal plate around sensor , had to position the cooker sideways to let the debris fall down and away from the contacts (try this position as the contacts may not clean up enough
Also suggest using compressed air to clean the contacts - the air can that we use to clean laptops and other electronics
-
-
-
-
Befestige ein Multimeterkabel an beiden Enden des Sensordrahts, während du sicherstellst, dass sich beide Kabel nicht berühren.
-
Stelle deinen Multimeter oder Ohmmeter auf die Widerstands- oder Flusseinstellung
-
-
-
Wenn der Multimeter einen hohen Widerstand oder keinen Fluss zeigt, könnte das bedeuten, dass die Sensorkontakte dreckig sind. Überprüfe die Multimeterkontakte und stelle sicher, dass diese die Drähte greifen.
-
Nutze einen Spudger oder deinen Finger, um fest auf die Spitze des Sensors zu drücken, bis es klickt.
-
Das Multimeter sollte sich ändern und keinen Fluss zeigen (0.L., im Fall meines Multimeters). Wenn es dies nicht tut, ist dort ein möglicher elektrischer Kurzschluss - die Kontakte könnten zusammengeschweißt sein, oder du musst den Sensor ersetzen.
-
-
-
Trenne den Niedrigdrucksensor durch Drücken auf den Platinenstecker, um den Verschluss zu lösen. Anschließend ziehst du den Sensorstecker gerade nach oben.
-
Befestige ein Multimeterkabel an beiden freiliegenden Enden der Sensorkabeln und stelle sicher, dass sich die beiden nicht berühren.
-
Stelle den Multimeter auf Widerstand oder Stromfluss und teste auf Stromfluss, wenn der Sensor im Ruhezustand und, wenn er gedrückt ist.
-
Das Multimeter sollte niedrigen Widerstand oder Fluss anzeigen, wenn der Sensor aufliegt und keinen Fluss, wenn er sich im Ruhezustand befindet.
Found that when disconnected from the board it wouldn't work on continuity. The video testing the high pressure side shows it connected too. This was a very helpful guide though. I cleaned my contacts and resolved the c6L error. Thank you Arthur for answering this issue. Instapot service was not helpful at all.
Hi David,
I think the continuity didn't work for you because the sensor contacts were dirty. I'm glad you resolved the issue!
Removed the pressure sensor connection from the board, the sensor connection was open. I pressed the sensor tongues for few times, the connection returned!. I did not have to remove the sensor assembly. Thanks Arthur.
Great info Arthur, thanks. I found the high press switch burnt on our duo so I replaced with new switch set. Checked all continuity as directed-all ok. Plugged in unit, and as soon as I placed pot inside I now get the C6L error with all lights flashing.
Now what? Please help!
Hi Jimmy! The C6L error is for the low pressure sensor. Maybe both sensors are burnt? Check the continuity for the low pressure sensor. If it's not continuous, you can short it temporarily with a wire, reassemble, and test it. If the C6L error goes away, then you have to clean/replace the low pressure sensor also.
If the low pressure sensor is showing no problems, this may be a circuit board problem.
-
-
-
Wenn dein Test annehmen lässt, dass die Kontakte verschmutzt sind oder du vermutest, dass die Kontakte zusammengeschweißt sind, folge dem nächsten Schritt und entferne die Sensoren, um diese zu reinigen.
-
Nutze einen Kreuzschlitzschraubendreher, um die Schraube zu entfernen, mit der der Sensor am Instant Pot befestigt ist.
-
Hebe die Sensor-Baugruppe aus der Aussparung.
-
-
-
Drücke den Sensor herunter, um die Kontakte zu öffnen.
-
Nutze etwas Schleifpapier, eine Feile oder elektrischen Kontaktreiniger, um die Kontakte zu reinigen. Achte darauf, beide Gegenflächen zu reinigen.
what do you do if the sensor is broken off?
I need this part. How do I find it online? Thanks!
if either of the sensor's contact pairs is open circuit(not making a connection), first clean and re-test. if it's still open circuit, bend the fixed contact towards the movable one. it's a simple mechanical spring loaded switch.
-
-
-
Nutze ein Multimeter, um die Sensoren auf ordnungsgemäße Funktion zu testen, bevor du den Instant Pot wieder zusammensetzt.
Very helpful. For me, simply pushing down on the pressure switches seemed to be enough to restore operation - at least for awhile. If the problem comes back, I will bother to clean the contacts. I would suggest for those who find the provided instructions daunting, just try unscrewing and removing the cover, push down on both pressure sensors with your finger, then replace the cover and see if the unit resumes proper operation. If it doesn’t, then try cleaning the contacts. The multimeter is useful if the instant pot still does not work and you need to isolate the problem to the pressure switches or the control board before investing in a used replacement pressure switch. Finally, according to an Instant Pot blog, the pressure switches are not bimetal temperature switches. They sense physical expansion of the bottom of the inner pot under pressure.
Thanks for the helpful comments Paul! I'll add your corrections into the guide.
Thank you! My wife loves me even more now🤗
Thank you so much. I cleaned up and worked.
I also bought new ones at Amazon to replace in the future soon.
"Electric Pressure Cooker Pressure Sensor or Switch Works with Instant Pot, Power Cooker, Cuisinart, Farberware, Power Quick Pot, Crock-Pot" This sensor is not created or sold by the mentioned brands. https://a.co/d/5RmcEtu
C'était tout à fait cela! Le contact du capteur basse pression était sale. Merci infiniment! Réparé en quelques minutes et 0.00 $. Le tuto (photos, explications) ne peut être plus clair. Chez "Instant Pot" on me dit qu'avec un code "C6L", ce n'est pas réparable et on m'offre plutôt 30% de rabais sur l'achat d'un nouvel appareil. Humm! Ça sent l'arnaque!!! Merciiiiii encore!
-
-
-
Setze deinen Ersatzdrucksensor ein und baue den Instant Pot wieder zusammen.
-
Gib 750ml Wasser in den Instant Pot und lasse ihn fünf Minuten lang unter hohem Druck kochen.
-
Nach Ablauf der fünf Minuten, entlüfte mithilfe der Schnellentriegelung.
-
-
-
Trenne deinen Instant Pot vom Strom und zerlege ihn, bis du Zugriff auf die Drucksensoren hast.
-
Entferne den weißen Kleber, der die Kalibrierungsschraube des Hochdrucksensors bedeckt, mit einem Spudger.
-
Dadurch wird der flache Schraubenkopf der Kalibrierschraube sichtbar.
-
Wenn dein Instant Pot zu viel Druck ausübt, drehe die Schraube mit einem Schraubendreher um eine Vierteldrehung im Uhrzeigersinn (anziehen). Dadurch wird der Sensor bei geringerer Hitze ausgelöst und schaltet sich ab.
-
Wenn dein Instant Pot zu wenig Druck ausübt, drehe die Schraube mit einem Schraubendreher um eine Vierteldrehung gegen den Uhrzeigersinn (lockern). Dadurch wird der Sensor bei höherer Hitze ausgelöst und schaltet sich ab.
-
Setze den Instant Pot wieder zusammen und führe den Drucktest im vorherigen Schritt durch. Stelle die Kalibrierschraube nach Bedarf neu ein.
-
Wenn du den Instant Pot kalibriert hast, bedecke die Kalibrierungsschraube mit etwas Silikon oder hitzebeständigem Klebstoff. Dadurch wird verhindert, dass sich die Kalibrierschraube dreht.
I tried to calibrate (3 times already)but it is still over-pressurized. At each test, it starts to vent/ leak when the cooking timer starts. Do I just keep calibrate the new pressure sensor or there is other parts go wrong? Thanks for your help.
Hi Peach,
It depends on how much you've had to change the calibration screw. Some people have had to twist 8-10 quarter turns to get theirs working.
I changed my high pressure sensor and reattached it to the unit but when I tighten the screw where the the sensor will touch the bracket it is sitting under it will give me a c6 error still when the pot goes in without the pot, no error. When I untighten it a bit where it is barely touching the bracket with the pot in no error. Is it still safe to use it that way?
Hi May,
I don't know if the Instant Pot will reliably work in that fashion. After you tighten the screw the secure the bracket, press on the top of the sensor to flex it. Does it still click? If it doesn't, then you need to loosen the calibration screw until it stops pressing on the sensor. There's a chance the replacement sensor doesn't fit right and no amount of calibration will get it to work.
Brilliant. Plain brilliant! Thank you so very much for your succinct, accurate, well-illustrated, and concise step-by-step instructions. This was the best help guide I have seen in ages. My 3-yr old InstaPot is my pride and joy, and I freaked out that I would have to discard it and repurchase it after a C6L error code. Last year, a similar thing happened when it just wouldn't turn on at all, and Dr. Google got me to a youtube video that showed me how to replace the fuse (for pennies). A year later, you taught me how to replace the pressure sensor switch. I feel so very good about salvaging my appliance (as I HATE premature deaths of vehicles, computers, and appliances)! You totally made my day (week/month, and so far 2024)!
-


Um das Gerät wieder zusammenzubauen, folge diesen Schritten in der umgekehrten Reihenfolge.
Um das Gerät wieder zusammenzubauen, folge diesen Schritten in der umgekehrten Reihenfolge.
Rückgängig: Ich habe diese Anleitung nicht absolviert.
33 weitere Nutzer:innen haben diese Anleitung absolviert.
Besonderer Dank geht an diese Übersetzer:innen:
100%


Diese Übersetzer:innen helfen uns, die Welt zu reparieren! Wie kann ich mithelfen?
Hier starten ›


46 Kommentare
Thanks for this helpful tutorial?
Great and informative presentation! The pictures show exactly what to do and make everything perfectly clear. In my case, I was able to clean the contacts and the pot is back to working order. It took more time to find my multi-meter than it did to fix the problem. As a bonus, I had to look up what a “spudger” is… Now I can stop calling it that “stick thingy.” ?
My IP-DUO80 from 2016 died with C6H. The high pressure switch didn’t click so I ordered and waiting delivery on a KS0105A dual switch. Apparently there’s another version (YCD3008) but I don’t know the difference. I saw your warning not to try calibrating the switch. Anyway, I did find a suggestion for the single high/low switch to turn the sensitivity screw clockwise/counter-clockwise as needed to adjust the high and low pressures.
Wow this post was just 11 hours ago. My
IP-DUO80 from 2016 died with C6H as well last night….wierd. Worked fine for years. Thanks for the part numbers. I have yet to pull the switch to see how bad the contacts are but the high pressure side definitely doesnt click when pushed. If cleaning doesn't help I will order a new switch.
Adding a lot of rices can make it go C6????
I'm still getting the C6h and I put a new sensor in any suggestions???
I ordered a new pressure switch and looked at my old one both very clean and both made the click.. But still throwing the code!!!
Hi Anthony!
It sounds like there's an open circuit somewhere. Double check the wires going to that sensor, and the motherboard socket connecting the wires.
Thank you for this was very helpful
Thank you for this great information! Has anyone been able to find the correct replacement sensor for the duo80 v2? I am nervous about trying to calibrate a new switch. I would love feedback if anyone has success stories.
Hooray I can do it. Thanks a lot Mr Shi. Easy to follow your instructions.
H Pham from Melbourne Australia.
I had just replaced the switch with YCD3008, everything seems working, however, it took longer time to cook as before, eg. usually it took about half hour to cook the beef stew, and now it take one hours 15 minutes to have the same result, I realized i am having lower pressure inside the pot than before, I guess I have to take a chance to calibrate the switch to get higher pressure otherwise it is no point to cook with a pressure cooker in hours of time. Anyone here can show me how to calibrate the switch? which screw to adjust? (screw with the red wire or black?) which way to adjust? (anti-clockwise to get higher pressure, increment in quarter turn?) thanks!
Hi Erick,
If you're encountering issues in "H" (high) mode, you should adjust the sensor connected to the red wire. If you're cooking in "L" (low) mode, you should adjust the sensor connected to the black wire.
If the Instant Pot isn't pressurizing sufficiently, turn the calibration screw counter-clockwise by a quarter turn. This makes the sensor less sensitive, which means the pot will pressurize more before it triggers the cutoff.
Test by adding 3 cups of water to the Instant Pot to cook for five minutes. Once the five minutes are up, vent using quick release. There should be a strong pressure release. If there isn't, loosen the screw by a quarter turn and repeat the test.
If the emergency vent begins to leak or vent during the heating cycle, the pot is over-pressurizing. Immediately turn off the Instant Pot and perform a quick release. You'll need to tighten the calibration screw to make it more sensitive to pressure.
Hello,
I had to disassemble my entire instant pot after it overcooked. After reassembling, the error C6L came up. So I opened it up again and found, that the low pressure sensor circuit was permanently open. By loosening the middle screw, it clicked and the pot worked. However, I'm a bit worried because I had to loosen this screw and the pot doesn't respond as well as before to settings: e.g. pre-heat at the highest level is not completed. Do you have any idea what I can do?
Thank you for the great instructions! They helped a lot.
Yvonne
Hi Yvonne,
Are you speaking of the mounting screw in step 8? I think that screw transfers heat to the sensors, so it needs to be tightened in order for the sensors to work. Your sensors may be worn out and refuse to close—in that case, you'll need to replace the sensor.
Hi Arthur,
thanks for your reply. Yes, I was referring to the mounting screw. Sorry for expressing myself unclearly.
I completely disassembled it again yesterday and noticed that I had inserted the heating plate a little crookedly. After straightening, the sensor clicked and I was able to tighten the mounting screw. Now everything works exactly as it should. I hope this information is usefulfor somebody here.
Yvonne
Arthur Shi is one badass mother spudger.
I had a C6L error. $@$*, no beans tonight. Popped the bottom off with the ole' torn driver and BOOM, FULL ACCESS. I actuated the sensor with my alternate spudger, also known as a screwdriver. Easy as bros and lady bros. Flipped the unit back over immediately, only because he astutely noted that most sensors just need a nudge to work properly. Plugged her into 120 volts of raging AC and let her rip. BOOM... No more beeps or errors, only the sweet silence of a pressure-rated Droid waiting to unleash a savory pressurized !&&* on my chickpeas or black eyed peas. Maybe a steamed bun tonight with tofu. Whatever.
Non-dairy FUDGE YEAH baby
WHO COOKIN TONIGHT?!
WHO COOKIN' TONIGHT?!
hi i did the 'open it and press on the sensor and see if it works' thing and it seems to be okay again but now i'm terrified i pushed too hard and broke it worse somehow so it doesn't know it's broken and will blow up if pressurized. is that possible?
Hi KLD,
Don't worry—the Instant Pot has a safety vent that will activate and vent if that happens.
El sensor c6L está sucio de comida empegostada. Con que puedo limpiarlo?
Hi Anabel,
Use some high concentration isopropyl alcohol to clean the contacts.
Thank you for your help! Luckily when I clicked on the pressure bars it worked!
You are a genius!
Very informative instructions. The only difficult step is removing the "spade connectors" from the board in Step 4, and even then, it's not that difficult. Does anyone know why these sensors fail? One of my sensors makes a click when pressed, but the other one doesn't and it looks like the metal spring-thing (I assume it is some kind of bi-metallic that bends when heated?) is stuck. I guess these things simply fail with time and use? But it seems like such a simple mechanism to fail....
Thank Mr. Shi for these instructions. After going back and forth with Mealthy about a warranty on their cooker that they refused to honor when the pot threw an “Err 6” code on the day after the warranty expired I looked up instructions for instant pot (which I also own - IP is way better, BTW). The insides of the Mealthy duo pressure cooker are a little different but your instructions were clear enough that I was able to make the adjustment needed to get it working again.
Related, our instant pot has just in the last week started to act up on the low pressure rice setting. It should cook for 12 minutes but then when the pot comes to pressure the timer sets for anywhere from 14 to 22 minutes instead of 12. Thoughts on this repair?
This fixed my problem and saved me $$$ thanks!! It was pretty easy to do as well
Very detailed, clear, explanation of the diagnosis and repair process! Excellent!
Thanks! Just what I needed to make a quick repair!
This was helpful for me even though I have an IP-LUX80 which only does high pressure cooking. As such, it only requires one switch, a normally-closed, ILD KSD105... they can be found on eBay and ship from China for $10-15. The switch is mounted on an extension from the bottom side of the platter inside the outer pot. When the inner pot comes up to pressure, it moves just enough to press on the switch, opening the circuit and cutting off power to the heating element. When the inner pot cools and shrinks back up, the switch closes returning power to the heating element and the cycle repeats until the timer runs down. I set my switch calibration using continuity on a voltmeter... making sure the switch stopped continuity when the platter was moved as it would under pressure. FWIW, I tried to contact Instant Pot customer service like their troubleshooter said but to no avail. If I had not been able to repair my LUX80, I'd have bought elsewhere... Instant Pot would have gotten no more dollars from me. JMNSHO.
Thank you for this guide. One of the sensors' contacts is blackened and fused. I assume that is beyond what sandpaper would do and I should replace it?
After ordering the part number above (KS0105A) on amazon $12 ... it took me 8-10 quarter turns of the screw, as my instant-pot was over-pressurizing each time. It was scary at first, but I quickly got into a fast routine ... and was able to get it all done pretty quickly
1) setup the pot with water and start (see this articles instructions)
2) If over pressurizing, unplug and vent as described above
3) remove lid and use a oven glove to remove inner pot, set aside
4) flip instant pot, open bottom, turn screw a quarter turn (of half turn if you've done this a few times already)
5) close bottom, flip instant-pot up-right
6) repeat
Tips helped me save the Instant Pot after Instant told me they didn't have parts any longer
thanks, worked like a charm :o)
Can anyone recommend what to do if the sensor both clicks and changes to show there's no continuity? Not sure what the next step is for solving C6 error?
A great help. The instructions were clear, concise and easy to follow, making the installation completely painless. Thank you!
I picked up my instant pot for my hunting trips from a guy who threw it away due to CL6 error code. He had left it out in the weather. It worked ok but sometimes failed. When the fails became pretty constant I followed these very clear instructions to clean the contacts on the low pressure Sensor. Working again and next I'll use the instructions to check the high pressure sensor is producing the right pressure. Thanks for such clear instructions. One instant pot saved from the landfill.
Hi, I have an Instant Pot duo crisp + air fryer error code c6h/ c6l. It appears even after replacing the pressure sensor alltogether plus adjusting the calibration screw. My error appears when I insert the pot inside and triggers the heating sensor of the pot; otherwise, it's set to OFF. Any suggestions on what might be the cause and a possible solution?
Hi Laurentiu,
The error normally triggers when the Instant Pot checks the sensors and finds them to be open circuit. To further diagnose the issue, you'll need a multimeter. You can try testing the sensors for continuity by following step 4. If the sensors check out fine, it there may be a continuity break down the path, either on the connecting wires or the control board.
"Sometimes, just flexing the sensors will fix the problem. Carefully re-assemble the Instant Pot and check if it works."
—Bingo! Thanks for turning a potential headache into a minor 60-second hiccup in dinner prep!