Einleitung
Diese Anleitung zeigt, wie das LCD im Wii U GamePad ausgetauscht werden kann. Du benötigst einen Schraubendreher PH00 und Tri-Wing.
Was du brauchst
Einführungsvideo
-
-
Drehe das GamePad um und entferne die beiden 4,7 mm Schrauben mit einem Kreuzschlitzschraubendreher #00.
-
-
-
Drücke mit deinem Finger nach unten und ziehen sie Akkustecker heraus.
-
Entferne dann den Akku aus dem Akkufach.
-
-
-
Entferne die zehn 9 mm Schrauben am äußeren Gehäuse mit einem Tri-Wing Y1 Schraubendreher.
-
Hebe die Rückseite des Gehäuses an.
-
-
-
Ziehe mit den Fingern den Stecker des Rumble-Motors am äußeren Gehäuse von der Hauptplatine ab.
I agree. A circle over the plug would have been better as the picture looks like you just pull on the wires lol.
Chris -
Thanks for the comment. I did get a set of tweezers and the negative cable broke anyway. They really could have done a better job at using a different connector for that.
Why in the world is this thing so tightly connected?
Thanks for the comment. I did get a set of tweezers to try to pull it out but still ended up breaking the negative cable. They really could have used a better set of cables and connectors for this.
-
-
-
Trenne das Kabel zum linken Lautsprecher mit den Fingern ab.
Speakers are connected with solder so removing them is not possible without requiring soldering later on. I left them both connected and instead of removing the motherboard completely I just "hinged" it carefully down to facilitate the work following step 18.
Thank you for offering this info because I spent 20 minutes between scratching my head and searching for any alternatives to just the image above, which had a wire nut/housing (and mine certainly did not). As I began to have an anxiety attack (
Mine also did not have connectors for the speaker. But like mentioned above, I was able to do repair WITHOUT the need to unsolder the speaker wires. Thanks!
-
-
-
Trenne das Kabel zum rechten Lautsprecher mit einer Pinzette von der Hauptplatine ab.
Note that on some units (presumably later ones), the speakers are soldered onto the motherboard.
-
-
-
-
Löse die beiden Sicherungen am oberen und unteren Ende des weißen Flachbandkabels mit einer Pinzette.
-
Entferne das weiße Flachbandkabel mit einer Pinzette.
Attention! You have to flip up gently the small plastic cap on top of the ribbon connector. Do not try to slide the plastic cap horizontally. This method holds for all ribbon connectors.
Isn’t it WiFi?
-
-
-
Hebe die Bluetooth-Platine mit den Fingern hoch und entferne sie.
These little boards (Bluetooth and NFC) have a small connector but also have double sided tape holding them down. So you may need to apply more force than expected to remove these due to the tape.
Isn’t it Wi-Fi?
-
-
-
Trenne das schwarze und das weiße Kabel auf der Rückseite der Platine ab.
One important thing to note here is how the black and white wires are routed to the board. You should take a picture since if you do not route these the same way, the wires can interfere with the button or get trapped when you assemble the case back possible blocking a screw hole.
Isn’t it Wi-Fi?
Any idea what the name of the white wire is? I accidentally broke through mine.. having trouble finding a replacement
-
-
-
Hebe die Bluetooth-Platine hoch und entferne sie.
Isn’t it Wi-Fi?
Does it really matter?
Thanks a lot for the guide. I just fixed my gamepad and it appears to be working good. Just one question: why do you include the step in which you remove the flatflex cable to the other pcb? It seems unnecesary
-
-
-
Ziehe den Stecker mit einer Pinzette ab.
There was a little tab on the top of the male end of the connectors that I had to push to get them out.
Take a small flat head screw driver and push out and to the left on top of the white part of the connector. If you try to use tweezers on this model it will not come out.
-
-
-
Ziehe den blauen Stecker mit einer Pinzette ab.
Looks like there are 2 of these connectors - left and right side
Lift the little gray tab before you pull the blue ribbon out.
-
-
-
Hebe die schwarze Sicherung vorsichtig hoch. Sie kann leicht kaputt gehen, wenn du sie nur an einer Stelle hoch ziehst. Entferne das braune Flachbandkabel mit einer Pinzette.
The small connector is the digitizer (touch senor panel) - The large connector is the actual display
For the small connector, lift up the black part on top from this side.
I broke that small connector (the lid) how can I fix that? The flex is still goes there but I won't get touch response unless I apply some pressure to it!
if you fixed it, can you tell me how did you do it?
Bast -
The small grey ribbon has a clasp holding it down. It needs to be opened in the opposite direction of the black clasp on the wide ribbon before you disconnect the ribbon.
-
-
-
Löse das kleine orangene Flachbandkabel mit einer Pinzette.
These tiny connectors are difficult to see how to manipulate. Similar to other ribbon connectors, there is a lever that flips up to release the ribbon cable. However, unlike the larger connectors, the lever flips up from the opposite side that the connector enters. Run your tweezers up the back side of the connector body, and the grey top should flip to vertical. Then the ribbon cable will slide out.
This small connector is attached to the screen as well.
What do I do if I broke off the gray top cover that went over the wire things.
You probably don’t need this anymore, but that happened to me a while ago and now i’m gonna have to buy a new motherboard. Your motherboard is as good as done for
The Boi -
Snapped it off too. Tried hot glue.with no luck. Does anyone know if Motherboard s are interchangeable? I have Version B
Foe Suar -
-
-
-
Entferne die NFC-Platine.
-
Löse den kleinen Stecker auf der Rückseite.
When trying to remove the red and black cords, it came off the green board. Is there a way to reconnect them?
-
-
-
Entferne die restlichen drei 5,1 mm Kreuzschlitzschrauben #0.
-
Hebe die Hauptplatine hoch und entferne sie.
There's a 4th 5.1mm screw along the bottom edge in the middle.
The speakers were soldered as mentioned above, so I carefully folded the motherboard down to facilitate work
-
-
-
Entferne die vier 5,1 mm Kreuzschlitzschrauben #0.
-
Ziehe das schwarze und das weiße Kabel weg vom Displaygehäuse.
-
-
-
Hebe das graue Displaygehäuse mit den Fingern hoch und entferne es.
There are two more screws under the sync component that requires you to disconnect the board and remove it as well. These screws prevent you from lifting out the display case as noted in step 19
-
-
-
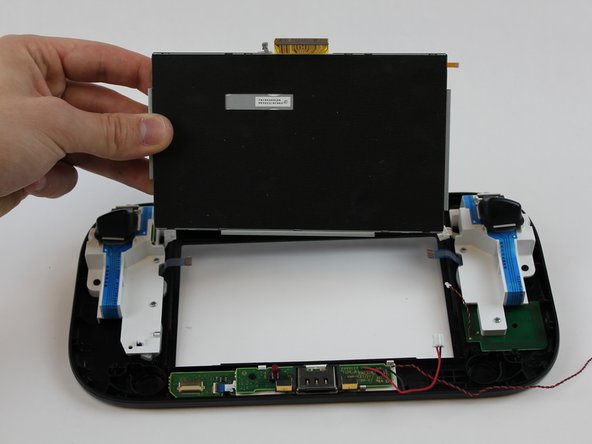
Drücke von der Vorderseite her behutsam auf das Display, bis es herauskommt.
-
Entferne das Display mit den Fingern.
There is a black plastic trim ring on the front of the screen, on top of the digitizer. While not technically required to it does provide a barrier to crud getting under the edges of the screen and also looks better. It is stuck down with adhesive or double sided tape. You can slowly and gently pry it up from the digitizer, remove the old adhesive and re-stick it down with double-sided scotch tape on the new digitizer. This is possible to do after you have everything re-assembled but is much easier to do BEFORE you reassemble. Just align it to the inside edges of the screen.
If you have two separate parts for your replacement, the LCD and the Digitizer, the digitizer usually has some adhesive on it, so you can stick it down onto the LCD. Make sure to remove all the protective films!
Could have mentioned the trim ring in the guide...
If there are two of a connector, say something please. Steps 12 and 13 only mention and show the left one, and I ended up tugging my motherboard up with the right ones still connected.
-


Um dein Gerät wieder zusammenbauen, folge den Schritten in umgekehrter.
Um dein Gerät wieder zusammenbauen, folge den Schritten in umgekehrter.
Rückgängig: Ich habe diese Anleitung nicht absolviert.
79 weitere Nutzer:innen haben diese Anleitung absolviert.
Besonderer Dank geht an diese Übersetzer:innen:
100%
VauWeh hilft uns, die Welt in Ordnung zu bringen! Wie kann ich mithelfen?
Hier starten ›
Team

USF Tampa, Team 1-6, Sullivan Spring 2016 Mitglied von USF Tampa, Team 1-6, Sullivan Spring 2016
USFT-SULLIVAN-S16S1G6
4 Mitglieder
40 Anleitungen geschrieben
18 Kommentare
was really perfect to repair my device. Thank you very much for this help
In step 14 - what does the small gray ribbon do? The replacement LCD display that I got in the mail did not have it.
Its the touch screen cable. The screen I ordered did not come with one. I had to carefully remove it from my broken display and put it on the new one. Thankfully the touchscreen still works for me.
Mine did not come with the touch screen either.
I replaced the digitizer, as well as the LCD screen. My replacement digitizer came with the wide orange ribbon; however, the tiny touchscreen ribbon is actually orange and fused onto the LCD display (the original was gray and located on the digitizer, not the LCD screen).
Thank you for this guide! Worked awesome repairing my device. I can add that if you are just replacing a broken screen, the digitizer (if not broken as well) can be removed from the broken (original) LCD screen very carefully, and re-used on the replacement. I took a gamble and only ordered the LCD part replacement but you can get both, or each separately. My is working perfectly and the LCD had been cracked badly. I appreciated the comments from various users on this article as well, pointing out the few things that were missed or not detailed! Still an excellent guide!
My screen was not as bright but all worked on the controller. Anyone else have that issue?
This guide was one the many online tutorials that truly did help me understand how to disassemble my Wii U. I had a digitizer problem so I had to start where I left off here and find another video on Youtube to follow how to switch this piece out. Hint: Each step has comments, make SURE to read those while disassembling. Good Luck
My LCD wouldn’t turn on so I bought one from amazon. Replaced it as per instructions, still completely blank screen. No light at all. Sound is coming from my gamepad, and touchscreen still works.
Hi, I’m going to try to fix my sons gamepad. The touchscreen seems to have stopped working. How would I know what exactly the problem is? Just the touchscreen? Also I’m in Aus, has anyone from here bought a replacement one before?
Replace the digitizer and Lcd. Took awhile connecting everything back up. Compared all the connections with pictures on this site and watched videos. Now the unit will not turn on or charge. Not sure where to even start. Even tried a battery from another unit and no luck.
Can I just mail it to you… and u fix it for me? Lol ?♀️
tried to unscrew the 10 Tri-Wing size Y1 screw with my iFixIt toolkit
unfortunately the tool is too “fat” and short, it cannot reach 4 screws on the corners of the gamepad.
having the iFixIt toolkit and needing to purchase an additional slim screwdriver it’s a shame…
Antonello Iannone - Antwort