Einleitung
Die Festplatte an deiner Xbox 360 s wackelt? Tausche die Halterung aus!
Was du brauchst
-
-
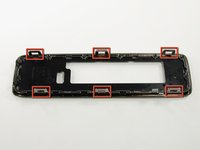
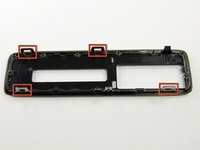
In den folgenden Schritten wirst du die Abdeckung an der Oberseite mit den Lüftungsschlitzen entfernen, welche mit 13 Clips an den gezeigten Stellen festgehalten wird.
-
-
-
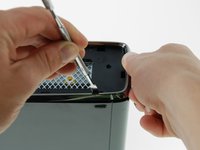
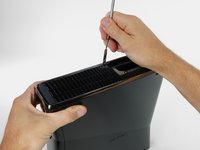
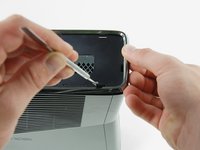
Richte die Konsole so aus, dass die Worte "XBOX 360" auf der Seite nach oben zeigen und die Frontplatte nach links zeigt.
-
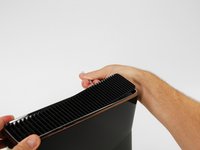
Führe einen Metall-Spudger zwischen den Lüftungsschlitzen auf der Oberseite und der oberen Abdeckung bei der Rückseite ein.
-
Drehe den Spudger von der Konsole weg, sodass du die Kante der Abdeckung mit den Lüftungsschlitzen nach oben hebelst, bis die zwei Clips sich lösen.
-
-
-
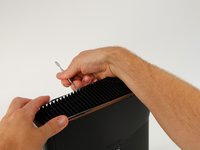
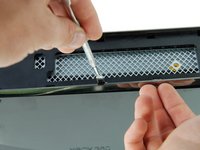
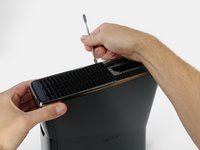
Führe einen Metall-Spudger zwischen den Lüftungsschlitzen und der oberen Abdeckung entlang der linken Seite ein.
-
Auf die gleiche Art und Weise wie oben, heble die linke Seite der Lüftungsschlitze von der oberen Abdeckung ab.
-
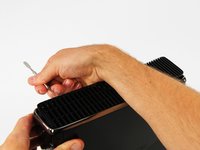
Heble weiter der linken Seite entlang, bis alle Clips auf dieser Seite gelöst sind.
-
-
-
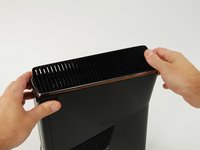
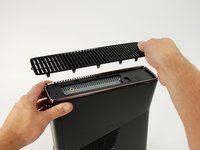
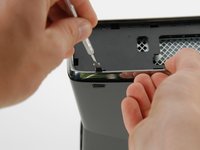
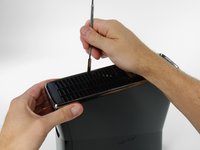
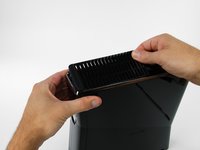
Hebe die Abdeckung mit den Lüftungsschlitzen an der befreiten linken Seite an, um die Clips auf der anderen Seite zu lösen.
-
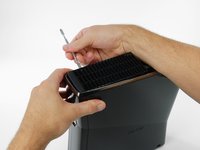
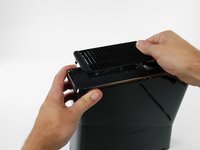
Entferne die Abdeckung mit den Lüftungsschlitzen.
-
-
-
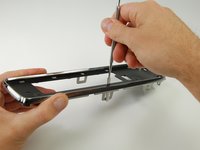
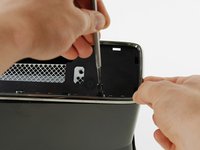
Setze einen Metallspudger - wie eben beschrieben - in den vordersten Schlitz an der linken Kante der oberen Blende zwischen die Unterkante des Clips und der linken Gehäuseseite ein.
-
Ziehe die obere Blende nach oben und drehe gleichzeitig den Spudger von der Konsole weg, bis sich der Clip löst.
-
-
-
Löse in der eben beschriebenen Weise die beiden restlichen Clips an der linken Kante der oberen Blende.
-
-
-
Fasse die ganze obere Abdeckung mit der Hand und hebe ihre linke Kante so weit hoch, dass die ablösten Clips oben auf der linken Gehäuseseite liegen.
-
-
-
Drehe die Xbox so, dass ihre Rückseite nach rechts und die rechte Gehäuseseite zu dir zeigt.
-
Setze einen Metallspudger in den Schlitz ganz hinten an der rechten Kante der oberen Blende zwischen die Unterkante des Clips und der rechten Gehäuseseite ein.
-
Hebe die obere Blende mit den Fingern hoch und drehe gleichzeitig den Spudger von der Konsole weg, bis sich der Clip löst.
-
-
-
Löse in gleicher Weise, wie in den vorherigen Schritten beschrieben, die mittleren und vorderen Clips an der rechten Kante der oberen Abdeckung.
-
-
-
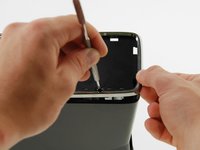
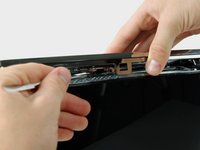
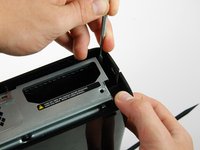
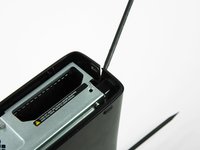
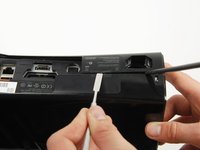
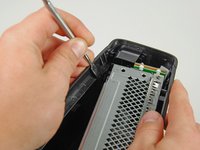
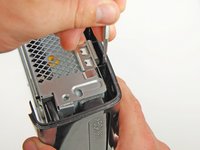
Schiebe die Einkerbung der Festplattenabdeckung nach links.
-
Ziehe die Festplattenabdeckung von der Konsole weg.
-
-
-
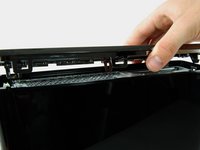
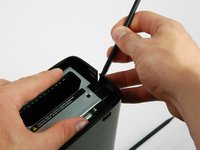
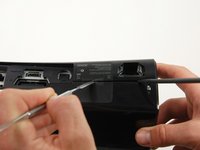
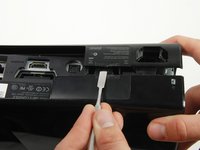
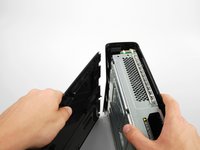
An der Festplatte ist eine Lasche aus Gewebe angebracht, auf der die Kapazität der Festplatte (z.B. "250 GB") aufgedruckt ist. Fasse die Lasche fest an.
-
Ziehe die Festplatte gerade aus der Konsole heraus.
-
-
-
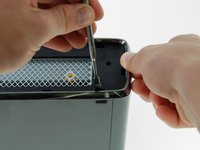
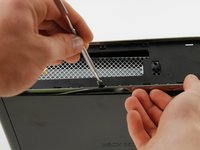
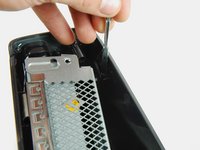
Setze einen Metallspudger zwischen das schwarze Lüftungsgitter am Boden und die untere silberne Zierleiste an der Blende in der rechten Ecke des Gitters ein.
-
Kippe den Spudger von der Konsole weg und heble dabei das Gitter von der unteren Blende ab.
-
-
-
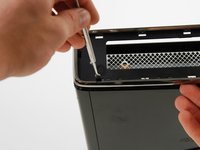
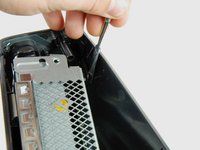
Löse so wie eben beschrieben auch die beiden restlichen Clips in der unteren rechten Kante.
-
-
-
-
Du kannst die rot markierten Clips lösen, indem du einen Metallspudger unter die Unterkante des Clips schiebst. Heble dann einfach von der Konsole weg und der Clip löst sich.
-
-
-
Setze einen Metallspudger in den Schlitz nahe bei der hinteren linken Ecke der unteren Blende ein.
-
Drehe den Spudger vom Gerät weg und hebe gleichzeitig die rückseitige Blende mit der Hand hoch.
-
-
-
Setze einen Metallspudger in den Schlitz an der unteren Blende zwischen der Unterkante des Clips und dem linken Gehäuse ein.
-
Ziehe gleichzeitig die untere Blende nach oben und drehe den Spudger von der Konsole weg, bis sich der Clip löst.
-
Löse in gleicher Weise den Clip vorne an der linken Kante an der unteren Blende.
-
-
-
Setze den Metallspudger in den Schlitz ganz hinten an der rechten Kante der unteren Blende. Drücke den Spudger nach unten und gleichzeitig mit der Spitze gegen das rechte Gehäuse, so dass sich der SPudger hinter den Clip zwängt.
-
Ziehe die untere Blende nach oben und löse gleichzeitig den Clip.
-
-
-
Setze den Spudger wie gezeigt zwischen die silberne Leiste und die untere Blende direkt unter dem Clip ein.
-
Ziehe die untere Blende hoch und löse gleichzeitig den Clip.
-
-
-
Hebe die Kante der unteren Blende weit genug hoch, um Platz zu bekommen.
-
Setze einen Metallspudger hinter die linke Kante des letzten Clips und drücke den Clip vom rechten Gehäuse weg.
-
-
-
Finde die beiden Clips hinter der WiFi-Karte, mit denen die rechte und die linke Gehäuseseite an der Oberkante der Konsole verbunden sind.
-
Drücke die linke und die rechte Gehäuseseite mit einer Hand auseinander und heble gleichzeitig die Clips mit einem Metallspudger frei.
-
-
-
Setze einen Spudger zwischen das rechte und das linke Gehäuseteil ein, damit sie im weiteren Verlauf der Reparatur getrennt bleiben.
-
-
-
Drücke das linke und das rechte Gehäuseteil mit einer Hand auseinander und löse gleichzeitig einen Clip neben dem Einschub für die Festplatte.
-
-
-
Setze einen weiteren Spudger direkt unter dem Clip zwischen das rechte und das linke Gehäuseteil ein.
-
-
-
Setze einen Metallspudger mit dem flachen Ende an der Stelle zwischen das rechte und das linke Gehäuseteil ein, wo normalerweise der Garantieaufkleber klebt.
-
Heble das linke Gehäuseteil nach oben, bis ein Spalt zwischen den beiden Gehäuseteilen entstanden ist und schiebe den Spudger zur linken Gehäuseseite hin.
-
Kippe den Spudger hoch, bis sich der letzte Clip löst.
-
-
-
In der vorderen linken Ecke an der Oberkante befindet sich ein Clip, mit dem die linke Gehäuseseite an der Frontplatte befestigt ist. Löse ihn ab.
-
-
-
Drehe die Konsole um, so dass die Unterseite nach oben zeigt.
-
In der vorderen linken Ecke an der Unterkante befindet sich ein Clip, mit dem die linke Gehäuseseite an der Frontplatte befestigt ist. Löse ihn ab.
-
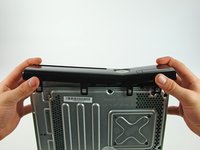
Drehe die linke Gehäuseseite vom Gerät weg, damit sich die beiden letzten inneren Clips lösen.
-
Entferne das linke Seitenteil.
-
-
-
Löse den Clip nahe bei vorderen rechten Ecke an der Oberkante, mit dem die rechte Gehäuseseite an der Frontplatte befestigt ist.
-
-
-
Löse den Clip in der unteren rechten Ecke an der Oberkante, mit dem die rechte Gehäuseseite an der Frontplatte befestigt ist.
-
-
-
Hebe die Frontplatte an der linken Kante nach oben, um die letzten beiden Clips zu lösen, mit denen die Frontplatte an der rechten Gehäuseseite befestigt ist.
-
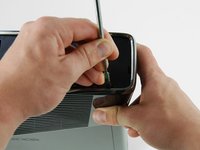
Nimm die Frontplatte vom restlichen Gerät ab.
-
-
-
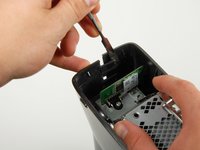
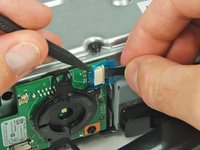
Hebe die durchsichtige blaue Zuglasche mit einem Spudger oder deinem Fingernagel vom Stecker weg.
-
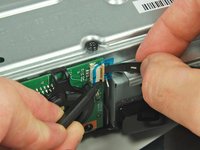
Schiebe den Sicherungsbügel am Stecker des Netzschalterkabels zur Oberseite der Konsole hin.
-
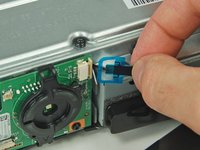
Ziehe das Netzschalterkabel gerade aus dem Anschluss heraus.
-
Nun ist die Frontplatte komplett frei.
-
-
-
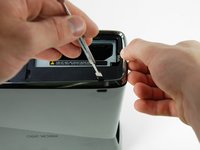
Entferne die beiden 5,6 mm langen Torx T8 Schrauben, mit denen das RF Modul am Metallgehäuse befestigt ist.
-
-
-
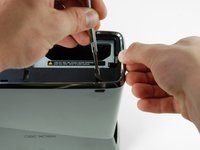
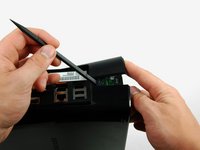
Entferne die einzelne Torx T10 Schraube, mit der die WiFi-Karte befestigt ist.
-
Ziehe die WiFi-Karte aus der Konsole heraus.
-
-
-
Entferne den Garantieaufkleber vom Metallrahmen. Darunter wird eine Schraube sichtbar.
-
-
-
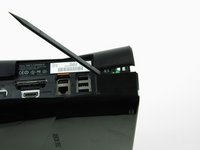
Entferne die fünf 55,5 mm langen Torx T10 Schrauben, mit denen die rechte Gehäuseseite am Metallrahmen befestigt ist.
-
-
-
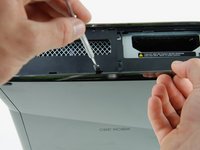
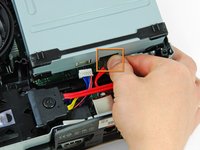
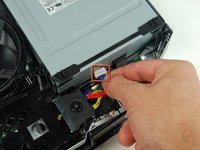
Entferne das Datenkabel des optischen Laufwerks von der Rückseite des Laufwerks.
-
Entferne das Stromkabel von der Rückseite des Laufwerks.
-
-
-
Entferne die einzelne goldfarbene 11,3 mm lange Torx T10 Schraube aus dem mit "G" markierten Schraubenloch.
-
-
-
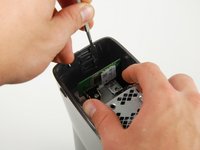
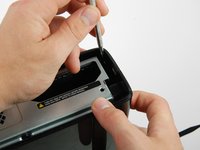
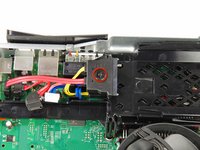
Entferne die einzelne 9,2 mm lange Torx T10 Schraube, die den Festplattenkabelstecker an der Kunststoffhalterung befestigt.
-
Hebe den Festplattenkabelstecker von der Halterung der Festplatte ab.
-
-
-
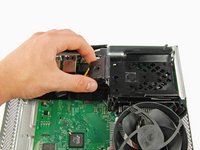
Entferne die einzelne 11,3 mm lange Torx T10 Schraube, mit der die Halterung der Festplatte nahe beim Stromanschluss befestigt ist.
-


Um dein Gerät wieder zusammenzubauen, folge den Schritten in umgekehrter Reihenfolge.
Um dein Gerät wieder zusammenzubauen, folge den Schritten in umgekehrter Reihenfolge.
Rückgängig: Ich habe diese Anleitung nicht absolviert.
20 weitere Personen haben diese Anleitung absolviert.
Besonderer Dank geht an diese Übersetzer:innen:
100%

Diese Übersetzer:innen helfen uns, die Welt zu reparieren! Wie kann ich mithelfen?
Hier starten ›
