Einleitung
Ältere Xbox 360 Modelle hatten große Probleme mit dem Kühlkörper. Tausche deinen Kühlkörper im (hoffentlich unwahrscheinlichen) Fall eines RROD-Déjà-vu aus.
Was du brauchst
-
-
In den folgenden Schritten wirst du die Abdeckung an der Oberseite mit den Lüftungsschlitzen entfernen, welche mit 13 Clips an den gezeigten Stellen festgehalten wird.
-
-
-
Richte die Konsole so aus, dass die Worte "XBOX 360" auf der Seite nach oben zeigen und die Frontplatte nach links zeigt.
-
Führe einen Metall-Spudger zwischen den Lüftungsschlitzen auf der Oberseite und der oberen Abdeckung bei der Rückseite ein.
-
Drehe den Spudger von der Konsole weg, sodass du die Kante der Abdeckung mit den Lüftungsschlitzen nach oben hebelst, bis die zwei Clips sich lösen.
This step is and the others following are to rough and not needed, simply put smth in between the lamellar and push it up with littlebit pressure thats better for the plastic parts.
-
-
-
Führe einen Metall-Spudger zwischen den Lüftungsschlitzen und der oberen Abdeckung entlang der linken Seite ein.
-
Auf die gleiche Art und Weise wie oben, heble die linke Seite der Lüftungsschlitze von der oberen Abdeckung ab.
-
Heble weiter der linken Seite entlang, bis alle Clips auf dieser Seite gelöst sind.
-
-
-
Hebe die Abdeckung mit den Lüftungsschlitzen an der befreiten linken Seite an, um die Clips auf der anderen Seite zu lösen.
-
Entferne die Abdeckung mit den Lüftungsschlitzen.
-
-
-
In den folgenden Schritten wirst du die sechs rot markierten Clips lösen.
-
-
-
Setze einen Metallspudger - wie eben beschrieben - in den vordersten Schlitz an der linken Kante der oberen Blende zwischen die Unterkante des Clips und der linken Gehäuseseite ein.
-
Ziehe die obere Blende nach oben und drehe gleichzeitig den Spudger von der Konsole weg, bis sich der Clip löst.
So I got the fan filter thing off, but the black edge plate thing isn't coming off. All I did was warp my flathead screwdriver and scratch the console.
-
-
-
Löse in der eben beschriebenen Weise die beiden restlichen Clips an der linken Kante der oberen Blende.
-
-
-
Fasse die ganze obere Abdeckung mit der Hand und hebe ihre linke Kante so weit hoch, dass die ablösten Clips oben auf der linken Gehäuseseite liegen.
-
-
-
Drehe die Xbox so, dass ihre Rückseite nach rechts und die rechte Gehäuseseite zu dir zeigt.
-
Setze einen Metallspudger in den Schlitz ganz hinten an der rechten Kante der oberen Blende zwischen die Unterkante des Clips und der rechten Gehäuseseite ein.
-
Hebe die obere Blende mit den Fingern hoch und drehe gleichzeitig den Spudger von der Konsole weg, bis sich der Clip löst.
-
-
-
Löse in gleicher Weise, wie in den vorherigen Schritten beschrieben, die mittleren und vorderen Clips an der rechten Kante der oberen Abdeckung.
-
-
-
Schiebe die Einkerbung der Festplattenabdeckung nach links.
-
Ziehe die Festplattenabdeckung von der Konsole weg.
-
-
-
An der Festplatte ist eine Lasche aus Gewebe angebracht, auf der die Kapazität der Festplatte (z.B. "250 GB") aufgedruckt ist. Fasse die Lasche fest an.
-
Ziehe die Festplatte gerade aus der Konsole heraus.
If i buy a new xbox 360 and replace the hardrive inside with my own, will i have my account and saves? or will i have to recover my account and start over?
You will still have your saves and account if you replace your hard drive in the new xbox
hola tengo un disco de laptop y quiero ponerle 100 juegos como puedo hacer la xbox me reconose el disco y todo lo configuro pero cuando conecto a mi pc para pasar los juejosel emulador no me deja
-
-
-
Setze einen Metallspudger zwischen das schwarze Lüftungsgitter am Boden und die untere silberne Zierleiste an der Blende in der rechten Ecke des Gitters ein.
-
Kippe den Spudger von der Konsole weg und heble dabei das Gitter von der unteren Blende ab.
-
-
-
Löse so wie eben beschrieben auch die beiden restlichen Clips in der unteren rechten Kante.
-
-
-
Du kannst die rot markierten Clips lösen, indem du einen Metallspudger unter die Unterkante des Clips schiebst. Heble dann einfach von der Konsole weg und der Clip löst sich.
-
-
-
Setze einen Metallspudger in den Schlitz nahe bei der hinteren linken Ecke der unteren Blende ein.
-
Drehe den Spudger vom Gerät weg und hebe gleichzeitig die rückseitige Blende mit der Hand hoch.
These are pretty awkward to remove, but once you understand how they work its easy enough. The goal here is to slot the spudger THROUGH the gap of the silver tabs (visible in previous steps image, circled) and then pry. Put pressure against the wall of the Xbox case and push downwards, once you feel the spudger slot in, then apply force away from the Xbox and pull up a little with your free hand.
-
-
-
Setze einen Metallspudger in den Schlitz an der unteren Blende zwischen der Unterkante des Clips und dem linken Gehäuse ein.
-
Ziehe gleichzeitig die untere Blende nach oben und drehe den Spudger von der Konsole weg, bis sich der Clip löst.
-
Löse in gleicher Weise den Clip vorne an der linken Kante an der unteren Blende.
-
-
-
-
Setze den Metallspudger in den Schlitz ganz hinten an der rechten Kante der unteren Blende. Drücke den Spudger nach unten und gleichzeitig mit der Spitze gegen das rechte Gehäuse, so dass sich der SPudger hinter den Clip zwängt.
-
Ziehe die untere Blende nach oben und löse gleichzeitig den Clip.
-
-
-
Setze den Spudger wie gezeigt zwischen die silberne Leiste und die untere Blende direkt unter dem Clip ein.
-
Ziehe die untere Blende hoch und löse gleichzeitig den Clip.
-
-
-
Hebe die Kante der unteren Blende weit genug hoch, um Platz zu bekommen.
-
Setze einen Metallspudger hinter die linke Kante des letzten Clips und drücke den Clip vom rechten Gehäuse weg.
-
-
-
-
Finde die beiden Clips hinter der WiFi-Karte, mit denen die rechte und die linke Gehäuseseite an der Oberkante der Konsole verbunden sind.
-
Drücke die linke und die rechte Gehäuseseite mit einer Hand auseinander und heble gleichzeitig die Clips mit einem Metallspudger frei.
-
-
-
Setze einen Spudger zwischen das rechte und das linke Gehäuseteil ein, damit sie im weiteren Verlauf der Reparatur getrennt bleiben.
-
-
-
Drücke das linke und das rechte Gehäuseteil mit einer Hand auseinander und löse gleichzeitig einen Clip neben dem Einschub für die Festplatte.
-
-
-
Setze einen weiteren Spudger direkt unter dem Clip zwischen das rechte und das linke Gehäuseteil ein.
-
-
-
Setze einen Metallspudger mit dem flachen Ende an der Stelle zwischen das rechte und das linke Gehäuseteil ein, wo normalerweise der Garantieaufkleber klebt.
-
Heble das linke Gehäuseteil nach oben, bis ein Spalt zwischen den beiden Gehäuseteilen entstanden ist und schiebe den Spudger zur linken Gehäuseseite hin.
-
Kippe den Spudger hoch, bis sich der letzte Clip löst.
if you make a hole right here like the link`s picture you can boot the lock
As the user above me said, please avoid doing it like shown in the guide. It just didn’t work on my Xbox (unless your goal is to destroy the plastic case). Instead, pick some small needle like object (the spudger was too short for this, I used the SIM bit of my iFixit driver kit) and find the right spot on the big sticker which is on the left in the pictures shown in the guide. That spot is just between the text and the column of logos (Dolby Digital, etc.) (https://team-xecuter.com/slim/slim_secre..., picture not mine). Poke it (don’t be too gentle, you have to apply some force) and you will hear the clip release.
Both the above links are dead, i used this YouTube video which shows you the process of getting the hidden clip
I was able to open it by pushing on the sticker to unclamp the clip while another person helped me pull open the case.
Here is a Video that shows the small hole behind the sticker, ist in german but ist good to see how to open that hidden clip easiely.
-
-
-
In der vorderen linken Ecke an der Oberkante befindet sich ein Clip, mit dem die linke Gehäuseseite an der Frontplatte befestigt ist. Löse ihn ab.
-
-
-
Drehe die Konsole um, so dass die Unterseite nach oben zeigt.
-
In der vorderen linken Ecke an der Unterkante befindet sich ein Clip, mit dem die linke Gehäuseseite an der Frontplatte befestigt ist. Löse ihn ab.
-
Drehe die linke Gehäuseseite vom Gerät weg, damit sich die beiden letzten inneren Clips lösen.
-
Entferne das linke Seitenteil.
-
-
-
Löse den Clip nahe bei vorderen rechten Ecke an der Oberkante, mit dem die rechte Gehäuseseite an der Frontplatte befestigt ist.
There are 4 black screw that has to be removed before you can detach the other cover. Please note
Sorry, there 5screws, one in the middle and 4 at the edges
-
-
-
Löse den Clip in der unteren rechten Ecke an der Oberkante, mit dem die rechte Gehäuseseite an der Frontplatte befestigt ist.
-
-
-
Hebe die Frontplatte an der linken Kante nach oben, um die letzten beiden Clips zu lösen, mit denen die Frontplatte an der rechten Gehäuseseite befestigt ist.
-
Nimm die Frontplatte vom restlichen Gerät ab.
There isn’t 2 clips there is 4 clips
-
-
-
Hebe die durchsichtige blaue Zuglasche mit einem Spudger oder deinem Fingernagel vom Stecker weg.
-
Schiebe den Sicherungsbügel am Stecker des Netzschalterkabels zur Oberseite der Konsole hin.
-
Ziehe das Netzschalterkabel gerade aus dem Anschluss heraus.
-
Nun ist die Frontplatte komplett frei.
-
-
-
Entferne die beiden 5,6 mm langen Torx T8 Schrauben, mit denen das RF Modul am Metallgehäuse befestigt ist.
On my disassembly during this part, I found the T9 Torx to be too big and had to use the T8 Torx instead.
The correct size is T8!
-
-
-
Ziehe das Modul gerade von der Xbox ab und entferne es.
It may not be required but recommended. As you move the xbox around you could break this part. Removing it and placing it in a safe place keeps that from happening.
-
-
-
Entferne die einzelne Torx T10 Schraube, mit der die WiFi-Karte befestigt ist.
-
Ziehe die WiFi-Karte aus der Konsole heraus.
-
-
-
Entferne den Garantieaufkleber vom Metallrahmen. Darunter wird eine Schraube sichtbar.
-
-
-
Entferne die fünf 55,5 mm langen Torx T10 Schrauben, mit denen die rechte Gehäuseseite am Metallrahmen befestigt ist.
-
-
-
Entferne das Datenkabel des optischen Laufwerks von der Rückseite des Laufwerks.
-
Entferne das Stromkabel von der Rückseite des Laufwerks.
-
-
-
Hebe das optische Laufwerk aus der Xbox heraus.
Is there a specific Optical Drive that Microsoft uses in these or can I upgrade my drive?
i took my drive out but when installed my replacement it would not work
WAS thinking of possibly trying to repair my son's Xbox 360S, by replacing the optical drive, but after looking at all the spudger steps to get to the drive and then your comment that the replacement might not actually work... forget about it! I ain't going to all that work for possibly nothing... t'ain't worth it!
Anyone want a perfectly working Xbox 360S with a drive the spins game discs upon ejection? We've already bought a replacement, so this unit is for sale... name your price.
Luposian -
In regards to davidgardner301 comment there is a extra step they. Didn't show on this replacement guide in order for your new disk drive to work you will need to remove the origional board connected to thje origional drive that came with the system and soler that onto the new one its a tricky process however its a step most people over look
Without the origional board the xbox will not accept the replacement drive only because each disk drive is coded to work with tat soecific xbox only so your out of luck if you already. Tossed out your old disk drive
The DVD drives are coded to the Motherboard. If you buy the same exact drive to replace the broken one. You will still need to either 1) transfer the DVD circuit board OR 2) get the Firmware from the old DVD drive using a PC and then transfer it to the New DVD. There are website regarding this procedure if you want to look it up.
-
-
-
Entferne die einzelne goldfarbene 11,3 mm lange Torx T10 Schraube aus dem mit "G" markierten Schraubenloch.
-
-
-
Entferne die einzelne 9,2 mm lange Torx T10 Schraube, die den Festplattenkabelstecker an der Kunststoffhalterung befestigt.
-
Hebe den Festplattenkabelstecker von der Halterung der Festplatte ab.
-
-
-
Entferne die einzelne 11,3 mm lange Torx T10 Schraube, mit der die Halterung der Festplatte nahe beim Stromanschluss befestigt ist.
-
-
-
Hebe die Halterung der Festplatte aus dem Metallrahmen heraus.
I have a 4GB Xbox 360 slim and I bought a 500GB hard drive for it. I pushed the hard drive in its place and after I heard that click, I pushed it a little bit more to be shure that it's in place. I noticed that the hard drive bracket (the slide that holds the hard drive) it's elastic: after the hard drive is inserted, it wobbles (maybe to prevent hdd damage when the xbox is moved).
My question is: how does the hard drive bracket work? is there a metal spring in its mechanism that allows it to wobble? Did I make any damage to it because I pushed the hard drive to be sure that it is in place? I don't want to teardwon my console to find that out.
Thank you!
-
-
-
Entferne das Lüfterkabel, indem du den Stecker vom Mainboard abziehst.
-
-
-
Entferne die zwei 11,7 mm Kreuzschlitzschrauben, mit denen der Lüfter am Kühlkörper befestigt ist.
-
Entferne den Lüfter vom Mainboard.
-
-
-
Das Mainboard ist mit insgesamt zehn Schrauben im Metallgehäuse befestigt:
-
Fünf 11,3 mm silberne T10 Torx Schrauben, in den mit "M", "N", "P", "R" und "T" markierten Löchern.
-
Vier 5,6 mm schwarze T9 Torx Schrauben, in den mit "D", "E", "J" und "K" markierten Löchern.
-
Eine einzelne 11,3 mm goldene T10 Torx Schraube, in dem mit "A" markierten Loch.
Correct size for the orange screws is T8!
I confirm what the user above me said, they were T8, at least on my Xbox.
I don't have the gold one. Is it normal?
My gold and silver screws were reversed. 5 gold, 1 silver.
-
-
-
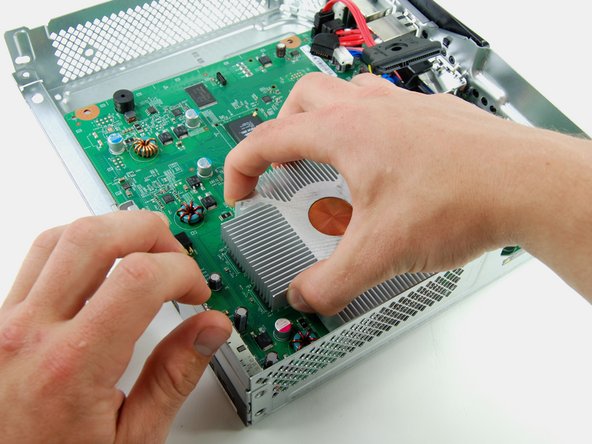
Greife den Kühlkörper mit einer Hand, und halte den Rahmen mit der anderen Hand fest.
-
Hebe die Mainboard-Einheit aus dem Metallrahmen heraus.
-
-
-
Beginne an der vorderen linken Ecke der X-Klemme und setze einen 1,5 mm Schlitzschraubendreher zwischen den Stift des Kühlkörpers und den Haken der X-Klemme.
Uggghhhh, Microsoft is still using X-Clamps. Didn't they learn anything from the original 360?
Hopefully having the smaller CPU and GPU on the same die, as well as an "improved fan cooling system" will keep those old issues from rearing their ugly heads. The Red Ring of Death technically doesn't exist anymore, either.
I've been reading that people are ruining their boards on this step when they slip and the tool slices the main board while trying to remove the x-clamp. Use a metal spudger and slip it between the post and the x-clamp from ABOVE... not along the bottom where the board is. The whole clamp came off in 30 seconds and the spudger was nowhere near the pcb.
-
-
-
Löse auf die gleiche Weise wie oben beschrieben den hinteren rechten Haken der X-Klemme.
-
-
-
Löse auf die gleiche Weise wie oben beschrieben den hinteren linken Haken der X-Klemme.
-


Um dein Gerät wieder zusammenzubauen, folge dieser Anleitung in umgekehrter Reihenfolge.
Um dein Gerät wieder zusammenzubauen, folge dieser Anleitung in umgekehrter Reihenfolge.
Rückgängig: Ich habe diese Anleitung nicht absolviert.
68 weitere Nutzer:innen haben diese Anleitung absolviert.
Besonderer Dank geht an diese Übersetzer:innen:
100%

Diese Übersetzer:innen helfen uns, die Welt zu reparieren! Wie kann ich mithelfen?
Hier starten ›

16 Kommentare
This is a great guide. Thank you for taking the time to make it.
Intercooler guys, purchase an intercooler and save yourself from this hassle
I had problems getting the x-bracket off the back (step 54-57).
I found this video using a pair of needle nose pliers that helped me immensely with this step:
I think we all ended up finding that video...
Thank you for taking the time to make this very instructional guide
I bought the single kit with tools and the multi fix kit. The kits come with mini heat sinks, pads, washers and screws. Nothing in this set of directions tells me where to use them.? Are there other directions somewhere that I have as yet not found?
This is an awesome guide that I only found after getting stuck trying to remove the heat sink - wish I had found it before I started. Once removed I found an odd pattern of thermal paste, the circle of copper on the heat sink and beneath it on the chip only had a few spattering’s of thermal paste - is it possible that heat pushed the thermal paste out to the boundaries of the chip?
I’m going to go look for a recommendation of what type of thermal paste I should put back down.
Why didn’t u show us how to reinstall the X clamp bracket. Its not as easy as just sticking it on so maybe don’t forget that.
Hey guys I figured out how to put the bracket back on with out killing the mobo. Here follow this:
So first off u need to look back at the part where u take off the bracket. That way u know what way the bracket came off as. This might not matter but I couldn’t get mine with out lining it up correctly from when I removed it so do that first.
Then put new thermal paste on the CPU>put heatsink threw mobo and flip the mobo over.
Now align the bracket as u did before u took it off, then hook the bracket on one end of the heatsink screw holes. Now push firmly down on the opposite screw hole from the one u are notched on right now. If u do it right u should have those 2 brackets parts notched on the screw holes. If not take off the brackets and try again. Once done with the first set simply do the same thing to the last set.
Hope this helps for those like me who got confused when there wasn’t a section showing how to put the bracket back on.
Is the Heatsink on this model your showing have the old, original, upgraded or newest one? My daughter's Slim was very dirty dusty & clogged cooling intake and I cleaned it. She has an external fan also that plug into USB port and it is obvious why overheating but I want to know if heatsink should be replaced it has that same circle copper center core heatsink. I have looked at a couple of heatsink sites online showing progression of changing of sinks xbox went through but not this one. I'm hoping it is the newer or better yet the newest style. I have artic silver 5 thermal paste I use on video cards & processors on my computer builds & repairs. I don't know what paste the xbox360 slim uses and I have seen the crappy thermal pads used in some Compaq Laptops for the video processor which I switch out for a copper plate thermal pasted and the heat immediately goes away. If you know which sink this is should I switch it or just take it off and replace the paste? Thanks
James Hamicksburg
יעקב המיקסברג
I starred this guide because I like long guides, as well as well-organized ones. Yours is both! You’re welcome!
It is great! Do you any of you guys have any information what is the space (its like a cpu socket on pc’s) between the cpu holding holes. I’m asking because i’d like to put on a aio watercooilng kit into it. :) Thanks.
What is that metal embedded in the heatsink? Is it copper?
two scratches because of how hard the heatsink is hard to take off and one stab to the mobo because of how hard it was to screw the fan back, and the thing still works. 10/10 would accidentally damage my xbox again
haywirestudent7 - that is like putting a band-aid on something. It might work but it isn’t proper or recommended whatsoever. TIM doesn’t last forever. Replacing something defective is highly more advisable then doing something unnecessary.
It is easier to remove the X bracket by using a small flathead screwdriver or spudger to pry between a post and the inside edge of the opening (the side nearest the center). This will disengage the hook on the opposite side of the X. Releasing two ends that are side-by-side allows for removal by only working on two legs.
When separating the second part of the main case, there is no need to damage the edges of the plastic. There really is a small (about 1mm) hole near the "checkmark" under the tough plastic sticker. You still need to remove the little Warranty Sticker, because that binds the two pieces of the case. Pushing very firmly on the black sticker with the pad of your thumb will make a faint dimple where the hole is; puncture it with something sharp, then press a straightened paper clip through the hole to release the clip.