Einleitung
'''Diese Anleitung zeigt nur, wie du das optische Laufwerk entfernen kannst.
'''
Die XBox 360 ist so entwickelt worden, dass sie nur mit dem im Werk eingebauten DVD Laufwerk arbeitet. Wenn du das DVD Laufwerk durch ein anderes ersetzt, wird dieses nicht funktionieren, da das Ersatzlaufwerk einen anderen DVD Schlüssel hat, den die Spielkonsole nicht annehmen wird.
Was du brauchst
-
-
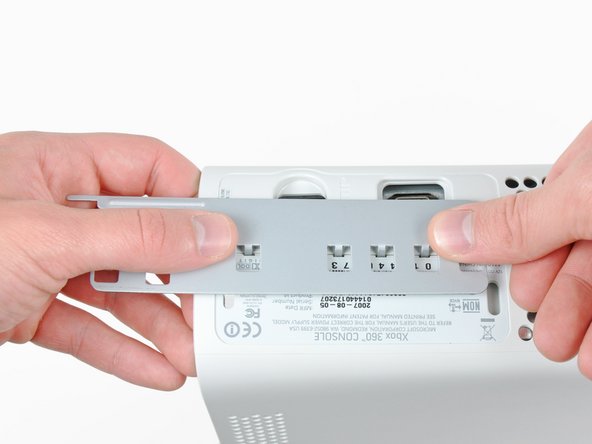
Greife die Festplatteneinheit mit einer Hand und drücke mit der anderen Hand den kleinen Knopf, während du die Festplatteneinheit nach oben hebst.
-
Nimm die Festplatteneinheit von der Konsole.
-
-
-
Führe das flache Ende eines Spudgers oder die Kante eines Xbox 360 opening tools in den kleinen Schlitz an der Seite des Front Pannels in der Unterseite.
-
Hebel die vordere Kante des Lüfters weg von der Frontplatte.
You can avoid this step by pulling the front cover off. Just make sure you don't break the springs for the USB bay area.
Hello, thank you ifix for this guide, I followed this guide, I got stuck at some point but I resolved it. Also I want to share this resource: Step by Step guide to fix Xbox 360 errors it helped me go through all the things associated with Xbox 360 and the troubleshooting of errors. Hope this can also help you all.
-
-
-
Um die Klammern zu lösen, arbeite dich von der Vorder- zur Hinterseite der Lüftereinheit entlang.
-
Während du die Bodenabdeckung leicht anhebst, nutze die Spitze eines Spudgers um die Klammern zu lösen.
-
-
-
Führe die flache Seite eines Spudgers zwischen der Frontabdeckung und der Außenhülle, nahe des An/Aus-Schalters, ein.
-
Führe den Spudger entlang der Kante der Frontabdeckung um die Klammern zu lösen, die sie an der Konsole halten.
The faceplate just pulls off, using a tool is completely unneccessary. https://beta.support.xbox.com/help/xbox-...
-
-
-
Die obere Lüftereinheit wird mit Klammern in der Konsole gehalten. Die ersten zwei sind hier rot markiert.
-
-
-
Führe das flache Ende eines Spudgers in die kleine, bereits erwähnte, Öffnung ein um die Klammern zu lösen.
-
-
-
-
Um die Klammern zu lösen, beginne in der Mitte der oberen Lüftereinheit.
-
Während du leicht die Kante der Lüftereinheit anhebst, nutze die Spitze eines Spudgers um die Klammern in der oberen Mitte der Seitenabdeckung hineinzudrücken um sie zu lösen.
-
-
-
Nutze die Spitze eines Spudgers um die Klammern an der hinteren Seite der oberen Lüftereinheit zu lösen.
-
-
-
Nutze die Spitze deines Spudgers um die Klammer an der hinteren Seite der oberen Lüftereinheit zu lösen.
-
Entferne die obere Lüftereinheit.
-
-
-
Stelle die Konsole senkrecht mit der Oberkante nach unten hin.
-
Ziehe vorsichtig den Garantie-Sticker von der Konsole ab.
LOL “Romove the warenty seal”
-
-
-
Nutze das flache Ende eines Spudgers um die folgenden Verriegelungen zu lösen:
-
Über dem Front-USB Port
-
Unter dem Front-USB Port
-
Über den Speicherkarten-Schlitzen.
-
-
-
Führe das flache Ende eines Spudgers in der Verriegelung über der Eject-Taste ein und hebel nach oben um die letzte Verriegelung zu lösen.
-
-
-
Hebe vorsichtig die vordere Kante der Seitenabdeckung an, um sicherzustellen, dass die Verriegelungen an der Vorderseite komplett gelöst sind.
-
-
-
Drücke das Xbox 360 Opening Tool in die Schlitze für die Klammern, die Ober- und Unterseite verbinden in der Nähe der I/O Ports.
-
Während du das Opening Tool in die Xbox drückst, drücke die obere und untere Hülle auseinander um die Klammern zu lösen.
I didn't have an XBox tool, so I followed instructions in this video for this step (https://www.youtube.com/watch?v=qaxIB6cX...) to pry it open with your fingers and a screwdriver.
The small (metal) women's hair clip is best for un-latching the tabs. The screw drivers just make the holes bigger.
You can also use the pointed end of a plastic spudger to push each clip free while you separate the case with your free hand.
-
-
-
Während du die obere und untere Hülle auseinander drückst, nutze die Spitze eines Spudgers oder den Stift eines Xbox 360 Opening Tools um die lange Klammer (rot markiert) in das Gehäuse zu drücken.
-
Die Klammer löst sich und hinterlässt die Klammern in der Nähe des Stromanschlusses als einzige Klammern zurück, die die Gehäuseteile verbinden.
-
-
-
Drück das Xbox 360 Opening Tool unten in die zwei verbleibenden Schlitze um die Klammern in der Nähe der Stromverbindung zu trennen.
-
Drücke die beiden Gehäuseteile auseinander um sie komplett voneinander zu trennen.
-
-
-
Greife den hinteren Teil der Rückseite und hebe ihn an um ihn von der Konsole zu trennen.
-
-
-
Verwende die Spitze eines Spudgers um die Klemme, die den Auswurfknopf festhält, aus dem Metallgehäuse zu lösen.
-
Führe die Flache Seite des Spudgers zwischen die Auswurftaste und das optische Laufwerk ein.
-
Hebel die Auswurftaste aus ihren letzten Verankerungen und nimm sie heraus.
-
-
-
Drehe die 6 silbernen 64 mm T10 Torx Schrauben heraus, die die obere Abdeckung am Metallgehäuse halten.
-
-
-
Zieh die silbrige Klebefolie ab, die das optische Laufwerk am Gehäuse festhält.
Looking at mine, I doubt it. It looks like standard foil tape
-
-
-
Hebe das optische Laufwerk leicht nach oben um an das SATA Kabel und das Stromkabel des Laufwerks heranzukommen. Die Kabel befinden sich auf der Rückseite des optischen Laufwerks.
-
-
-
Greife das Stromkabel kurz hinter seinem Stecker und zieh es gerade aus dem optischen Laufwerk heraus.
-
Greife das SATA-Kabel am Stecker und ziehe es gerade aus dem optischen Laufwerk heraus.
I found the power cable to be very tough to get out, at least it is the first time doing this.
-
-
-
Hebe das optische Laufwerk aus dem Metallgehäuse heraus.
Be careful not to lose or break the two teeny metal clips securing the optical drive assembly snugly to the metal casing on either side of the drive's front face. I used a spudger to press in the topmost tines on these clips because they were catching on the drive and bending up. The clips should stay on the metal housing, not come off with the drive.
-
-
-
Drücke die Abdeckung des optischen Laufwerks zur Oberseite des Laufwerks hin und löse gleichzeitig mit dem flachen Ende des Spudgers die beiden Rasten an der Unterseite der Abdeckung.
-
-
-
Entferne die Abdeckung des optischen Laufwerks.
-


Um dein Gerät wieder zusammenzusetzen, folge den Schritten in umgekehrter Reihenfolge.
Um dein Gerät wieder zusammenzusetzen, folge den Schritten in umgekehrter Reihenfolge.
Rückgängig: Ich habe diese Anleitung nicht absolviert.
236 weitere Nutzer:innen haben diese Anleitung absolviert.
Besonderer Dank geht an diese Übersetzer:innen:
100%

Diese Übersetzer:innen helfen uns, die Welt zu reparieren! Wie kann ich mithelfen?
Hier starten ›

24 Kommentare
who knows xbox360 can use desktop drives?We have all kinds of drives,but i am not sure if it is fit for xbox360.
Thanks
That has nothing to do with this guide. If you have any question regarding this equipment, go to the answer section.
Very easy to follow, got my drive fixed...thanks!
" Replacing a defective optical drive with a replacement optical drive does not work. The replacement will have a different DVD drive key, which the game console will not accept."
Not entirely accurate, that statement.
Having fixed a PS3 blu-ray drive by following the excellent guide on here, tried the same technique.
I had a bad drive in my xbox, and I replaced it with a new drive (of the same type). I took the daughter-board from the faulty drive and transplanted it to the good drive. It involved stripping down both drives, disconnecting 2 ribbon cables and unsoldering about 8 wires, transplanting the daughter-board - and resoldering the wires. Then reassembling. It worked for me, anyway.
Sounds like an extremely patience depleting process.
I did this once on one of the newer 360s that are more basic, with help from someone , using scissors.
I am getting the famed red ring of death now...it there any troubleshooting I can do to fix this? I followed all steps and made sure that each wire mirrored the old unit.
you actually can swap the drives out pretty easy. you just rip the key off of the old drive and flash it on the new one. you have to make sure you purchase the same drive model and the use jungle flasher. would they allow an extraction and flashing guide on here? and while you are at it, you can mod them pretty easy as well ;)
Because, You cannot replace the laser without replacing the drive. It is not possible to replace the laser.
No instructions on how to replace the PCB or what kind of drives there are?
So easy a GIRL can do it! Thanks!
This guide is incomplete thus the pictured console wont work upon drive replacement. Please finish the steps for flashing for they are a very required step in replacing the drive at all.
Author just ended the repair when there were more steps needed lol. I have done so many of these repairs and it shouldn’t be in the difficult section. If the PCB is ok, just swap it into a different drive deck you know that works. If your PCB is broken , you will need an X360 USB Pro and 3rd part software to extract the key and flash it and original firmware to the new PCB. I should update this tutorial for it is pretty weak.
What kept you from fulfilling your proclamation?
I realize my 360 is old but I cannot afford to replace it with the one. I replaced the dvd drive and same wont read problem, so I swapped the old board with the new and verified it is the board that is bad, not the drive itself. Now what do I do? Give up and scrap it? How expensive is the fix to replace the board? Are the parts still available? Im not concerned with the technical difficulty.
This guide sucks. He says you cant swap the disc drives without the logic board or it wont work. Then proceeds to swap the drive but doesnt actually show anything about swapping boards too lol
So people will follow this guide and miss a huge key part, thus ending with a nonworking disc drive lol
Crap guide.
It's right there in the header section. It literally says that this guide is ONLY about taking out (and in reverse order putting back in) the optical drive and that, for a new drive to work, it wont work without extra steps. So only very inattentive people will end with a nonworking drive.
But instead of contributing and adding a corresponding guide on how to exchange the logic board in the drive you chose to nag and have a whinge.
Crap comment.
Thank you so much. I was able to fix my Xbox 360
You will have to transfer the daughterboard.
With out googling it I believe there was 3 diff models of DVD drives so make sure u replace it with the same model drive than remove the pcb board from the old one and put it in the new one because there married to the Xbox main board other wise it won't work with the new replacement . MAn I moded ps1s on and remember most of this stuff like it was yesterday. Fun .fun.
WARNING: Just replacing the drive will not make it work correctly. Microsoft has married the drives to the motherboard. Hence, in order to get full operation out of the drive you'll have to perform more steps not listed here. Search in the FAQ on this specific topic for more details. Otherwise, before buying a new drive, try cleaning the inside of the old one and/or replace the belt involved in opening and closing the drive door.
- Good Luck
Eric - Antwort
Thanks..helped!
joseph zulu - Antwort
bress the button and lift with the same hand! i thought mine was stuck because of this pic!!!
Maths with Luigi - Antwort