Einleitung
Wenn der Joystick deines Controllers drittes und du nicht auf Maximaleinstellungen gehen kannst oder der Joystick nicht mehr richtig klickt, dann hilft vielleicht ein Austausch des Potentiometers.
Was du brauchst
-
-
Die seitlichen Abdeckungen können mit einem geeigneten Hebelwerkzeug entfernt werden.
-
-
-
Entferne die fünf Torx Sicherheitschraube (TR8).
all the T8 screws on my controller have a clear filling in them, WTF?!?!?
all my T8 screws have a clear filling in them, WTF?!?!?!
I've never seen that, I can't advise much other than scrapping it out with an xacto knife
My screws have a tiny metal pin in the center. Looks like I need a TR8 bit, not a T8. This might be what you are mistaking for a clear filling.
Thanks it might be TR8 i’ll update the guide
@isbelldl thanks, updated to specify TR9
TORX TR8 worked form the ifixit kit
My anolog stick is lagging on my elite 1 controller. Can I remove a anolog module from a normal xbox 1 controller and then put into the elite 1 controller would it be compatible. I have all the soldering irons and stuff. It's only that I dont have any money and wanted to no if thay would work . Thanks guy appreciate your time kris
-
-
-
Heble die Rückabdeckung in der Nähe der 3,5 mm Buchse auf.
-
-
-
Du kannst den Stecker abziehen, dann geht das Flachbandkabel leichter ab.
-
Das Flachbandkabel.
My connector did not look like this and popping it up broke it
please post a picture of the connector so we can update this, you also might have a newer revision of the motherboard
@joe you can try tape, or even hot glue (easy to remove with rubbing alcohol), that might hold it down. I wasn’t able to find the connector but i’m sure if you count the number of pins and measure it you’d be able to locate a replacement connector on something like mouser.
-
-
-
-
Löte vier Drähte an jeder Seite ab, sie verbinden die Vibrationsmotoren und die RT LT Tasten.
-
-
-
Ziehe die Hauptplatine von oben her hoch.
Hi,
I would like to know if I could get from you a Motherboard . In case you don' t have it, where could I find one?
Thank you
You mean like this one? Xbox One Elite Controller (1698) Motherboard
Hi, I have 2 not working controllers (both 1698 and 1708). The 1708 broke the bumper switch, I manage to fix it but as always, postponed. So, can I either swap Xbox One Elite comtroller (1698) into Xbox One (1708) shell/housing or vice versa??
Or can I mix both motherboard together so I can make one of them working?
It might work…it might damage one of the boards but probably wouldn’t
I don’t work for ifixit, I don’t know if they see comments on a private made guide.
I decided to toss all this stuff in the trash at this point as I am not going to spend +$50 on equipment and replacement parts to fix a $60 controller. But thanks for the educational manual all the same.
-
-
-
Entlöte die vier Lötstellen am linken Joystick.
-
Entlöte die vier Lötstellen am rechten Joystick.
fahrenheit not celcius.
-
-
-
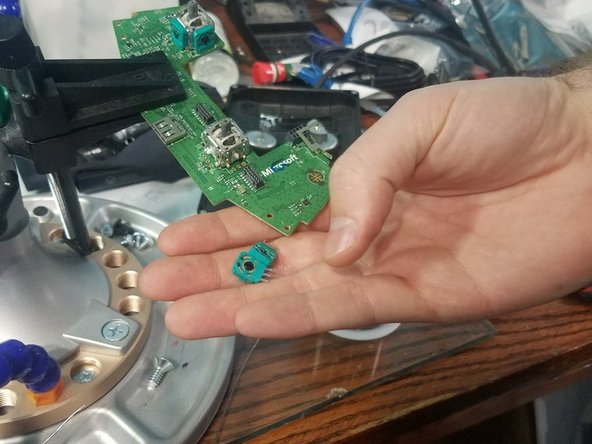
Entlöte den Potentiometer links.
-
Entlöte die sechs Lötstellen des rechten Potentiometers
-
-
-
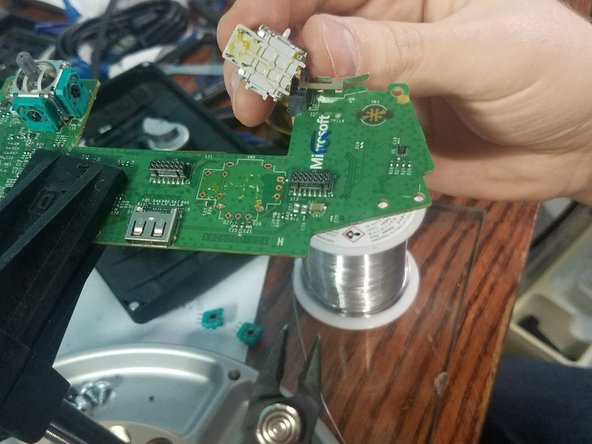
Löte den linken Joystick vom Controller ab.
-
Löte den rechten Joystick vom Controller ab.
Watt? Or is that a typo and it should say 650F again?
Thanks updated guide
-
-
-
Wenn es Probleme beim Ablöten gibt, kannst du zwei Dinge tun:
-
Du kannst die Widerstände mit einem Schraubendreher von der Platine abnehmen, im besser an die Masseanschlüsse heranzukommen.
-
Dann kannst du mit einem Seitenschneider die Kontakte abzwicken. Entlöte dann die Drahtreste vorsichtig.
-


Um dein Gerät wieder zusammenbauen, folge den Schritten in umgekehrter Reihenfolge.
Um dein Gerät wieder zusammenbauen, folge den Schritten in umgekehrter Reihenfolge.
Rückgängig: Ich habe diese Anleitung nicht absolviert.
15 weitere Nutzer:innen haben diese Anleitung absolviert.
Besonderer Dank geht an diese Übersetzer:innen:
100%
Diese Übersetzer:innen helfen uns, die Welt zu reparieren! Wie kann ich mithelfen?
Hier starten ›

35 Kommentare
I’ve replaced a thumbstick sensor on one of these controllers recently, and it doesn’t register movement like the other, original one. It can be described as the entire intended range of movement being compressed down into a very narrow band over the travel of the stick. The deadzone is quite large now, relatively speaking. Can this kind of behavior be attributed to a bad soldering job (all directions are recognized during tests), or is it perhaps just a bad sensor?
Bad solder job is unlikely, i’d assume the new joystick doesn’t have the same specs as the old one.
i cant get the module out. I desoldered the pins but it seems like the module is glued onto the board? Tutorials doesnt show that part
It is just soldered in, hold the soldering iron the the pins and pull gently. If you pull too hard you might damage a solder pad, although it is unlikely.
I have a desolder vacuum gun and I still have the issue you are describing I'll be fixing an elite controller tomorrow so I'll record that and take more pictures to update this.
@easyasabc
Would be great if you could do that :)
Hm after finally being able to replace the module im getting this now. The stick just drift to the right now :/ Do you know what could cause it? https://imgur.com/a/ghac5 im not moving the stick
Yes this is likely from a bad replacement, always buy multiple since they all come from china
It can be a lot of different things that have gone wrong with the potentiometer in charge of that direction of control
So you mean the module was bad? Because i bought two and both of them produced this :/
that’s what constant drift means if you unplug let go of both sticks and replug…that might fix it but i doubt it
Do you know the part number for analog joysticks in the elite controller? There’s so many out variants out there and I don’t want to order crappy ones.
See this is my problem I don’t wanna get the crappy ones too and I don’t know if they even make one for just the Elite controller do they ?
the standard and elite controller share the same potentiometers, so do the xbox 360 controllers if i’m recalling right.
They are all cheap, they don’t put high quality pots in these controllers…the cheapest are normally just not tested as well meaning they might not be perfect out of the box
So is this the fix when you’re joystick gets loose and how do you find the right joystick for the elite controller aren’t they for the original Xbox one controller and isn’t there a difference?
the standard and elite controller share the same potentiometers, so do the xbox 360 controllers if i’m recalling right.
Do you have any video tutorials on the desoldering of an elite controller? Would love to see your method, its been tough for me.
I have this video which is of a normal xbox controller, i have a desolder gun though so it probably won’t be super beneficial.
Is there a site to buy the board pre built?
Not that i’m aware of, there are plenty of people you can ship your board to with what you want done to it though.
my dude, it’s a potentiometer. Not a directional resister. That’s a made up term.
My dude
it says potentiometers everywhere i don’t know why it had directional resistors
My problem is that i tried desoldering but they won’t come of .the pins are so small does anyone have some ideas tho help me or maybe a link to the whole motherboard . Thx
try clipping the pins adding new solder to the joints…and then pulling the pins out with pliers while heating from the other side…these are through hole and might take more heat than you are used to. you might need a 700W soldering iron to remove them…clipping them off at the board will show you specifically which ones you haven’t desoldered though.
Hi ive killed the Solder Pad of the right stick s Potentiometers.
Please can somebody Upload where i have to put wires on witch contacts?
This would be awesome.
That is impressive, did you cut them somehow? You would have to really burn out the controller with the soldering iron to “damage” these with just a soldering iron. This diagram has a lot of the traces but i don’t know if it has the joystick traces http://www.acidmods.com/forum/index.php?...
You should ask around at a maker space or find someone local to show you how to accomplish this. There are also plenty of youtube videos showing how to accomplish this.
Hello,I just replace the left analogue 3D module of my Xbox one controller and I struggled a lot to remove the old one,with the new one up and down are working but left and right aren’t,I don’t know what went wrong,because I replace it a 3rd time because I thought the 3D modules wasn’t working well but the problem remains
The board might be damaged or just the new joystick isn’t installed just right, i couldn’t really tell you without seeing it.
After the exchange, the left stick does not work when it is pressed. What can you do?
Verify the soldering on the 4 smaller pins from the joystick those are what controls the button action of the joystick
Hi there.
With this tutorial I managed to replace the entire Stick with a new one. Yet I experienced some odd behavior. The range of the stick is too big. Meaning with about 50% of physical stick movement I already am reaching full movement in test programms like gamepad tester. This is making the controller super sensitive and practically unplayable... :( Is there any fix? Thanks in advance
Anyone have issues with de-soldering temperature? Trying to get the main stick out, but even at 400c (max temp on my iron) it doesn’t even budge.
Short answer: Unless you have an underpowered iron (>65w is enough); The problem is likely that you aren't using enough flux, or that your soldering tip badly needs to be replaced.
Long answer:
You are likely either not achieving good enough thermal transfer rate from your solder tip to the board (add new solder to the pins before starting to desolder, then add plenty of flux after it has cooled down so you don't just oxidize the new solder when desoldering) or your're not insulating the parts you don't want to heat up properly. Though if you've tried it at 400 degrees celsius the problem is very likely the first one, I seldom have to increase the temp on mine above 325 (I have a good deal of hand-soldering experience though) when desoldering, the one exception being when I need to repair parts that solder to the GND-planes of a PCB (then 350-365).
Best regards /Marc