Einleitung
Willst du mit einer besseren Kühlung aufrüsten? Oder musst du einen defekten Kühlkörper austauschen? Diese Anleitung hilft dir dabei
Wenn du den Kühlkörper von der CPU trennst, wird dadurch die originale Schicht Wärmeleitpaste beeinträchtigt. Du musst die Kontaktflächen reinigen und neue Wärmeleitpaste auftragen. Unsere Anleitung hilft dir dabei.
Was du brauchst
-
-
Um die Xbox zu öffnen musst du diesen Sicherheitsaufkleber auf der Rückseite ablösen oder am Spalt im Gehäuse aufschneiden. Aber keine Sorge - solange du nichts beschädigst, kann Microsoft nicht legal deine Garantie für ungültig erklären . Viel Spass!
-
-
-
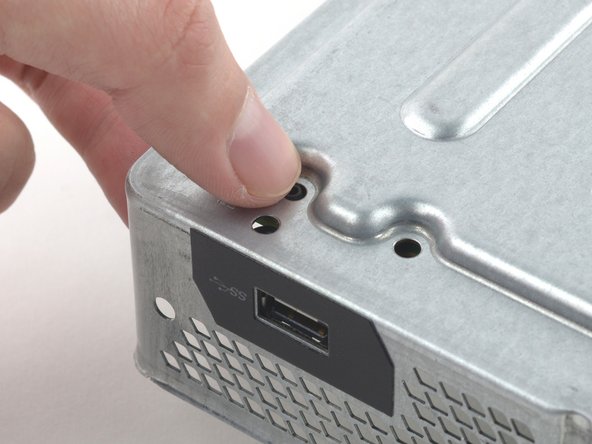
Löse mit einem Öffnungswerkzeug aus Plastik das Kunsstofflüftergitter um die seitliche USB Buchse.
-
Das Gitter ist ziemlich flexibel und mit schwachen Plastikklammern befestigt - beginne an der Rückseitel und löse es allmählich ab.
- 플라스틱 오프닝 도구를 애용해서 측면 usb 포트를 둘러싼 통풍구를 들어올려 분리하세요.
- 이 통풍구는 무척 유연하며 연약한 플라스틱 클립으로 고정되어 있습니다. 뒤쪽에서부터 들어올려 분리하고 떼어냅니다.
-
-
-
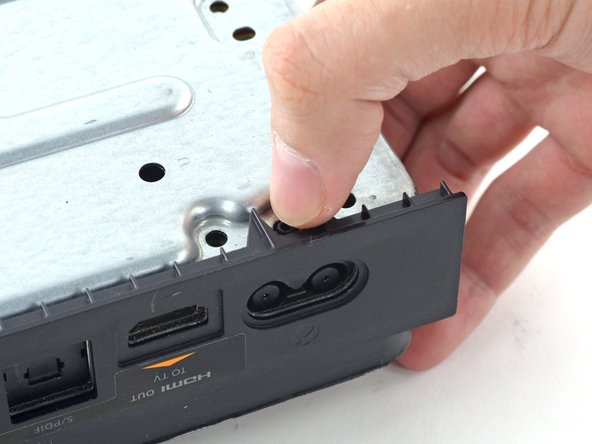
Schiebe das Plastikstück gerade nach hinten und entferne es.
Here is What's Stated in Step-3 : (There is a small plastic tab that reinforces the front corner of the Xbox.) Actually, the "Tab" is NOT SMALL at all. See the Picture: The "TAB" is the Piece that this Person has their Thumb on, is the Tab that you NEED TO SLIDE TOWARDS THE "REAR" of the Unit. You will be able to tell How this Large Tab Holds the Top and the Bottom Case Covers together. Take Note how to Replace this tab back where it Belongs, when you are putting the Case Covers back together. Hope that this comment will help you. 6-29-2017
- xbox의 전면 모서리를 지지하는 작은 플라스틱 탭이 있습니다.
- 뒤쪽으로 똑바로 밀어서 제거하세요.
What is this small tab referred to as?
What is it called i need to order one.
-
-
-
Setze das flache Ende eines Spudgers zwischen dem oberen und unteren Gehäuseteil genau da ein, wo sie sich hinten an der Lüftungsöffnung treffen.
prying does not work. my spudger is causing damage. my soft. plastic. spudger. and the %#*@ thing does not move. this is a common issue with the instructions on this site. you write instructions like you assume people have extensive repair experience. describe the plastic tab. add detail. because simply prying WILL damage the case. hire a %#*@ writer. cause you guys do not know how to precisely convey important detail. constant problem with tech companies actually. no writers.
- 벗겨낸 통풍구쪽부터 상판과 하판 사이의 틈으로 spudger의 평평한 끝을 밀어넣습니다.
- 플라스틱 클립들이 꽤 강하기 때문에 생각보다 강한 힘을 사용해야 합니다.
- 케이스를 완전히 열 때까지 spudger를 계속 끼워두세요. 클립이 강해서 작업도중 다시 닫힐 수도 있습니다.
it would be very very nice that the part, that you sell, will Fix. This an ols Tutorial. The new opening tools that you sell, will not help anything, cause there is no flat sign on the side. you link these tools at this tutorial, but never tested, if the new tools work. so i tell this you, no they dont fit. Thanks for nothing.
I ve made it this far with only a Lego membership card and a flimsier amusement park card (I'm a big year old)
I had to use a 1/32nd flathead screw driver. In the corner to get it started push the top joint of the case down and up will simultaneously pulling up and down to seperate the seam. You will need a 3rd hand to insert the 1/32nd flathead and pry up to get the case started.
I had a virgin never opened xbox day one og so that might be why I had to do it this way.
even the wikihow instructions are better
It’s easier if you push the top empty area part of the plastic with your finger, and stick the spudger about 3/4” (2 cm) away from the back of the xbox and start prying. You have to do this because that is the only spot where there are no clips in the way. If you do any less or more distance, the clips are in the way, and you’ll never be able to pry open the Xbox because the tool can’t get in.
A youtube video I found explains this step better. You are meant to pull up on one half and push down on the other, this separates the two halves. Then use a spudger on the rear of the console to separate the clip right under the warranty sticker, then move down the back of the console to the other clips
-
-
-
Setze ein Öffnungswerkzeug aus Plastik zwischen das obere und untere Gehäuse, um die Klammer über der hinteren Lüftungsöffnung zu lösen.
- 상판과 하판 사이에 끼인 후면 단자판은 여러개의 클립으로 고정되어 있습니다.
- 플라스틱 오프닝 도구로 후면 통풍구의 클립들을 분리하세요.
-
-
-
Fahre weiter ringsum die Rückseite der Xbox fort, um die Klammern zu öffnen.
- 후면을 따라서 계속 클립을 들어서 분리하세요.
- spudger가 제대로 꽂혀 있는지 중간중간 확인하세요. spudger가 빠질정도로 케이스가 분리 되더라도 남은 클립들이 매우 탄력적이라서 방심하면 도로 닫히기 십상입니다. 원활한 진행을 위해 spudger가 잘 꽂혀서 사이를 벌리도록 유지하세요.
-
-
-
Fahre fort Klammern zu öffnen. Dabei ist es hilfreich mit dem Öffnungswerkzeug aus Plastik direkt über die Klammern zu fahren.
- 클립들을 계속해서 분리합니다. 클립들을 가로질러 플라스틱 오프닝 도구를 주욱 미는 것이 도움이 될수도 있습니다.
- 후방 케이스를 따라 분리하면 상판이 열릴 기미가 보여야 합니다. 만약 열릴 기미가 보이지 않는다면 모서리부터 플라스틱 오프닝 도구로 분리를 시작하고 usb포트가 없는 쪽을 따라서 클립 분리를 다시 시도하세요.
-
-
-
Beginne mit dem Spudger, der noch in der Lücke steckt. Hebel das obere Gehäuseteil hoch, um die letzten Klammern zu lösen.
-
Hebe das obere Gehäuseteil leicht an und schiebe es ein bisschen weg um an das vordere Bedienteil zu kommen.
I got confused here. I couldn’t unclip the front panel at all. I found out that if I open the case like a clamshell (or a book, with the front being the spine of the book) I popped right off easily.
Yeah, I saw your comment afterwards but this is exactly what I ended up doing as well. just a note for anyone reading this be careful of the flex cable as it does seem to put a questionable amount of strain on it when you open it in this manner.
-
-
-
Über dem Verbinder ist ein blauer Plastikbügel. Hebe ihn mit einer Pinzette über den weißen Verbinder.
-
Nimm die Spitze eines Spudgers um die Lasche, die den Verbinder festhält zum Kabel hin zu schieben und damit zu entriegeln.
Or anyone else who has this problem or reads this on this thread, which is not the correct thread for this question by the way, here is a link to the forum for that. It could be any of a number of issues including overheating, Portland elation, or infestation, among others.
Is there somewhere that I can buy a replacement zif connector
-
-
-
Mit einer Pinzette kannst du das Kabel nun vorsichtig aus der Buchse ziehen.
-
Entferne das obere Gehäuseteil.
-
-
-
Benutze das flache Ende des Spudgers, um die Klammern zu lösen, die das Front Panel an der oberen Gehäusehälfte festhalten.
-
Entferne die vordere Verkleidung vom oberen Gehäuseteil.
-
-
-
Setze das Oberteil wieder auf.
-
Bringe die Klammern in Position und drücke sie fest, um sie ringsum wieder zum Einschnappen zu bringen.
-
-
-
Halte das Front Panel nahe der Vorderseite der Xbox fest.
-
Mit einer Pinzette kannst du nun das Kabel des vorderen Knopfes wieder in den ZIF Anschluss einsetzen.
-
Mit der flachen Seite eines Spudgers sicherst du den ZIF Stecker indem du den Bügel wieder nach links drückst.
My Xbox stopped working after this thanks
Mine did as well, its possible it may be the same reason. For me I had to unplug and plug it back in a few times and then clean off the contacts with isopropyl alcohol. Seems simple but if you haven’t already, I would try it.
-
-
-
-
Bringe das Front Panel in einen Winkel von 45 Grad und verzahne seine Haken mit denen des unteren Gehäuseteils.
-
Drücke die Oberseite des Front Panels in die XBox hinein, so wie man einen Briefkastendeckel schließt. Drücke fest so dass die Klammern, die das Front Panel mit dem oberen Gehäuseteil verbinden, sicher einrasten.
-
-
-
Ziehe vorsichtig den Verbinder des Lautsprecherkabels ab, um es vom von der Frontplatine zu trennen.
-
Mit dem flachen Ende des Spudgers kannst du das Antennenkabel von der Platine trennen.
If this connector is broken off, will that prevent the control panel to not work at all and NOT turn on? Is there a fix or work around IF this connector is broken off?
-
-
-
Entferne die beiden 9,5 mm Torx T9 Schrauben von der WiFi-Platine.
-
Ziehe die WiFi-Platine gerade aus ihrem Anschluss auf dem oberen Metallgehäuse.
-
Lasse das WiFi Kabel an seinem Platz und schiebe die WiFi Platine zur Seite. Unter ihr wird eine Schraube mit der Kennzeichnung "C3" sichtbar.
When reassembling- put the outer ones on first to secure the port to the metal. Then putting the wi-fi board into the port will be easy
The T9 fit but was a tad big, for me the T8 worked fine
Where can i get a T9
-
-
-
Entferne die acht 65 mm Torx T10 Schrauben auf der Oberseite des oberen Metallgehäuseteils.
-
-
-
Hebe das obere Metallgehäuseteil an - aber entferne es noch nicht ganz.
-
-
-
Löse das WiFi-Verbindungskabel von der Hauptplatine.
-
-
-
Löse die SATA Festplattenkabel von der Hauptplatine.
I found that it is not necessary to take out the hard drive in order to remove the front panel module. If you can lift the whole metal enclosure a little to get to the right most torx screw, then you do not need to move the hard drive.
Thanks for letting us know about when the open day is going to be. Will make sure get my work completed by rushmyessay before the day so I can attend it in peace.
-
-
-
Löse die SATA Datenkabel und Versorgungskabel von der Hauptplatine.
I their a way to replace the motherboard pins the piece that connects to the hard drive, part on the motherboard that connects to HD
-
-
-
Hebe die Einheit der Hauptplatine aus dem unteren Gehäuse heraus.
-
-
-
Entferne die drei 9,5 mm Torx T9 Schrauben, welche die Frontpanel-Platine befestigen.
-
-
-
Drücke die Haken zusammen und ziehe sie durch den Rahmen, um die Schraubenstützen herauszuholen.
-
-
-
Entferne die 8,3 mm Torx T9 Schraube, welche die weiße Kunstoffschraubenstütze am unteren Metallgehäuse befestigt.
-
Entferne die weiße Schraubenstütze vom Rahmen.
-
-
-
Entferne folgende Torx Schrauben von der Unterseite des unteren Rahmens:
-
Vier 11,2 mm T10 Schrauben
-
Vier 9,5 mm T9 Schrauben
-
-
-
Hebe die ganze Einheit aus Hauptplatine und Lüfter/Kühlkörper aus dem unteren Metallgehäuse heraus.
-
-
-
Setze die Klinge eines kleinen Flachschraubendrehers zwischen Haltestift und der äußeren Kante eines Arms der X-förmigen Halteklammer.
-
Verdrehe vorsichtig den Flachschraubendreher und hebe so die X-förmige Klammer hoch und aus dem Stift heraus.
-
-
-
Benutze die gleiche Technik, um einen weitern Arm der X-förmigen Klammer zu lösen.
-
Entferne die X-förmige Klammer.
-
-
-
Hebele die beiden Klammern an einer Seite mit einem Plastiköffnungswerkzeug aus der Nut in der Seite des Kühlkörpers.
-


Um dein Gerät wieder zusammenzusetzen, folge den Schritten in umgekehrter Reihenfolge. Vergiss nicht, mit Hilfe unserer
[Anleitung neue Wärmeleitpaste aufzutragen.
Um dein Gerät wieder zusammenzusetzen, folge den Schritten in umgekehrter Reihenfolge. Vergiss nicht, mit Hilfe unserer
[Anleitung neue Wärmeleitpaste aufzutragen.
Rückgängig: Ich habe diese Anleitung nicht absolviert.
40 weitere Nutzer:innen haben diese Anleitung absolviert.
Besonderer Dank geht an diese Übersetzer:innen:
100%

Diese Übersetzer:innen helfen uns, die Welt zu reparieren! Wie kann ich mithelfen?
Hier starten ›

5 Kommentare
Can you by chance get the measurements for the heatsink such as the mounting points and height of the heatsink?
Hi.I've just wondering can i put a liquid metal thermal paste i think the radiator has to be copper and that's all , pluses of the procedure that liquid metal thermal paste doesn't age, and the xbox will need only fan cleaning
Pry on the sides in a x formation, and when you get it on the post, just push down till you see it click in to the groove on the heatsink post
Disassembled removed dust with a brush, replaced the thermal paste and reassembled in 50 minutes. Feeling like a pro lmao.
In the United States the Magnuson-Moss Warranty Act of 1975 is a Federal Law that states that stickers and clauses are illegal. It says you can open your electronics without voiding the warranty, regardless of what language of that warranty says.
Dustin D'Amour - Antwort
Stickers are illegal!?
Brandon -
For anyone concerned, if you apply heat with a blow dryer or heat gun you can carefully remove the sticker without damaging it, making it impossible to know that the sticker was ever removed.
Kelton Stewart - Antwort
All the immature comments aside, thank you Dustin for sharing the information.
Wade - Antwort
xbox를 열기 위해서 이러한 위조방지 테이프를 자르거나 떼어내야 합니다. 하지만 걱정 마세요. 여러분이 무언가 직접적으로 망가트리지 않는한 ms는 보증을 취소하지 않습니다.
승대/SeungDae 정/Jeong - Antwort