Diese Version enthält möglicherweise inkorrekte Änderungen. Wechsle zur letzten geprüften Version.
Was du brauchst
-
Dieser Schritt ist noch nicht übersetzt. Hilf mit, ihn zu übersetzen!
-
Position the iFixit Opening Tool's riveted edge in between the top and bottom cover of the plastic enclosure.
-
Apply downward pressure on the iFixit Opening Tool until the security clip unlocks.
-
Repeat on different points of the plastic enclosure until the bottom cover is removed.
-
-
Dieser Schritt ist noch nicht übersetzt. Hilf mit, ihn zu übersetzen!
-
Remove the six 50 mm green screws (labeled F1-F6) from the metal chassis using a Torx 10 screwdriver.
-
-
Dieser Schritt ist noch nicht übersetzt. Hilf mit, ihn zu übersetzen!
-
Apply pressure to peel off the sides of the casing.
-
Separate the metal chassis from the top cover, lifting the back of the chassis up and away from the top cover.
-
-
Dieser Schritt ist noch nicht übersetzt. Hilf mit, ihn zu übersetzen!
-
Flip the metal enclosure so that the fan cover is on top.
-
-
Dieser Schritt ist noch nicht übersetzt. Hilf mit, ihn zu übersetzen!
-
Remove the two 15mm screws from the front panel using the Torx T8 screwdriver.
-
-
Dieser Schritt ist noch nicht übersetzt. Hilf mit, ihn zu übersetzen!
-
Carefully slide the top metal case off the frame.
-
-
-
Dieser Schritt ist noch nicht übersetzt. Hilf mit, ihn zu übersetzen!
-
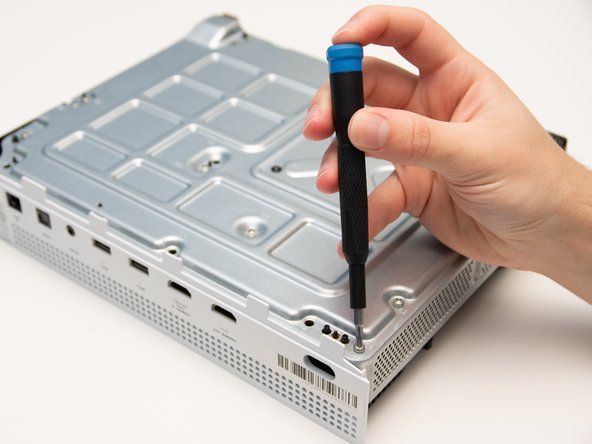
Remove the three 15 mm screws with the Torx T8 Security Bit Screwdriver.
-
-
Dieser Schritt ist noch nicht übersetzt. Hilf mit, ihn zu übersetzen!
-
Carefully remove the WiFi Card from the metal chassis.
-
-
Dieser Schritt ist noch nicht übersetzt. Hilf mit, ihn zu übersetzen!
-
Remove the four 15mm screws attaching the IR Blaster to the metal chassis with the Torx T8 Security screwdriver.
-
-
Dieser Schritt ist noch nicht übersetzt. Hilf mit, ihn zu übersetzen!
-
Carefully remove the IR Blaster from the metal chassis.
-
-
Dieser Schritt ist noch nicht übersetzt. Hilf mit, ihn zu übersetzen!
-
Remove the eight 10mm screws from the bottom of the metal casing using the Torx T9 screwdriver.
-
Remove the four 15mm screws from the bottom of the heatsink fastener using the Torx T8 screwdriver.
-
-
Dieser Schritt ist noch nicht übersetzt. Hilf mit, ihn zu übersetzen!
-
Remove the two plastic pieces from the motherboard.
-
-
Dieser Schritt ist noch nicht übersetzt. Hilf mit, ihn zu übersetzen!
-
Lift the motherboard up from the metal chassis.
-
-
Dieser Schritt ist noch nicht übersetzt. Hilf mit, ihn zu übersetzen!
-
Gently lift the hard drive to free up some space around the power supply.
-
-
Dieser Schritt ist noch nicht übersetzt. Hilf mit, ihn zu übersetzen!
-
Lift the power supply up and away from the motherboard.
-
-
Dieser Schritt ist noch nicht übersetzt. Hilf mit, ihn zu übersetzen!
-
Disconnect the six pin connector from the motherboard.
-


Rückgängig: Ich habe diese Anleitung nicht absolviert.
4 weitere Nutzer:innen haben diese Anleitung absolviert.

Team

Cal Poly, Team S12-G6, Regan Fall 2019 Mitglied von Cal Poly, Team S12-G6, Regan Fall 2019
CPSU-REGAN-F19S12G6
4 Mitglieder
26 Anleitungen geschrieben
3 Kommentare
I replaced the power supply and my Xbox still isn't turning on. I used a power supply I got from this website. Please help
Another issue could be the power button on the front power board. If possible, you could try to replace that as well.