Einleitung
This guide will show you how to remove and replace the optical disc drive on the Xbox One S. This procedure is necessary if your gaming system will not read any gaming disks or movies. The tools necessary are a screwdriver (i.e. a Torx Security Screwdriver) and any slim pry tool. This process requires gentle hands and patience, as it can take more than a few minutes. Light soldering may be required when dealing with the drive’s wires.
Was du brauchst
-
-
Begin by working at the case on the rear where the warranty sticker is located. Insert the plastic opening tool into the gap between the bottom of the case and the grated top side. Then find the clips in between that hold the case in place. Use the opening tool to pop the clips out. The best method is to pry the black case away from the bottom.
-
Use the opening tool to pop the clips out. The best method is to pry the black case away from the bottom.
-
-
-
Use a T10 Torx screwdriver to remove the six green 50 mm long screws from the metal case labeled F1 through F6.
-
-
-
Gently separate the interior case from the white exterior case using the appropriate method.
-
Pry the white plastic sides outwards at the rear to separate from the plastic I/O shield
-
-
-
-
To access the hardware within the casing, you can pop and lift the top panel of the casing. It should come right off.
-
-
-
To replace the hard drive, flip over the console and remove the two 10 mm T-10 Torx screws, C3 and C5, from the backside of the Xbox One S.
-
-
-
Gently disconnect the hard drive from the motherboard (at the two plastic connector bodies).
-
-
-
To remove the optical disc drive, remove the silver 10 mm T-10 Torx screw labeled "C4."
-
-
-
Pull the disc drive slightly off the motherboard and disconnect the plastic connectors from the motherboard.
-
-
-
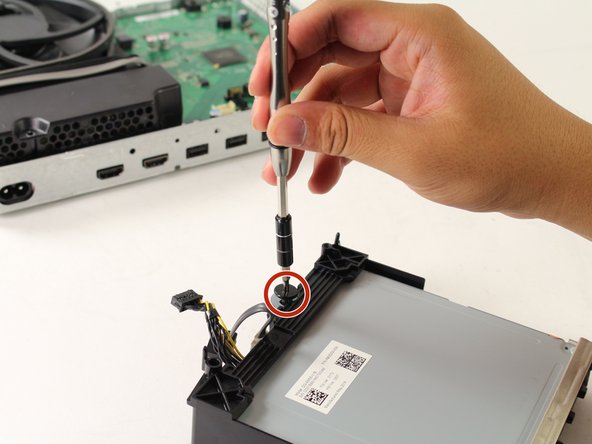
Remove the black, flat Torx screw from the bottom of the optical drive.
-


To reassemble your device, follow these instructions in reverse order.
To reassemble your device, follow these instructions in reverse order.
Rückgängig: Ich habe diese Anleitung nicht absolviert.
27 weitere Nutzer:innen haben diese Anleitung absolviert.
Team

Cal Poly, Team S22-G3, Livingston Spring 2017 Mitglied von Cal Poly, Team S22-G3, Livingston Spring 2017
CPSU-LIVINGSTON-S17S22G3
4 Mitglieder
56 Anleitungen geschrieben
8 Kommentare
Why do you have to replace the motherboard when replacing the optical disc drive?
because Microsoft puts a security code on the motherboard to pair the drive with the motherboard. so if they don’t match, all it will do is read DVDs and not play any games. Depending on the drive, sometimes you have to Unsolder and resolder the wires going to the motherboard. Other times, it can just be a series of clips for 2 cables and a plug.
If you learned basic soldering in High School, it isn’t too hard to solder.
Lawrence -
Helped me get to the optical drive in order to disassemble it and remove a coin that was blocking the motor (gotta love toddlers). Thanks!
Is this what is to be done if the laser unit seems to be faulty?