Zum Hauptinhalt wechseln

Xbox One Wireless Controller Vibrationsmotoren Austausch

Was du brauchst

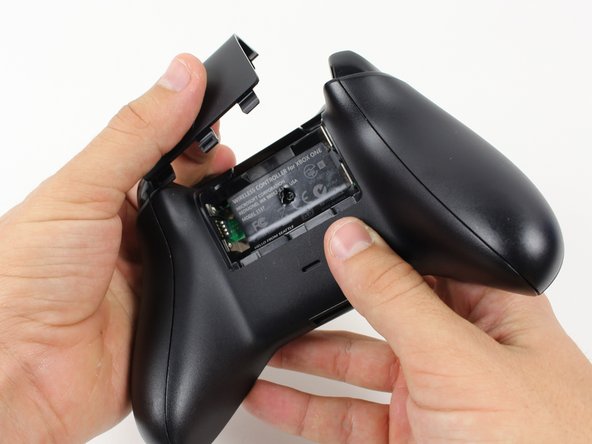
  1. Xbox One Wireless Controller Vibrationsmotoren Austausch, Akku: Schritt 1, Bild 1 von 1
    • Entferne den Akkudeckel

    • Entnimm den Akku

  2. Xbox One Wireless Controller Vibrationsmotoren Austausch, Seitenteile: Schritt 2, Bild 1 von 2 Xbox One Wireless Controller Vibrationsmotoren Austausch, Seitenteile: Schritt 2, Bild 2 von 2
    • Im Foto ist ein Metallspudger zu sehen. Wir empfehlen einen Spudger aus Plastik.

    • Nimm den Controller fest in die Hand um die Seitenteile abzunehmen. Heble mit einem Spudger in die Naht zwischen Front- und Seitenteil.

    • Ziehe das Seitenteil ab indem du den Spudger vor und zurück bewegst. Das musst du entlang der ganzen Naht durchführen.

    Start prying the side plate off underneath the trigger, this makes it easier to disconnect the other clips connecting the side plate to the backplate.

    Brandon - Antwort

    One you take it off, is it possible to click it back in?

    Aiden Bear - Antwort

    As long as you don’t exceed the couple tons you need to take it off you should be able to put it back.

    Brandon -

    I don’t have a squdger

    TimidFerret4982 Gaming - Antwort

    getting those handles back on seems impossible, they just dont fit as well, a gap remains even after snapping into place.

    Dont think ill be doing this in the future

    Spoutin Wyze - Antwort

    edit: wiggled the bo9ttom middlewith the handles off and somethign finally “clicked” into place for that extra 1/4 mm for the down arrow on my D-Pad to click back up into place!.

    Spoutin Wyze - Antwort

  3. Xbox One Wireless Controller Vibrationsmotoren Austausch, Schrauben: Schritt 3, Bild 1 von 2 Xbox One Wireless Controller Vibrationsmotoren Austausch, Schrauben: Schritt 3, Bild 2 von 2
    • Hinter einem Aufkleber in der Mitte des Controllers ist eine Schraube verborgen.

    • Mit einem Schraubendreher kannst du ein Loch direkt in die Mitte des Aufklebers stoßen.

    • Wenn du den Aufkleber nicht verletzen willst kannst du ihn auch vorsichtig anheben.

    • Entferne die fünf 10 mm Torx TR8 Sicherheitsschrauben auf der Rückseite.

    i damaged my screws. how do i get the screws out?

    tenzin - Antwort

    wait. i just watched a video guide on ifixit's youtube channel about damaged screws. i'll try those methods.

    tenzin - Antwort

    It's a t8 or t9 security bit btw, I got the top two out with a regular T8, but the bottom two and middle needed a T9 Security bit.

    David Loper - Antwort

    All five faceplate/backplate screws in the controller I disassembled were T8 security fasteners.

    John Dziedzic - Antwort

    Am I doing something wrong because I got the tool it said I needed and got the middle screw out but the others have a bump or something in the center of the screw and it won't fit.

    kolton77 - Antwort

    The T8 is only good for the middle screw on my One S controller. The others require something bigger

    Matej Skelo - Antwort

    These requires SECURITY Torx bits (they have a cannulated hole in the driver). I don't believe the iFixIt branded driver is cannulated but you can buy a set of bits from DeWalt DWAX200 which is overkill but has what you need.

    jhighsmith - Antwort

    The driver that iFixIt sells is cannulated.

    jhighsmith -

    where do you get this dumb ass screw driver

    Jake Zweier - Antwort

    iFixit Store #IF145-027-3

    VauWeh - Antwort

    You can bypass it with a 1.5mm flathead.

    Marianne Sandling - Antwort

    thank you for this. worked for me

    Mr Anderson (Evolluisionist) -

    These screws required a T10, not T8.

    Armand - Antwort

    TR9. A $10 kit from Walmart has the bit/driver in it and extra goodies to make life simple.

    Matt Martin - Antwort

    As weird as it sounds, the top 2 came out for me with a flathead- but the bottom two and the middle one wont

    macybrooksevans - Antwort

    If you damage the middle part of the screws you can still take it out with the same screwdriver.

    Kev God - Antwort

    Thank-You :)

    Isaiah - Antwort

    needed a T8H, not easy to see.

    on a grey green xbox one controller

    Michael - Antwort

    On my 1708 controller there are two internal screws near the rumble motors that need to be removed with a T6 non security bit to remove the back cover.

    teeedubb - Antwort

  4. Xbox One Wireless Controller Vibrationsmotoren Austausch, Rückseite: Schritt 4, Bild 1 von 1
    • Nimm die Rückseite ab.

  5. Xbox One Wireless Controller Vibrationsmotoren Austausch, Frontplatte: Schritt 5, Bild 1 von 1
    • Entferne die Frontplatte.

  6. Xbox One Wireless Controller Vibrationsmotoren Austausch, Oberes Motherboard: Schritt 6, Bild 1 von 2 Xbox One Wireless Controller Vibrationsmotoren Austausch, Oberes Motherboard: Schritt 6, Bild 2 von 2
    • Du kannst die Vibrationsmotoren frei aus ihren Sockeln hängen lassen.

    • Entlöte die Lötstellen, während du die roten und schwarzen Drähte auf der oberen Hauptplatine hälst.

    • Entlöte die schwarzen und grauen Kabel, die am oberen Motherboard befestigt sind.

    • Entferne die Vibrationsmotoren und lege sie beiseite.

    • Sei bei der Verwendung des Lötkolbens vorsichtig, damit du andere Komponenten nicht zu beschädigst oder dich selbst verletzt.

    • Informationen zum Löten findest du hier.

    Steps 6-8 aren't completely necessary, and are very risky if you aren't good at soldering. It would seem the only reason to remove the motherboard and mess with all this soldering is just so you can reach both screws on the trigger in step 10. However, you can reach them already with a small-bodied screwdriver. Although you might have to rest the screwdriver on the black square processor to reach the bottom screw, it shouldn't damage the processor or motherboard to jimmy that screw out.

    Robert Rapier - Antwort

    like mentioned by ‘Robert Rapier’ you can skip the de-soldering in most cases,

    for example cleaning or changing the buttons is doable, but the grey and black wires are pretty short

    and wired through the inner case so it can get a bit fiddly and you have to be careful not to damage them in the process.

    If you have a soldering station around i would still recommend using it.

    yKekS Yzz - Antwort

    Thanks to above commenters. Can confirm I was able to do a button repair without soldering. Thank you all!

    Matt Hunt - Antwort

    If you peal back the Kapton tape mounting the grey/black wires there is enough play to maneuver all the boards for cleaning most of the buttons from a soda spill. Cleaning the dimple buttons on the mother board by immersion requires the de-solder...

    agzero - Antwort

  7. Xbox One Wireless Controller Vibrationsmotoren Austausch: Schritt 7, Bild 1 von 1
    • Löse die beiden 7mm T6-Schrauben in der Nähe der Vibrationsmotoranschlüsse.

    Are these just T6 screws or Torx security T6 that is cannulated?

    Kenan Vickstrom - Antwort

    The outer screws are security screws. The ones on the system boards are Torx.

    Rongwey -

  8. Xbox One Wireless Controller Vibrationsmotoren Austausch: Schritt 8, Bild 1 von 1
    • Fasse die Seiten des Motherboards fest in der Mitte.

    • Hebe das Motherboard nach oben, während du es leicht vorwärts und rückwärts wackelst.

    • Das Anheben des Motherboards erfordert etwas Kraft.

    Hola, como se instala el software a la nueva placa base ?

    MANSONN755 - Antwort

  9. Xbox One Wireless Controller Vibrationsmotoren Austausch, Vibrationsmotoren: Schritt 9, Bild 1 von 1
    • Entferne das gelbe Klebeband welches die Kabel vorne im Kontroller festhält.

  10. Xbox One Wireless Controller Vibrationsmotoren Austausch: Schritt 10, Bild 1 von 3 Xbox One Wireless Controller Vibrationsmotoren Austausch: Schritt 10, Bild 2 von 3 Xbox One Wireless Controller Vibrationsmotoren Austausch: Schritt 10, Bild 3 von 3
    • Auf der Unterseite der Drücker sind zwei 7mm T6 Torx Schrauben. Drehe sie heraus.

  11. Xbox One Wireless Controller Vibrationsmotoren Austausch: Schritt 11, Bild 1 von 1
    • Entferne die Abdeckungen der Drücker.

  12. Xbox One Wireless Controller Vibrationsmotoren Austausch: Schritt 12, Bild 1 von 1
    • Löte die Drähte von der Platine ab.

    • Entferne die Vibrationsmotoren samt Kabeln aus ihren Befestigungen.

    Perso après le remontage ça n'a jamais refonctionné ma manette détecte plus du tout les gachettes et jai changé les joysticks en même temps et eux non plus ne detecte plus….

    Tuto Free - Antwort

Abschluss

Um dein Gerät wieder zusammen zu setzen folge den Schritten in umgekehrter Reihenfolge.

19 weitere Nutzer:innen haben diese Anleitung absolviert.

Besonderer Dank geht an diese Übersetzer:innen:

en de

100%

VauWeh hilft uns, die Welt in Ordnung zu bringen! Wie kann ich mithelfen?
Hier starten ›

Tommy

Mitglied seit: 01/22/15

1.909 Reputation

2 Anleitungen geschrieben

Team

Cal Poly, Team 20-15, Maness Winter 2015 Mitglied von Cal Poly, Team 20-15, Maness Winter 2015

CPSU-MANESS-W15S20G15

5 Mitglieder

50 Anleitungen geschrieben

10 Kommentare

After a drop onto tile flooring, the side clip of the outer handle snapped and got lodged into the trigger, causing it to only pull to 80% and go no further. Thanks for this breakdown.

solofrom303 - Antwort

My right trigger won't work on gta 5 and on other games it works

Devean Velasquez - Antwort

Very strange, Devean. That sounds more like a software problem than a hardware problem, if I had to guess. If you haven't already, maybe check to make sure that your control setup is correct.

Alternatively, see if you can find any other games that your RT doesn't work for, and see what they have in common with GTA - it might be that the trigger isn't registering as fully depressed, or only ever registering when fully depressed.

Liam Gow -

Trying to replace bumpers assembly and green sync button fell out can not figure how to put it back in.

Anthony Bembenek - Antwort

Do you know how to remove the plastic plate where the trigger rumble sits?

Angel Marban - Antwort

Could you not just pull the wires?

Spencer Alty - Antwort

How do you place the wires back onto the trigger rumble?

Timmy Sparkles - Antwort

Where would one buy the replacement trigger motors?

Jared Thicc - Antwort

Both wires fell out of one of the motors. How would I be able to fix this?

Abler e - Antwort

can this guide be reworked to add rumble feature to the powera fusion controller for nintendo switch?
Xavier Beck - Antwort

Kommentar hinzufügen

Seitenaufrufe:

Letzte 24 Stunden: 5

Letzte 7 Tage: 53

Letzte 30 Tage: 209

Insgesamt: 60,047