Einleitung
Diese Anleitung zeigt dir, wie du das äußere Kunststoffgehäuse der Xbox One X austauschen kannst, entweder, weil du das Gehäuse selbst auswechseln, oder weil du innere Bauteile reparieren willst. Sorge vor Reparaturbeginn dafür, dass alle nötigen Werkzeuge und ausreichend Arbeitsfläche vorhanden sind. Sei dir bewusst, dass du eine eventuell vorhandene Garantie verlierst, wenn du die Xbox öffnest, ließ also vorher lieber nochmals die Garantiebedingungen durch.
Was du brauchst
-
-
Entferne die 13 mm Torx T9 Schraube links unterhalb der Netzbuchse.
-
-
-
Entferne mit einer Pinzette die Schraubenabdeckung an der gegenüberliegenden Seite des Gehäuses.
-
Entferne die darunterliegende 13 mm Torx T9 Schraube.
-
-
-
Drehe das Gehäuse so, dass die Vorderseite (mit der Einschalttaste) zu dir zeigt.
-
Schiebe den Deckel zu dir hin und hebe ihn vom Gehäuse ab.
Bitte auch diesen Schritt überarbeiten. Es wird lediglich das Gehäuse für ca 2-4 Zentimeter nach hinten verschoben, dann sollte bereits das erste Hinterniss kommen, welches man ohne Gewalt nicht bewältigen kann. Hier muss das Gehäuse auf der Rechten Seite angehoben werden, dann lässt sich das Gehäuse ohne Probleme entfernen. Auch beim Zusammenbauen. Erst auf der Linkenseite bis zum ersten Plastik Haken (ca 2-4 Zentimeter vom Ende entfern) anlegen, danach auf der Rechten seite einklicken. Das Gehäuse kann auf der Rechten Seite auch etwas gedehnt werden, dabei geht nichts kaputt.
Please also revise this step. It is only the case for about 2-4 centimeters moved backwards, then should already come the first butt that you can not cope without violence. Here, the housing must be raised on the right side, then the housing can be removed without problems. Also when assembling. First put on the left side until the first plastic hook (about 2-4 centimeters from the end), then click on the right side. The case can also be slightly stretched on the right side, nothing breaks.
-
-
-
-
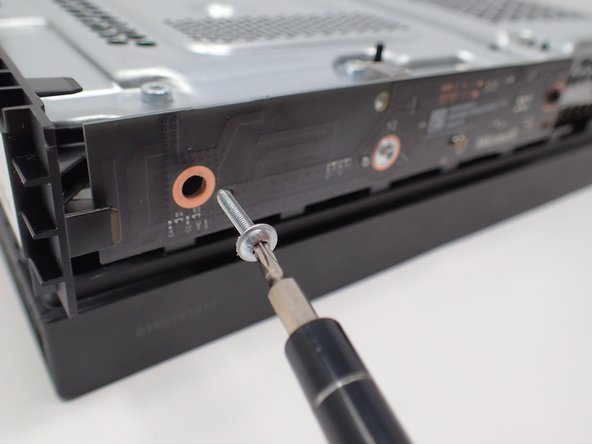
Entferne die beiden silberfarbenen 15 mm Torx T9 Schrauben, mit denen die Platine an der Seite des Metallgehäuses befestigt ist.
-
Entferne die schwarze 9 mm Torx T9 Schraube weiter rechts an der Platine.
I feel like someone wanted to use a T9 for everything, but these were T8.
You can use a T8 or T9 for this step. I was able to get all three screws with a T9 but there’s so little difference that both will work.
-
-
-
Ziehe die Oberkante des weißen Clips nach unten und entferne den weißen Stecker mit einer Pinzette.
Unfortunately the manual is not correct here. Above the black slot is a white switch / pen, fold it over with your fingernail, so fold it over to the front. Then the cable can be easily removed without any problems and tweezers. GERMAN: Hier ist die Anleitung leider nicht korrekt. Oberhalb des schwarzen Steckplatzes befindet sich ein weißer Schalter/Stift, diesen mit dem Fingernagel umklappen, also praktisch zu der Vorderseite umklappen. Danach lässt sich das Kabel ohne Probleme und Pinzette einfach abziehen.
Thanks for telling me that
NR26 -
Thank you. Had no idea what the !&&* this guy was talking about with the “pull down" part. You flip it downward gently like a flap.
It is not necessary to remove the white flat cable. After removing the three gold screws from the board, go to the next steps and in step 9 remove the cover while hold the board against the cover to prevent stress on the white cable.
@Whole Witt, I second this. When you get to step 9 to remove the cover, just carefully remove the board, then remove the cover along with the board. You can leave the board in the cover.
-
-
-
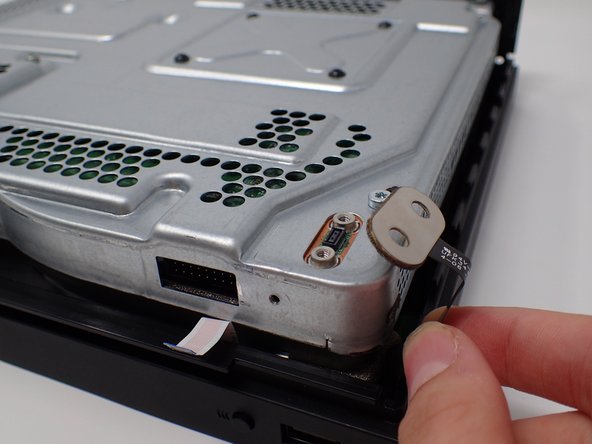
In der oberen Ecke, direkt über dem weißen Stecker, befindet sich eine von zwei Schrauben befestigte ovale Platte.
-
Entferne die beiden 7 mm Torx T9 Schrauben.
-
Ziehe die ovale Platte zur Seite.
These are actually T8. Be careful trying to use a T9.
what is the name of this strip it tore on mine how do I get it replaced?
-
-
-
Entferne die sechs 47 mm Torx T9 Schrauben, mit denen der Boden am äußeren Gehäuse befestigt ist.
These are all T10 on my Scorpio.
These are T10 on the Xbox One X MFR Date 22-OCT-2017. You could get away with T9 and would be careful.
My manufacture date is 15-JUN-18 and is not a Scorpio and is still T10. I would not recommend using a T9.
They are t-10 and t-8
-
-
-
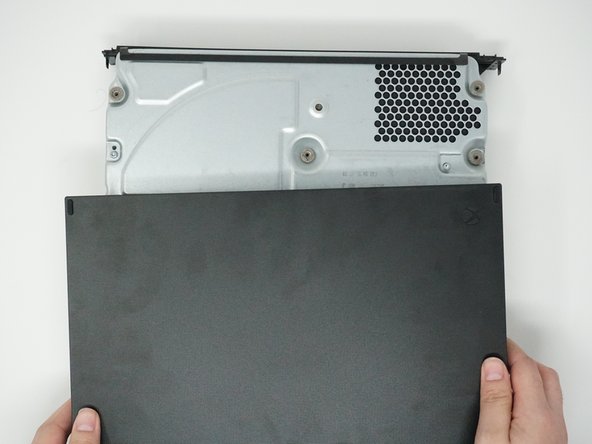
Lege die Xbox mit der Unterseite nach oben.
-
Ziehe den Boden des Gehäuses hoch zu dir hin und hebe ihn ab.
I had to slide it forward off of the disc drive a little bit before I could lift up.
When putting this cover back on, lay it flat and slide the case into it, slightly angling the front down so the plastic lugs on the BD-ROM fascia board slide into the slots in the cover You’ll have to push to the left slightly (with the cover flat side down and the front facing you) so as to depress the clip on the left-front side of the cover. You can check that the cover is on correctly by looking at the back of the cover and case and ensuring the screw holes on the cover line up with the case bezel.
-


Um dein Gerät wieder zusammenbauen, folge den Schritten in umgekehrter Reihenfolge.
Um dein Gerät wieder zusammenbauen, folge den Schritten in umgekehrter Reihenfolge.
Rückgängig: Ich habe diese Anleitung nicht absolviert.
7 weitere Nutzer:innen haben diese Anleitung absolviert.
Besonderer Dank geht an diese Übersetzer:innen:
100%
VauWeh hilft uns, die Welt in Ordnung zu bringen! Wie kann ich mithelfen?
Hier starten ›
Team

Cal Poly, Team S2-G6, Livingston Winter 2018 Mitglied von Cal Poly, Team S2-G6, Livingston Winter 2018
CPSU-LIVINGSTON-W18S2G6
4 Mitglieder
23 Anleitungen geschrieben
2 Kommentare
Where do you get the outer case from? And if I only want to replace the outer case could I just follow the first 3 steps?
Following. I need a replacement project Scorpio case. the system I got it from was from Mercari and the guy did a poor job in taking care of the case and I need a top Scorpio case.