Diese Version enthält möglicherweise inkorrekte Änderungen. Wechsle zur letzten geprüften Version.
Was du brauchst
-
Dieser Schritt ist noch nicht übersetzt. Hilf mit, ihn zu übersetzen!
-
Use a coin to rotate the battery locking screw 90 degrees clockwise.
-
-
Dieser Schritt ist noch nicht übersetzt. Hilf mit, ihn zu übersetzen!
-
Lift the battery out of the computer.
-
-
-
Entferne die beiden 1,5 mm Innensechskantschrauben auf jeder Seite des Displays (also insgesamt vier).
-
-
-
Setze das flache Ende eines Spudgers senkrecht zur Oberfläche in den Spalt zwischen der vorderen und hinteren Blende nahe bei der oberen linken Displayecke ein.
-
Kippe den Spudger vom Display weg, um die hintere von der vorderen Blende wegzuhebeln.
-
-
-
Schiebe den Spudger an der Oberkante der vorderen Displayblende entlang, um beide Blenden gleichmäßig zu trennen.
-
-
-
Schiebe das flache Ende des Spudgers von der oberen linken Ecke ausgehend nach unten und heble dabei die hintere Blende von der linken Displaykante ab.
-
-
-
-
Heble die hintere Blende mit dem flachen Ende des Spudgers von der rechten Seitenkante des Displays ab.
-
Heble, falls nötig, an der Unterkante der hinteren Blende, um sie vom Display abzulösen.
-
-
Dieser Schritt ist noch nicht übersetzt. Hilf mit, ihn zu übersetzen!
-
Close the display.
-
Remove the small pieces of yellow tape securing the thin metal LCD cover to the display.
-
Remove the large piece of tape near the right display hinge.
-
-
Dieser Schritt ist noch nicht übersetzt. Hilf mit, ihn zu übersetzen!
-
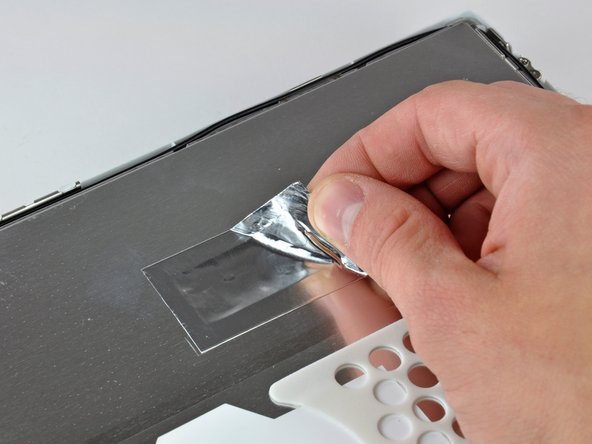
Remove the tape covering the inverter cable connector.
-
Remove the piece of foil tape near the center of the thin metal LCD cover.
-
-
Dieser Schritt ist noch nicht übersetzt. Hilf mit, ihn zu übersetzen!
-
Remove the Phillips screw near the right display hinge.
-
Use the tip of a spudger to remove the small spacer under the screw you just removed.
-
-
Dieser Schritt ist noch nicht übersetzt. Hilf mit, ihn zu übersetzen!
-
Pull the foil/braided pieces of tape off the aluminum frame of the clutch hinges. Leave the tape attached to the thin steel LCD cover.
-
Remove the small piece of tape holding the display data cable ground strap to the LCD cover.
-
-
Dieser Schritt ist noch nicht übersetzt. Hilf mit, ihn zu übersetzen!
-
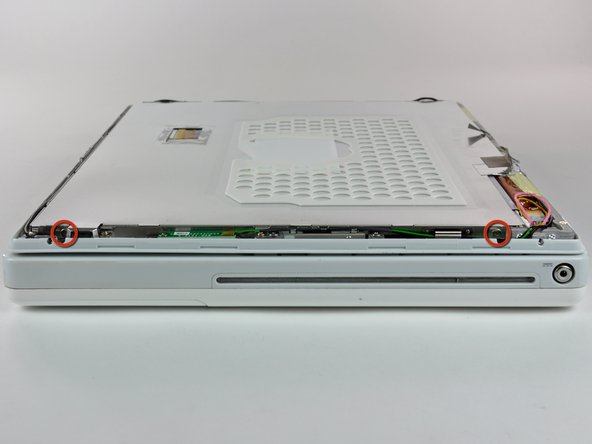
Remove the two Phillips screws securing the left and right sides of the LCD to the frame of the clutch hinges (four screws total).
-
-
Dieser Schritt ist noch nicht übersetzt. Hilf mit, ihn zu übersetzen!
-
Carefully remove the thin steel LCD cover.
-
-
Dieser Schritt ist noch nicht übersetzt. Hilf mit, ihn zu übersetzen!
-
Remove the long piece of tape securing the display data cable to the LCD.
-
Disconnect the display data cable by pulling the cable away from the socket on the LCD.
-
-
Dieser Schritt ist noch nicht übersetzt. Hilf mit, ihn zu übersetzen!
-
Disconnect the backlight cable from the inverter.
-
-
Dieser Schritt ist noch nicht übersetzt. Hilf mit, ihn zu übersetzen!
-
Open the display.
-
Lift the LCD out of the display assembly.
-


Rückgängig: Ich habe diese Anleitung nicht absolviert.
11 weitere Nutzer:innen haben diese Anleitung absolviert.
