Zum Hauptinhalt wechseln

iHip Fold-up Portable Speaker iPod/iPhone Input Replacement

Was du brauchst

  1. iHip Fold-up Portable Speaker iPod/iPhone Input Replacement, Removing the battery case cover: Schritt 1, Bild 1 von 1
    • Use your fingers to slide the battery case cover off in the direction of the arrows.

  2. iHip Fold-up Portable Speaker iPod/iPhone Input Replacement, Cleaning the battery case: Schritt 2, Bild 1 von 3 iHip Fold-up Portable Speaker iPod/iPhone Input Replacement, Cleaning the battery case: Schritt 2, Bild 2 von 3 iHip Fold-up Portable Speaker iPod/iPhone Input Replacement, Cleaning the battery case: Schritt 2, Bild 3 von 3
    • Remove the four AAA batteries. Be sure to check your nearest battery recycling point!

    • Use the detailing brush and a paper towel to remove any corrosion left by previous batteries.

  3. iHip Fold-up Portable Speaker iPod/iPhone Input Replacement, Removing the screws: Schritt 3, Bild 1 von 2 iHip Fold-up Portable Speaker iPod/iPhone Input Replacement, Removing the screws: Schritt 3, Bild 2 von 2
    • Unscrew the four outer 1.0 mm screws with a Phillips-Head screwdriver.

    • Screws will be magnetized in position and will require the use of tweezers to be removed.

    • Push down gently on the battery case cover and slide it in the direction the arrows indicate. Remove the batteries.

    • Unscrew the 0.6 mm screw located in the center of the battery case.

    • Keep the 1.0 mm and 0.6 mm screws separate from each other for reassembly.

  4. iHip Fold-up Portable Speaker iPod/iPhone Input Replacement, Removing the back cover: Schritt 4, Bild 1 von 2 iHip Fold-up Portable Speaker iPod/iPhone Input Replacement, Removing the back cover: Schritt 4, Bild 2 von 2
    • Remove the back cover carefully; there are many wires that connect it to the device.

  5. iHip Fold-up Portable Speaker iPod/iPhone Input Replacement, Taking out the iPod/iPhone input: Schritt 5, Bild 1 von 2 iHip Fold-up Portable Speaker iPod/iPhone Input Replacement, Taking out the iPod/iPhone input: Schritt 5, Bild 2 von 2
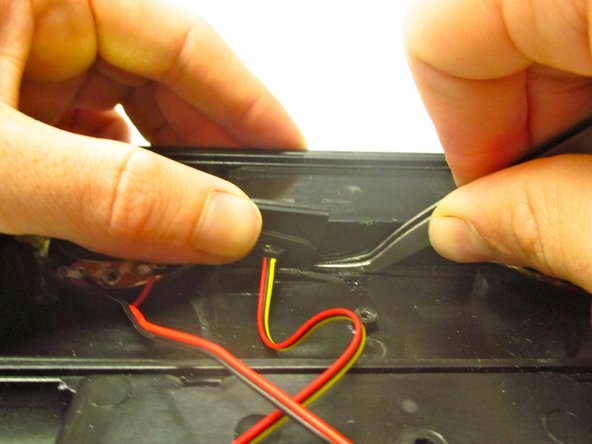
    • Locate the iPhone/iPod input that is in the center of the console.

    • Push the black plastic input stand to the left, and up, with your index finger.

    • Use tweezers to wedge the input stand out of its slot.

  6. iHip Fold-up Portable Speaker iPod/iPhone Input Replacement, Removing iPod/iPhone Input: Schritt 6, Bild 1 von 1
    • Pull out the iPod/iPhone input with tweezers.

  7. iHip Fold-up Portable Speaker iPod/iPhone Input Replacement, Removing the Line In Chip: Schritt 7, Bild 1 von 1
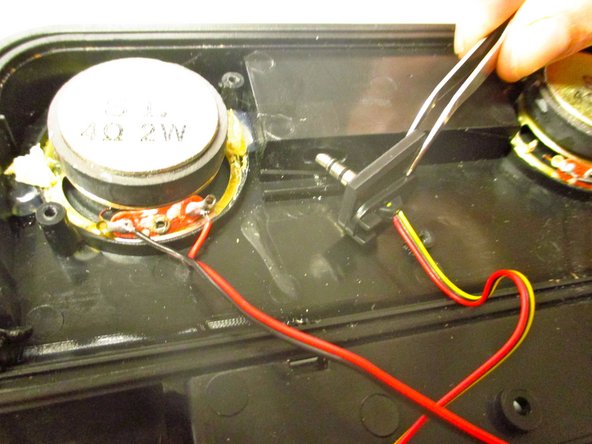
    • Gently remove the Line In chip with tweezers.

    • Note: The Line In chip is located on the left side of the device.

  8. iHip Fold-up Portable Speaker iPod/iPhone Input Replacement, Cutting the Input Wires from the Line In Chip: Schritt 8, Bild 1 von 1
    • Use scissors to cut the black, yellow, and red wires that connect the Line In chip to the iPod/iPhone input.

    • Remove the old iPod/iPhone input and its associated wires.

  9. iHip Fold-up Portable Speaker iPod/iPhone Input Replacement, Cauterizing the New Input Wires to the Line In Chip: Schritt 9, Bild 1 von 1
    In diesem Schritt verwendetes Werkzeug:
    Desoldering Pump
    $3.99
    Kaufen
    • Follow the instructions provided with the soldering station to preheat the gun before use.

    • Place new iPod/iPhone input wires, one by one, in their previous position on the Line In chip. Wrap a strip of soldering wire on the point of contact between the chip and input wire.

    • Use the soldering gun to melt the strip of soldering wire.

  10. iHip Fold-up Portable Speaker iPod/iPhone Input Replacement, Replacing the Line In Chip: Schritt 10, Bild 1 von 1
    • Use tweezers to carefully place the newly soldered Line In chip back into its original position.

  11. iHip Fold-up Portable Speaker iPod/iPhone Input Replacement, Positioning New iPod/iPhone Input Into Original Position: Schritt 11, Bild 1 von 1
    • With tweezers, insert the end of the iPod/iPhone input through its designated hole.

    • Note: The device has been rotated 90 degrees to the left in this picture.

    • With both thumbs, push in the black plastic input stand until it snaps into place.

Abschluss

To reassemble your device, follow these instructions in reverse order.

Team

Clemson, Team 3-4, Benson Fall 2014 Mitglied von Clemson, Team 3-4, Benson Fall 2014

CLEM-BENSON-F14S3G4

5 Mitglieder

8 Anleitungen geschrieben

0 Kommentare

Kommentar hinzufügen

Seitenaufrufe:

Letzte 24 Stunden: 0

Letzte 7 Tage: 0

Letzte 30 Tage: 0

Insgesamt: 233