Diese Version enthält möglicherweise inkorrekte Änderungen. Wechsle zur letzten geprüften Version.
Was du brauchst
-
Dieser Schritt ist noch nicht übersetzt. Hilf mit, ihn zu übersetzen!
-
The iMac G3. This was a great computer for the time, and had plenty of features.
-
-
Dieser Schritt ist noch nicht übersetzt. Hilf mit, ihn zu übersetzen!
-
Start by flipping the iMac upside-down. It may help to lay it on a towel, so you don't damage the screen, or scratch the face.
-
-
Dieser Schritt ist noch nicht übersetzt. Hilf mit, ihn zu übersetzen!
-
Remove this Phillips screw.
-
Using a flathead screwdriver, work your way around the bottom cover, until it comes off.
-
Then, lift the bottom cover up and out, and set it aside.
-
-
Dieser Schritt ist noch nicht übersetzt. Hilf mit, ihn zu übersetzen!
-
Now, remove the DB-15 Video connector from the logic board.
-
It may be helpful to use a Phillips screwdriver to remove the thumbscrews.
-
-
Dieser Schritt ist noch nicht übersetzt. Hilf mit, ihn zu übersetzen!
-
Remove the power cable from the logic board assembly.
-
-
Dieser Schritt ist noch nicht übersetzt. Hilf mit, ihn zu übersetzen!
-
Remove the front panel connector. (You may also need to remove an additional screw that connects the front panel connector to the logic board assembly).
-
-
-
Dieser Schritt ist noch nicht übersetzt. Hilf mit, ihn zu übersetzen!
-
Now, remove these Phillips screws.
-
Now, grab the logic board assembly by the piece of plastic, and lift it out.
-
-
Dieser Schritt ist noch nicht übersetzt. Hilf mit, ihn zu übersetzen!
-
The logic board assembly. This is the heart of the computer, it contains the motherboard, CPU, RAM, V-RAM, PRAM battery, the hard drive, and the optical drive.
-
-
Dieser Schritt ist noch nicht übersetzt. Hilf mit, ihn zu übersetzen!
-
Now to remove the optical drive!
-
-
Dieser Schritt ist noch nicht übersetzt. Hilf mit, ihn zu übersetzen!
-
The optical drive is located near the front of the assembly.
-
-
Dieser Schritt ist noch nicht übersetzt. Hilf mit, ihn zu übersetzen!
-
To remove the drive, push it in, lift up, and then pull forward.
-
As you pull the drive forward, disconnect the ribbon cable and set it aside.
-
-
Dieser Schritt ist noch nicht übersetzt. Hilf mit, ihn zu übersetzen!
-
Remove the two phillips #00 screws.
-
Then remove the board. This will reveal that it is a standard PATA drive.
-
Congrats, the drive is free! You can use any PATA-tray loading drive in the iMac G3 which means you can install a CDRW to burn CDs in OS9 or X(if using OSX,install that DVD writer) but, of course only original drives will match the great look of the iMac).
-
-
Dieser Schritt ist noch nicht übersetzt. Hilf mit, ihn zu übersetzen!
-
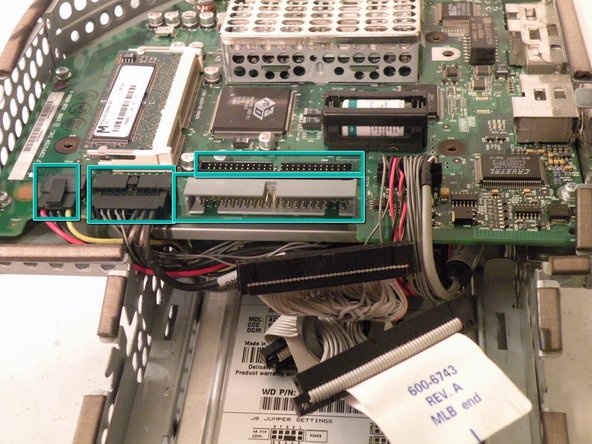
Start by removing these Phillips screws:
-
Now, remove all of these cables:
-
-
Dieser Schritt ist noch nicht übersetzt. Hilf mit, ihn zu übersetzen!
-
Now, remove the optical drive retention spring.
-
Push in on both sides, and pull towards you releasing the retention spring.
-
-
Dieser Schritt ist noch nicht übersetzt. Hilf mit, ihn zu übersetzen!
-
Now lift the drive up, and pull it out.
-
-
Dieser Schritt ist noch nicht übersetzt. Hilf mit, ihn zu übersetzen!
-
To remove the drive from the metal caddy, remove these four screws from the side of the drive.
-


Rückgängig: Ich habe diese Anleitung nicht absolviert.
39 weitere Nutzer:innen haben diese Anleitung absolviert.

Team

8 Kommentare
great description, great photos
Many thanks. Worked perfectly.
is the hard disk on a mac interchangeable to iMac 4984 from iMac M5521? Power supply failed on M5521. thx
Çok güzel. Makul bir para ödemesi yapabilirim.
Thank you so much! My grandmother finally decided to throw hers away but she wanted the hard drive and I got it for her with your help!!!