Diese Version enthält möglicherweise inkorrekte Änderungen. Wechsle zur letzten geprüften Version.
Was du brauchst
-
-
Löse die beiden unverlierbaren Kreuzschlitzschrauben, mit deinen die Zugangsklappe am iMac befestigt ist..
-
Entferne die Zugangsklappe zum iMac.
-
-
-
Entferne die folgenden vier Schrauben:
-
Drei 6 mm T8 Torx.
-
Eine 8 mm T8 Torx.
8mm screw is 2nd from left - useful when reassembly
-
-
-
Drehe den iMac um und lege ihn mit der Standseite nach unten auf eine ebene Fläche.
-
Um die vordere Blende vom iMac abzuheben, führe die folgenden Schritte gleichzeitig durch:
-
Verwende deinen Daumen, um die RAM-Arme einzudrücken und den iMac festzuhalten.
-
Benutze deinen Zeigefinger, um die kleine Brücke an der vorderen Blende zu dir hin zu ziehen.
-
Hebe die vordere Blende mit den Zeigefingern an.
-
Sobald die kleine Materialbrücke die RAM-Arme passiert hat, hebe die vordere Blende an ihrer unteren Kante gerade genug an, um die untere Kante des hinteren Gehäuses zu überwinden.
-
-
-
Führe eine Plastikkarte in die Ecke des Belüftungsschlitzes in der Nähe der Oberseite des hinteren Gehäuses ein.
-
Schiebe die Karte in Richtung Oberseite des iMacs, um die Verriegelung der Frontblende zu lösen.
-
Ziehe die Frontblende vom restlichen Gehäuse weg.
-
Wiederhole diesen Vorgang für die andere Seite der Frontblende.
-
Sollte sich die Blende nicht lösen lassen, drücke die untere Kante wieder auf das hintere Gehäuse und wiederhole den Vorgang mit der Plastikkarte.
Apple uses a powerful magnet to release these latches, but the official tool is not available. If you have access to a few failed hard drives, you can take out the magnets from those, and stack them up to have a magnet strong enough to easily open these latches.
Simply place the magnet on an upper corner of the machine, and when you hear a click, gently pull the corner of the front case forward. Repeat the process for the other upper corner. Use care not to pull on the iSight cables.
Note: Use care when handling the hard drive magnets, they are powerful, and you don't want them to snap together on your fingers. OUCH!
You can use a credit card. Mine survived, though it did get a little bent.
I used two credit cards for extra thickness and the latches released very easily.
The magnetic latches are about 2-3 cm from the left and right edges right at the top edge of the case. I just ran a rare-earth magnet over the from of the bezel in this area. You can hear it click when it disengages. RadioShack has these kind of magnets for $3, the call them "super magnets".
This was a nuisance. Had to really move the card around to get it to finally release.
Be very careful not to damage the metal clips with a credit card. My iMac was very stubborn and I ended up bending the clips in a way they cannot be bent back. The clips do still work and the front bezel does still go back on, however it no longer sits flush with the back of the iMac.
The double credit card worked for me. Have to be persistent. It's a very light latch, no force needed or anything, or any click when it releases.
-
-
-
-
Lege deinen iMac mit der Standfläche nach unten auf einen Tisch.
-
Hebe die Frontblende von der unteren Kante an und drehe die Blende vom Rest des iMac weg, wobei du auf die RAM-Hebel achten mußt, die sich verfangen könnten.
-
Lege die Frontblende über den Rest des iMac.
-
-
-
Wenn nötig, entferne das gelbe Kapton Klebeband (es ist ok es dann wegzuwerfen), welches um die Mikrofon- und Kamerakabel gewickelt ist.
I was able to skip Steps 6 & 7 entirely. The microphone and camera cables had enough slack to flip the front cover off and lie it flat above the rest of the computer.
Step 4 is completely unnessecary. Just lift the bezel up and wiggle it until the metal clips let go. Then lift the bezel straight up.
-
-
-
Trenne die Kamera- und Mikrofon-Steckverbindungen.
Make sure the white wire is on the same side of both parts of the connector before reconnecting.
It is possible to reconnect the microphone cable in the wrong/reversed orientation with the connector. The microphone will still work but will be muted and result in a "tinny" sound on the receiver's end.
Can anyone ID these connectors (at least the camera connector) so that I may make an extension (to move the camera out and re-house it myself). I probably have the gear to do the mic already.
Is the camera connector some standard I can order M & F versions online to terminate to an extension cable?
-
-
Dieser Schritt ist noch nicht übersetzt. Hilf mit, ihn zu übersetzen!
-
Peel up the lower EMI shield from the rear case.
-
-
Dieser Schritt ist noch nicht übersetzt. Hilf mit, ihn zu übersetzen!
-
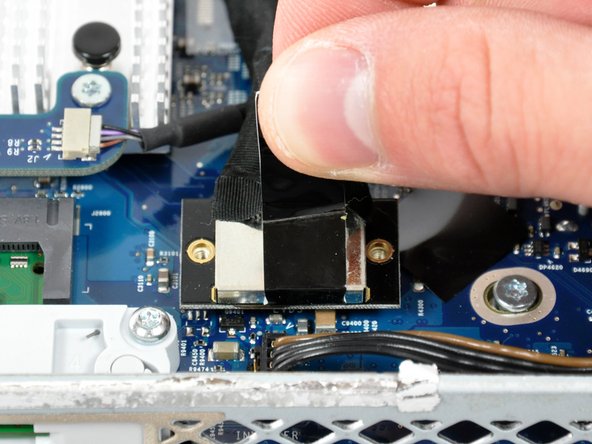
Remove the two 4.8 mm T6 Torx screws securing the display data cable to the logic board.
-
Grab the display data cable connector by its black tab and pull it straight up off the logic board.
-
-
Dieser Schritt ist noch nicht übersetzt. Hilf mit, ihn zu übersetzen!
-
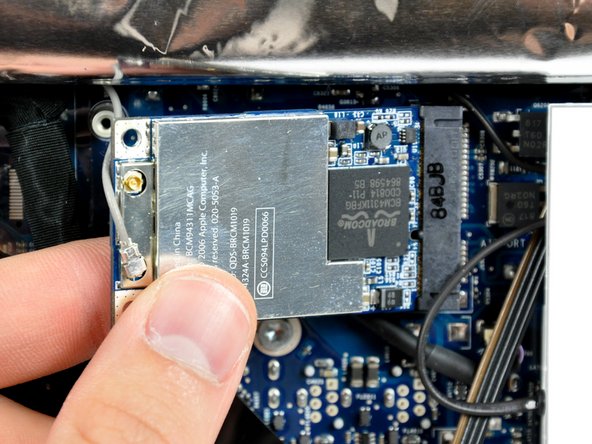
Remove the two 4.8 mm T6 Torx screws securing the AirPort Extreme card to the logic board.
-
Lift the free end slightly and pull the AirPort Extreme card straight away from its socket.
-
-
Dieser Schritt ist noch nicht übersetzt. Hilf mit, ihn zu übersetzen!
-
Use a spudger to pry the antenna connector up off the AirPort Extreme card.
-


Rückgängig: Ich habe diese Anleitung nicht absolviert.
4 weitere Nutzer:innen haben diese Anleitung absolviert.

Ein Kommentar
My intel c2d 17" sold in europe had four T8 screws to loosen front. Not the three T6 and one T8.
That is a really, really unnecessarily complex way of fitting a new hard drive. Thanks, but no thanks...
annax - Antwort
annax, if you can suggest a simpler way we're all ears!
Jake Simmonds - Antwort
I found this guide to be very useful. The installation was super easy, especially since I've never opened my iMac before. I was able to skip steps 6, 7, 9, 10 and 14. Wish I had one of those long skinny magnetic torx screwdriver's though. I had to use duct tape to hold the screws on the end of the bit for step 12.
I used this opportunity to vacuum out the dust with mini attachments. Much needed after 3 years ;0)
Awesome site!!! Thanks for sharing your knowledge and saving me time and $$$!
Eric Patten - Antwort
Yes I did it! thanks for this very good manual
Philippe d Anfray - Antwort