Diese Version enthält möglicherweise inkorrekte Änderungen. Wechsle zur letzten geprüften Version.
Was du brauchst
-
-
Löse die beiden unverlierbaren Kreuzschlitzschrauben, mit deinen die Zugangsklappe am iMac befestigt ist..
-
Entferne die Zugangsklappe zum iMac.
-
-
-
Entferne die folgenden vier Schrauben:
-
Drei 6 mm T8 Torx.
-
Eine 8 mm T8 Torx.
-
-
-
Drehe den iMac um und lege ihn mit der Standseite nach unten auf eine ebene Fläche.
-
Um die vordere Blende vom iMac abzuheben, führe die folgenden Schritte gleichzeitig durch:
-
Verwende deinen Daumen, um die RAM-Arme einzudrücken und den iMac festzuhalten.
-
Benutze deinen Zeigefinger, um die kleine Brücke an der vorderen Blende zu dir hin zu ziehen.
-
Hebe die vordere Blende mit den Zeigefingern an.
-
Sobald die kleine Materialbrücke die RAM-Arme passiert hat, hebe die vordere Blende an ihrer unteren Kante gerade genug an, um die untere Kante des hinteren Gehäuses zu überwinden.
-
-
-
Führe eine Plastikkarte in die Ecke des Belüftungsschlitzes in der Nähe der Oberseite des hinteren Gehäuses ein.
-
Schiebe die Karte in Richtung Oberseite des iMacs, um die Verriegelung der Frontblende zu lösen.
-
Ziehe die Frontblende vom restlichen Gehäuse weg.
-
Wiederhole diesen Vorgang für die andere Seite der Frontblende.
-
Sollte sich die Blende nicht lösen lassen, drücke die untere Kante wieder auf das hintere Gehäuse und wiederhole den Vorgang mit der Plastikkarte.
-
-
-
Lege deinen iMac mit der Standfläche nach unten auf einen Tisch.
-
Hebe die Frontblende von der unteren Kante an und drehe die Blende vom Rest des iMac weg, wobei du auf die RAM-Hebel achten mußt, die sich verfangen könnten.
-
Lege die Frontblende über den Rest des iMac.
-
-
-
Wenn nötig, entferne das gelbe Kapton Klebeband (es ist ok es dann wegzuwerfen), welches um die Mikrofon- und Kamerakabel gewickelt ist.
-
-
Dieser Schritt ist noch nicht übersetzt. Hilf mit, ihn zu übersetzen!
-
Peel up the lower EMI shield from the rear case.
-
-
Dieser Schritt ist noch nicht übersetzt. Hilf mit, ihn zu übersetzen!
-
Remove the two 4.8 mm T6 Torx screws securing the display data cable to the logic board.
-
Grab the display data cable connector by its black tab and pull it straight up off the logic board.
-
-
-
Dieser Schritt ist noch nicht übersetzt. Hilf mit, ihn zu übersetzen!
-
Inverter cable on 24inch iMac pulls off to the left.
-
Pull the inverter cable connector straight up off its socket on the logic board.
-
-
Dieser Schritt ist noch nicht übersetzt. Hilf mit, ihn zu übersetzen!
-
Peel back the aluminum EMI tape from the two vertical edges of the display.
-
-
Dieser Schritt ist noch nicht übersetzt. Hilf mit, ihn zu übersetzen!
-
Remove the four 8 mm with 2 mm thick head coarse-thread T10 Torx screws securing the display to the rear case.
-
-
Dieser Schritt ist noch nicht übersetzt. Hilf mit, ihn zu übersetzen!
-
Lift the display from its lower edge and pull it toward yourself to peel off the EMI shield attached to its top edge.
-
-
Dieser Schritt ist noch nicht übersetzt. Hilf mit, ihn zu übersetzen!
-
Remove the two 7 mm T10 Torx screws securing the optical drive clip to the logic board.
-
-
Dieser Schritt ist noch nicht übersetzt. Hilf mit, ihn zu übersetzen!
-
Remove the optical drive clip.
-
-
Dieser Schritt ist noch nicht übersetzt. Hilf mit, ihn zu übersetzen!
-
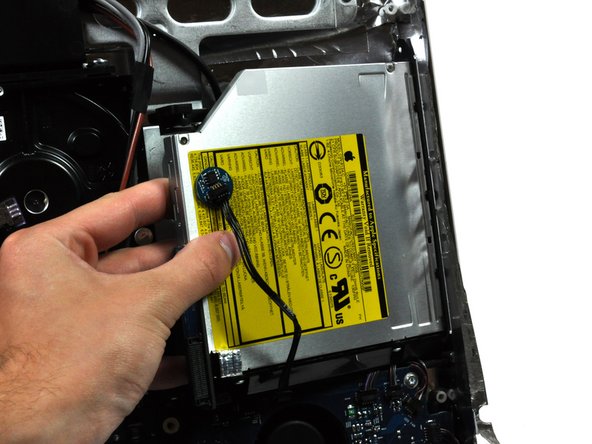
Pull the optical drive thermal sensor cable connector away from its socket on the logic board.
-
-
Dieser Schritt ist noch nicht übersetzt. Hilf mit, ihn zu übersetzen!
-
Squeeze the two optical drive bracket ears together while pulling the drive toward yourself.
-
Pull the optical drive away from the side of the rear panel and remove it from the iMac.
-
-
Dieser Schritt ist noch nicht übersetzt. Hilf mit, ihn zu übersetzen!
-
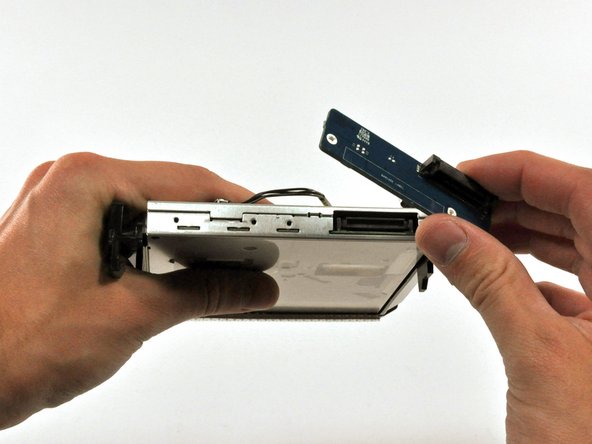
Remove the two T6 Torx screws securing the connector board to the optical drive.
-
Pull the connector board away from the optical drive.
-
-
Dieser Schritt ist noch nicht übersetzt. Hilf mit, ihn zu übersetzen!
-
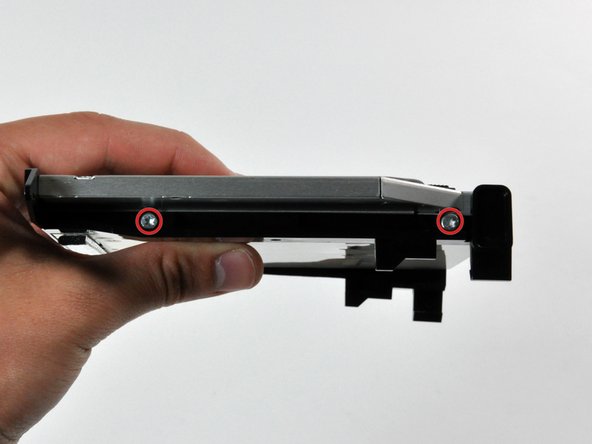
Remove the two T10 Torx screws from each side of the optical drive (four screws total).
-
-
Dieser Schritt ist noch nicht übersetzt. Hilf mit, ihn zu übersetzen!
-
Use the flat end of a spudger to remove the EMI gasket from the underside of the optical drive.
-
-
Dieser Schritt ist noch nicht übersetzt. Hilf mit, ihn zu übersetzen!
-
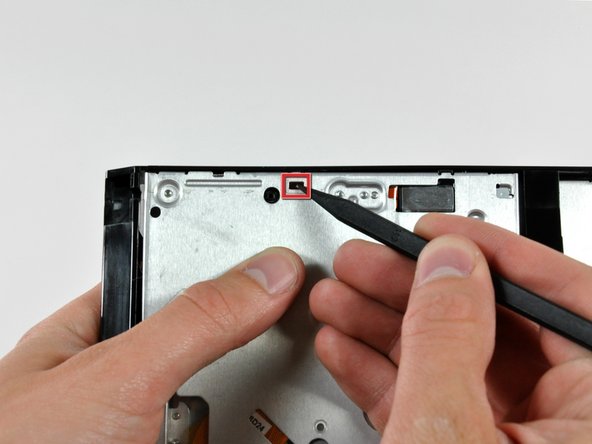
Use the sharp end of a spudger to push the optical drive bracket tabs out of their slots on the bottom of the optical drive.
-
-
Dieser Schritt ist noch nicht übersetzt. Hilf mit, ihn zu übersetzen!
-
Using the sharp end of a spudger, press the optical drive bracket tab out of its slot on the side of the optical drive.
-
-
Dieser Schritt ist noch nicht übersetzt. Hilf mit, ihn zu übersetzen!
-
Push the optical drive bracket tabs out of their slots in the top of the optical drive.
-
-
Dieser Schritt ist noch nicht übersetzt. Hilf mit, ihn zu übersetzen!
-
Pull the optical drive away from its bracket, minding any tabs that may still be caught in their slots.
-
-
Dieser Schritt ist noch nicht übersetzt. Hilf mit, ihn zu übersetzen!
-
Use a flat end of a spudger to remove the EMI gasket from the top of the optical drive.
-
-
Dieser Schritt ist noch nicht übersetzt. Hilf mit, ihn zu übersetzen!
-
Use the flat end of a spudger to pry the optical drive thermal sensor off the adhesive holding it to the top of the optical drive.
-
Don't forget to transfer this to your new drive.
-


Rückgängig: Ich habe diese Anleitung nicht absolviert.
25 weitere Nutzer:innen haben diese Anleitung absolviert.

2 Kommentare
There are two things not mentioned in this guide (which is, all-in-all very good)
1. There is a short lead connected through the EMI shielding at the top of the IMac to th right (inside vie) of the camera board, to a very small daughter card marked Apple 820 2009-A 2006 srewed to the inside upper ABS case surface by a single 1mm torx screw. The lead s othere end goes to the power board. Check this has not been severed. I extended mine.
2. The Super drive DVD drive is very difficult to re-position because apart from the mounting frame ears mentioned, there are two "dowels" moulded into the ABS bezel. If these are not correctly aligned when fitting, then the CD/DVD will not eject because of the mis-alinement. The ears can be difficult to release because the unit is forced against the logic board at the point where the board to drive connector is situated.
I didn't buy a DVD I'm taking it out of my other 27" IMAC I'm hoping this works as there was no mention of what drive to use buy but this is an excellent guide and I hope others have easier time also I'm replacing the screen new>(LP171WU1 (TL)(A3) LINES in it from walmart $54.00 and got a deal on V4 adapter. Thank you all for this info .