Einleitung
Stelle die Bluetooth Verbindungen wieder her, indem du die Bluetooth Karte austauschst.
Was du brauchst
-
-
Lege den iMac mit der Vorderseite nach unten auf einen Tisch, so dass die Unterkante zu dir zeigt.
-
Löse die einzelne Kreuzschlitzschraube in der Mitte der Abdeckung.
-
Entferne die Abdeckung vom iMac.
-
-
-
Befestige zwei Saugnäpfe in gegenüberliegenden Ecken der Scheibe.
A good alternative to the two heavy duty suction cups is a regular household plunger.
Also, 2" wide packing tape. Maybe a 6 or 8" piece, folded in the middle to give you say, a 1-2" "handle". Make a pair of these. They look like a capital T but with a short vertical part (the handle), and a wide top I the sticky wings). Get the good 3M tape, it's strong, and it peels off clean without leaving any glue from the screen.
for me one household plunger did the trick!
-
-
-
Hebe die Glasscheibe vorsichtig gerade weg vom iMac.
Another approach that worked for us was to get 4 small plastic wedges (the kind used in iphone screen replacements). Working one corner at a time you can use a cheap suction cup to pry just that corner up enough to slide the wedge in. Then proceed to the next then next, etc. Once all 4 have the wedges under them the glass should be away from the body all the way around, then just carefully lift it the rest of the way up.
-
-
-
-
Entferne folgende zwölf Torx Schrauben, welche die Frontblende am Rückgehäuse befestigen:
-
Acht 13 mm T8 Schrauben
-
Vier 25 mm T8 Schrauben
I would strongly suggest taping the screws down on a piece of paper towel or cloth in the same order you take them out, as there are different lengths in no particular order and they don't all fit into just any hole. Unless you keep track of which hole each screw belongs, there is no other way of knowing. I stress taping because I didn't tape mine down and after bumping the table I was working on they scattered, leaving me to guess.
Even better, use an ice cube tray to keep the screws from each step together.
As a rule with iFixit repairs, for years I've been printing the guides, applying scotch magic tape near each picture (which allows me to reutilise the paper prints in the future), neatly putting the appropriate screw next to their picture and taping them down with scotch magic tape.
Even if I have to wait for spare parts, this allows me to neatly file the guide + screws in a copy safe and a binder (or in a cardboard filing box together with the rest of the parts) for later reassembly. Hardly any mistake possible...
I think the caption on the picture is wrong here for 24" iMacs - it says: "On the 24" iMac Intel Model A1225, the bottom center two screws are long (26mm), four on sides (two left, two right) are medium (18mm), and the remaining 6 (four top, two bottom corners) are short (14mm)." I think actually bottom centre two are long, then all the rest are medium apart from the two either side of the CD/DVD drive
I print out the steps. Get a roll of scotch tape ready. Every screw, or set of screws I remove, I lay on some tape, and then tape them to the number on the directions. Then you have each screw labeled, with direction, and in order, or reassembly. Just working backwards in the directions.
I agree with @HBloomfield’s comment overall, but to add to that comment, mine was a little different.
(2) Long: bottom center
(4) Medium: bottom left and right; on either side of the CD/DVD drive
(6) Short: everything else
-
-
-
Hebe die Frontblende vorsichtig vom oberen Rand her aus dem Gehäuse.
-
Wenn der obere Rand frei ist, kannst du die Frontblende zum Fuß hin kippen und aus dem Gehäuse heben.
-
Drehe die Frobtblende weg vom restlichen Gerät und lege sie über die Oberkante des iMac.
Contrary to the pictures, to lift the front bezel off, start at top of the computer screen lifting up while apply a little bit of pressure to the foam in the upper corners of the screen. This will give you the leverage needed to get the bezel to lift up. Be careful to not pull to fast, as the camera cable is still attached.
-
-
-
Löse den Stecker am Mikrofonkabel, entferne das Klebeband, wenn nötig.
During reinstallation of the LCD panel, be sure that the iSight microphone cable does not become trapped behind the panel.
I actually didn't have to remove the cable. With the iMac laying on its back, just rotate the front bezel (bottom edge rotating around top edge) so that it's laying upside down, above the iMac. When reassembling, just rotate back into place.
-
-
-
Hebele mit dem flachen Ende des Spudgers den Verbinder der Bluetooth Antenne von der Bluetooth Karte hoch.
-
-
-
Entferne die einzelne Torx T6 Schraube, welche die Bluetooth Karte am Logic Board befestigt.
-
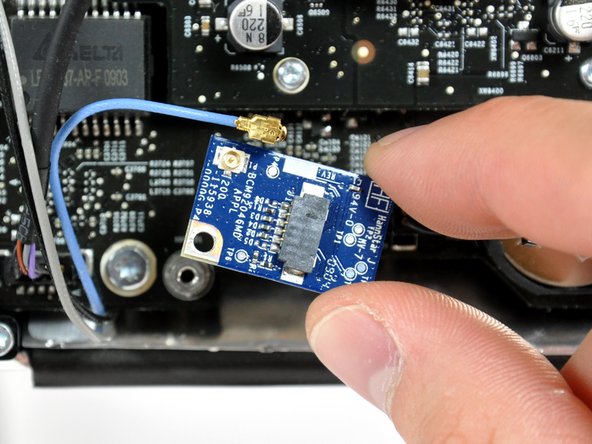
Hebe die Bluetooth Karte aus dem iMac.
-


Um dein Gerät wieder zusammenzusetzen, folge den Schritten in umgekehrter Reihenfolge.
Um dein Gerät wieder zusammenzusetzen, folge den Schritten in umgekehrter Reihenfolge.
Rückgängig: Ich habe diese Anleitung nicht absolviert.
3 weitere Nutzer:innen haben diese Anleitung absolviert.
Besonderer Dank geht an diese Übersetzer:innen:
100%

Diese Übersetzer:innen helfen uns, die Welt zu reparieren! Wie kann ich mithelfen?
Hier starten ›

Ein Kommentar
Is it possible to upgrade the bluetooth card with one for 4.0 bluetooth?
The grid won't fall off by itself. You'll have to help it. Use the smallest screwdriver you have; the Torx 6 worked fine for me. It should enter in one of the many holes composing the grid. Use it as a lever to ploy the grid a little bit. You may catch it with your fingers and that's it.
Be carefull not to damage the hole by a too strong leverage.
Laurent - Antwort
much more safer to use duct tape, instead of torx 6. (glue it along the length of the grid and pull). it will loose instantly and smooth;)
Hofmann78rus - Antwort
Anyone know a guide to replace the plastic piece this screw connects to? I accidentally forgot this step - went to remove the front bezel and bent the plastic piece the access door connects to.
Jason Augustin - Antwort