Einleitung
Hier wird der Austausch eines kaputten optischen Laufwerks gezeigt.
Was du brauchst
-
-
Befestige einen Saugnapf in jeder der oberen Ecken der Scheibe.
-
Wenn der Saugnapf sich nicht festsaugt, dann versuche die Scheibe und den Saugnapf mit einem milden Reinigungsmittel zu säubern.
-
-
-
Hebe die Scheibe vorsichtig senkrecht zum LCD an, gerade soweit um die Metallstifte, die oben an der Unterseite der Scheibe angebracht sind zu befreien.
-
Ziehe die Scheibe von der Unterkante des iMac weg und lege sie sorgfältig zur Seite.
What's the best product to clean the face of the LCD?
Microfiber Cloth
Try your best not touch it in the first place
Brian -
Wearing Nitrile or regular surgical gloves helps prevent finger prints if you accidentally touch the glass.
I use a Swiffer duster from above at the last moment before I let the magnets grab the glass cover. This has worked so well the last dozen or so times I’ve replaced a glass cover since I never have access to a “clean room” and don’t wear a “bunny suit”.
Also, more dust will shed from your skin if you’ve just taken a shower, so I like to finish these repairs in the morning before a shower.
-
-
-
Entferne die acht 8mm Torx T10 Schrauben, die das Display am Gehäuse befestigen.
The metal near the screws is VERY magnetic. Honestly, the hardest and by far most frustrating step was trying to put these screws back in.
I ran into the same problem - easily the most frustrating part of this process. To help deal with it, I took a drinking straw, cut it to be about 2 inches long, and used it as a chute to guide the screw to the hole. Dropping the screw down the straw, it'd still stick to the side due to the magnets, but using my screwdriver, it was easy to push the screw down to where it needed to go, and the straw kept the screw from being pulled out of place by the magnets.
josh -
Hmm… yes, the magnets sucks - literally. But if you use a normal screwdriver or a bit, the screwdriver tip or the bit can be “loaded” by the magnets too. Just move the screwdriver (or bit) over one of the magnets and then “plug” the screw onto the screwdriver’s tip (or bit). It will be held by magnetic force. Just enough to move the screw vertically and very slowly into the whole.
There are some special screwdriver on the market with “claws” to hold screws, but they are hard to find/to buy and expensive. I sometimes use superglue (a LITTLE) to temporary fasten the screw at the screwdrivers tip. This technique can be used with destroyed screw heads too to optimize adhesion.
Replacing these screws was like playing the most difficult game of “Operation” imaginable. I wish I’d seen the tip about using a straw before I started playing!
-
-
-
Hebe den oberen Rand des Displays leicht aus dem äußeren Gehäuse.
The harddisk can be removed WITHOUT the next steps. The opening angle of the partially lifted LCD display gives enough room to untighten the two Torx T9 screws of the hard disk bracket, to unplug the two SATA connectors and to carefully lift out the harddisk. There is absolutely no need to dismantle the whole thing.
All you need is a screwdriver which fits into the room. I’ve used the “Pro Tech Toolkit” from iFixit. The screwdriver with Torx T9 bit fits perfectly.
The other “tool” you need is either someone who holds the LCD plate or the inner leftover of a kitchenroll, a scrunched paper, a small towel or similar which has to be stuffed between the logic boards and the LCD plate to keep the LCD at its lifted place (careful! don’t unplug any of the cables).
I’ve opened and changed the harddisks of those 21,5 iMacs a dozen times with the help of the “Pro Tech Toolkit” and a kitchen roll.
If i want to replace the HD with a SSD, can i still skip the next steps? I think i can’t because i need to change the termal censor, but i would like an other opinion please.
Danois -
“Kitchen Roll” - paper towel core.
kyoder11 -
You can absolutely replace the drive without removing any cables. It's a little tight, you need your torx driver to be short enough to fit in the limited space. Be careful not to put any pressure on the cables (the one nearest the front is a good guide of how much space you have to play with). It's helpful to have another set of hands to hold it up while you remove the drive, but I just did it by holding the display up with one hand and it wasn't that hard to remove and replace the drive.
I wouldn't install any thermal sensor, just use something like Macs Fan Control (free) to adjust the fans so they don't race out of control.
Hia,
thx to IFIXIT and 20+ years of computer repair and building experience (all PC) there was no problem at all to remove a 500 Gb HDD from a mid 2011 iMac and replace it with an 500 Gb SSD Drive (with help from Comtec EDV, where i bought the upgrade kit).
Skip the steps where people are advised to remove the display. Due to my experience it is def better to leave cables and plugs where they are. I lifted the display 12 cm and fixed this position w/ one pencil in each front corner of the case where the other end of the pencil sticked in ascrew hole of the display-frame. Very easy to operate afterwards! No probs w/ the screws of the hdd-frame.
Some care-taking of static electricity is advised - wear a wrist cable. And don’t forget to press start button after having removed power chord. I had an Android Tablet on the right side, where i could watch these ifixit pages :-)
thx to IFIXIT!
w/ regards from cantbtroo from Berlin
Thank you ifixit for the guide. Like so many others I jumped from step 4 to step 10 and left all the cables intact. Felt much safer doing so. Papertowel cores secured the LCD to higher position. There was enough room to remove the old HDD and replace it with a SSD drive.
Cheers!
-
-
-
Ziehe den Verbinder des Vertikalsynchronisationskabel aus seinem Sockel auf der LED Treiberplatine nahe der linken oberen Ecke deines iMac.
Tried doing this on my iMac, but this cable would not come out for love or money. No matter what I did, I could not unplug this cable. My iMac is the same 21inch 2011 as this one. Any advice would be greatly appreciated.
I was tempted to forgo steps 4-10 but found the inside of the case to be very dusty and decided to do the full disassemble. I struggled getting this vertical sync cable connector out. The trick that worked for me was to prop the display up using a pair of toilet paper tubes then using the fingernails of both thumbs, one on each side of the connector and it came out easily.
-
-
-
Drehe das Display soweit aus dem Gehäuse heraus, dass du das Stromversorgungskabel der LED Rückbeleuchtung von der LED Treiberplatine ablösen kannst.
Slip a thumbnail under the “front” (toward the top of the iMac) of the connector to release its clamp from the retaining ridge. Then push toward the “back” (bottom of iMac).
-
-
-
-
Fasse die Zuglasche am Sicherungsbügel des Displaydatenkabels an und drehe ihn nach oben.
-
Ziehe das Displaydatenkabel aus seinem Sockel auf dem Logic Board.
I am having a difficult time reattaching the LCD cable. A better description or any tips would be useful here.
Me too — ditto that.
https://eshop.macsales.com/item/OWC/DIDI... —> abt. 5:30 into the vid. Handle up to slide in, then flip it down to lock the connector in place.
The connector needs to be carefully pushed in parallel to the board with a surprising amount of pressure and the pull tab must be folded back. Not super fragile, but not strong either.
I really wish that the fagility of this connector was mentioned in Step 10 or 11.. When i rotated the screen on step 11.. It pulled this connector out and now I can't get it back in.. I hate computers.. HA!
This is the most painful part of the whole event. Replacing this cable took me around 30 minutes !
I have tried and tried to get this cable back in. How do I know if I have messed it up?
Mine seems to be…upside down? Looks like the little flappy lock thing is on the bottom as opposed to it being in top as pictured?
I agree with everybody that this is the critical step in this fix. Removing it is not that difficult, the description is quite accurate, but I would highlight that the “rotate” part of the step could be detailed: the black plastic tab is attached to the metal lock (golden colored) , which should rotate into the direction of the cable almost 180 degrees to unlock the connector. After doing this you can pull the cable out of the connector, PARALLEL to the board and away from the connector. It travels a very short distance to disconnect. After going through the rest of the steps to remove the display, take some time to examine closely the connector and understand what you have to do to reconnect it on assembly. It helps to fully visualize beforehand, since on reassembly it is difficult to see properly.
Magnifying glasses are needed for this step. Carefully study the cable and how it attaches to the connector. Take a few pictures to help. This is the most difficult step.
-
-
-
Löse den Verbinder des Kabels zum Thermosensor des LCD aus seinem Sockel auf dem Logic Board.
The replacement hard drive I used doesn't even appear to spin up and the Time Capsule restore process doesn't show it as available. It just stays at Searching for disks and never finds it.
I had to use Disk Utility to partition the drive and then it showed fine. Rookie mistake.
JRBv3 -
I managed to damage the LCD thermal sensor socket in the logic board. Now the connector won’t stay in place. I know the missing thermal sensor should cause the fans to spin up (they do spin up after a while), but the screen is blank.
I connected an external monitor and it works fine, so it doesn’t seem to be a graphics or logic board issue. I also replaced the LED driver board with one from a working iMac, to no effect.
Can the missing thermal sensor be causing this?
Having the same problem. Black screen, works fine with external display.
Passerby -
-
-
-
Ziehe das Display sorgfältig in Richtung Oberkante deines iMac und hebe es aus dem Gehäuse. Achte darauf, dass sich keine Kabel verfangen.
Btw, I was pretty safe (& content) with two suction cups - i bought 3 for less than 7 Euros. They were a good help for a glass that hasn’t been removed since 2011. But i am sure fingernails will do a good job, too (of course not mine, cos i have short ones).
At the end of the job it was even possoible to clean the fan that sucks cool air into the iMac (w/ a paintbrush and a controllable vaccuum cleaner). After that, it’s also a good opportunity to clean the air inlet that is part of the aluminium case (behind the stand - it’s always dusty).
w/ regards from cantbtroo, Berlin
-
-
-
Entferne die folgenden vier Torx Schrauben:
-
Eine 9,3 mm T10 Schraube mit breitem Kopf
-
Drei 9,3 mm Schrauben mit normalem Kopf
In my case the red screw was on the lower left side near the power-data cable!
Same for me.
-
-
-
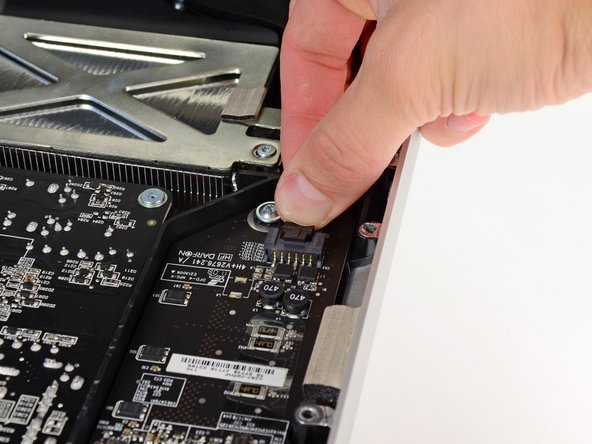
Ziehe den Stecker des Thermosensors vom optischen Laufwerk gerade aus dem Sockel auf dem Logic Board heraus. Ziehe parallel zur Platine.
The thermal sensor connector shown in the red box is the one for the hard drive, not the optical drive. The optical drive sensor attaches to motherboard near bottom left of optical drive fan.
The guide was correct in my case that this is the Optical Drive sensor. The board has “ODD Temp” written on it. Original HD has it’s own built in temperature sensor without a separate cable to the Motherboard, which is why OWC sells a special “In-line Thermal Sensor” SATA cable with a Temp. sensor that attaches to any new hard drive itself.
When I was removing the optical drive cable sensor the connector came loose from the board. Is there any way to repair this?
-
-
-
Hebe die innere Kante des optischen Laufwerks etwas an und manövriere den Stecker durch den GPU Rahmen am Logic Board.
-
Ziehe das optische Laufwerk vorsichtig aus den Befestigungsstiften auf der rechten Seite des Gehäuses. Du schaffst dadurch Platz, um das Kabel des optischen Laufwerks zu lösen.
-
Lasse das optische Laufwerk hängen und führe den Stecker des Thermosensors vom optischen Laufwerk hinter dem Kühlkörper der GPU heraus.
On the reassembly, I found threading the optical drive cable back under the GPU frame trying. Here’s some advice: Take some dental floss, form a loop, and feed that loop under the GPU frame. Put the cable into the loop of floss, tighten the loop, and pull the loop back through. This is much easier, faster, and far less frustrating.
-
-
-
Löse das Kabel zum optischen Laufwerk, indem du den Stecker weg vom optischen Laufwerk ziehst.
-
Entferne das optische Laufwerk vom iMac.
I have already installed the second SSD drive, but due to the size of the drive I need to change it with another SSHD 1 TB drive. Am I right that I have to follow the instructions up to Step 18? Because The SSD is already behind the optical drive, so what I need to do is remove it and install the new SSHD drive and put everything back again. Please confirm.
This was my only error on reassembly. The SATA cable must be under the black plastic prong. I did not want to pull to logic board again. I managed to bend the black plastic bits and get the cable in the right place.
-
-
-
Löse den rot markierten Teil des Aluminiumbands ab, der am Laufwerk klebt. Der Rest an der schwarzen Plastikhalterung kann bleiben.
-
-
-
Entferne die beiden T10 Torx Schrauben auf jeder Seite des optischen Laufwerks, also insgesamt vier.
-
-
-
Drehe die Halterung leicht weg vom Laufwerk.
-
Ziehe die Halterung weg vom offenen Ende des optischen Laufwerks, achte dabei darauf, dass sich keine Kabel verfangen.
-
-
-
Löse das Stück verklebten Schaumstoff mit der Spudgerspitze vom Thermosensor des optischen Laufwerks ab.
-
Heble vorsichtig mit dem flachen Ende des Spudgers den Thermosensor aus der Verklebung mit dem optischen Laufwerk.
Hello, I've broken the temperature sensor of the unit superdirve, where I can buy one?
-


Um dein Gerät wieder zusammenzusetzen, folge den Schritten in umgekehrter Reihenfolge.
Um dein Gerät wieder zusammenzusetzen, folge den Schritten in umgekehrter Reihenfolge.
Rückgängig: Ich habe diese Anleitung nicht absolviert.
41 weitere Nutzer:innen haben diese Anleitung absolviert.
Besonderer Dank geht an diese Übersetzer:innen:
100%

Diese Übersetzer:innen helfen uns, die Welt zu reparieren! Wie kann ich mithelfen?
Hier starten ›

4 Kommentare
Great tutorial. Now if I wish to replace the Superdrive by an SSD (the Superdrive is dead), since the SATA port of the Superdrive is 3Gb/s only, can I keep the Superdrive cable for the SSD but swap it plug to the free SATA III port on the motherboard? Or do I need a new cable?
Thanks
What kind of caddy do I need if I want to put an SSD in there? Is it 9.5mm or 12.7mm? Is any of it non-standard?
Hi! 12mm for imacs and 9 to macbooks... but 9 fits too cuz the place in imac is bigger (also 12 on macbooks not fit)
Very easy to lift the glass out. Don't jerk too hard.
kctipton - Antwort
Another comment on DATA & LCD Temp. Sensor cables: I had to remove the vertical sync, and the backlight cable, however, if you have an assistant or/can carefully rotate the screen clockwise/and then have it held up about 5" to 6" at a slight angle, you do not need to remove LCD data cable or LCD thermal cable, however - IMPORTANT: you must have a second pair of hands/or way to securely prop up the LCD. Also, don't rotate too much, since then you will pull out LCD data cable, and it renders the whole exercise moot, or can damage the cable or connector.
MaximBorzov - Antwort
You don't need suction cups. The screen, held by magnets, can simply be pried off using a very thin blade such as a screw driver and fingers.
Deepsurvival - Antwort
That's a bad idea. using a metal tool to pry off glass is likely to end with an expensive broken front glass.
Suction cups are common. Find a couple and do it the safe way. I use some cheap ones that came with iPhone repair kit.
max damage -
No need for suction cups, I just stuck my nails (short like guys usually have) between the top part of the screen and body, and it came off easily. I've never done it before, so it seems to be very easy.
Nikolas Lintulaakso - Antwort
Nails worked for me too
Rob Dale - Antwort
Just completed the replacement of the optical drive with an SSD using an OWC Data Doubler kit. Attempted to remove the optical drive without disconnecting any cables but found it a bit fiddly to orient the screen for good access. I bit the bullet and disconnected them and found the process less daunting than I imagined. Reconnecting them was similarly straightforward if you're careful.
Tip: you can skip the step for removing the optical drive thermal sensor connector from the motherboard. Still need to remove the sensor from the optical drive but you can leave that hanging and reattach it to the SSD later.
osienna - Antwort
I use Garmin GPS suction cup. Work very well
jc3Dcx - Antwort
I’ve just successfully installed a 1TB SSD in place of my optical drive thanks to the information here- thank you to everyone who has contributed!
3 comments- the procedure described here seems to vary between HD replacement and dual HD/optical drive replacement. This can be confusing at times.
Expect there to be minor differences between the layout described and what you find when you open up your iMac. There are also, surprisingly, differences between the HD enclosure description, and the article provided by ifixit.
I was able to replace the DVD/HD enclosure single-handedly without fully removing the LCD, or deconnecting any of the cables (steps 5-11). It’s a bit cramped, and fiddly, but I was not happy removing any of the cables despite watching videos, etc., since they all seemed to involve applying more force than I was comfortable with. A more detailed description of how to release them might have helped, but even here, there may be minor variations even within the 2389 model.
Good luck!
ivan birks - Antwort
I did it several times with one suction cup at the end of a kitchen brush. Once with the blade of a swiss army knive, also ok. And i’m pretty sure it works with fingernails too
Tai - Antwort
Fingernails are all you need to free the glass from its magnetic hold. If you don’t have them, slip something thin and plastic, like a spudger, at a top corner.
Max Powers - Antwort
Minha dúvida é a seguinte: após o técnico trocar o HD do meu iMac de 21,5 polegadas, a câmera parou de funcionar. Seria por causa da troca do HD? Tem solução?
Claudio - Antwort
Creio que o cabo da camera não foi plugado ou deu mau contato… ou até danificado.
glecyo@gmail.com
glecyo medeiros -
I can’t get my glass to budge. I’m replacing a cracked one and now it’s about to shatter.
jamboxmitchell - Antwort
I know that I'm replying really late but I advise to use clear tape over any cracks so the cracks don't get bigger
Jace Holmes -
Check for chips in the glass BEFORE you do this step. If there is a chip when you pull up with the suction cups you will wind up with a jagged mess. If you do have a chip I would advise covering the screen near the chip with clear tape of some kind before lifting out. Mine shattered right at the chip and the resulting glass dust cloud got all over. My solution was buying a new glass screen.
BCam - Antwort