Einleitung
Hier wird der Austausch oder das Aufrüsten der CPU am 2017er iMac 21,5" 4K gezeigt.
Einige Bilder in der Anleitung stammen von einem 2015er iMac, der geringfügige Unterschiede zeigt. Auf den Reparaturverlauf hat das keinen Einfluss.
Die Anleitung ist als "potentiell gefährlich" eingestuft, weil du am Netzteil arbeiten musst, welches große Kondensatoren enthält. Ziehe den Netzstecker und halte den Einschaltknopf mindestens zehn Sekunden lang gedrückt, damit sich die Kondensatoren entladen. Fasse die Platine nur an den Kanten an und berühre keine Bauteile an der Oberfläche.
Was du brauchst
-
-
Wenn du die iFixit-Reparaturhilfe aus Karton verwendest, dann baue sie zuerst mit Hilfe dieser Anleitung zusammen.
-
Bevor du beginnst an deinem iMac zu arbeiten: Ziehe den Netzstecker, drücke und halte den Ausschaltknopf für mindestens zehn Sekunden. Dadurch werden die Kondensatoren im Netzteil entladen.
-
-
-
Setze das iMac Opening Tool an der linken Seite des Displays, in der Nähe des An/Aus Schalters beginnend, in die Spalte zwischen Glaspanel und Rückgehäuse ein.
Don’t get too worried about starting exactly where the picture says. The glue is stronger in some parts so just start wherever is easier and then work slowly and patiently around in the direction shown.
As this guide doesn’t cover replacing the adhesive strips, I found referring to the following was useful (noting that it’s not for the same model of iMac, so the modification they mention wasn’t necessary): IMac Intel 21.5 "EMC 2544 Klebestreifen ersetzen
This part of the exercise should be done with extreme patience. I took my sweet time with the opening tool, rolling it through the entire panel and enclosure gap over and over again, until I was very sure no parts were sticking together anymore. And when I thought I was I done, I decided to do it over again.
You can "warm up" the adhesive before try to cut it with the tool using a hair dryer. Heat the edges for about a minute, keep moving it so you don't cause stress in the glass. Also the above note.. use the tool and then the cards. Do not use a guitar pick or other objects as the thickness will cause you to break the front glass, which is a bonded part of the display (expensive).
Merci pour ce conseil
-
-
-
Benutze es wie einen Pizzaschneider - Rolle es entlang des Spalts und trenne dabei den Klebeschaum in der Mitte.
-
Lasse das Werkzeug die linke Seite des Displays entlang laufen.
If re-opening a screen that was opened and re-attached using iFixit’s adhesive strips, I would strongly recommend heating it first with an iOpener, heat gun or hair dryer. 20 minutes after attaching with the iFixit adhesive I tried to open it again with the pizza slicer to fix something and cracked the screen on the left-hand side.
-
-
-
Fahre fort und lasse das Werkzeug um die obere linke Ecke laufen.
-
-
-
Fahre an der Oberseite des Displays fort.
In this step can I cut along the display without make any damage to the front camera?
Hi! Actually - there is no need to cut the tape around the camera area - there is no tape to cut at all! And so, the way go is easy - just pass 10 mm to the left and to the right from camera and start cutting!
P.S. Just did the whole procedure to replace a RAM and to add SSD on PSIe an hour ago! Seems to be different reading the instructions... you know - 2/10 and so on. But it's really not that hard, trust me. I'll give it 5/10.
P.P.S. By the way there is one trick to pass the difficult steps. Any action which requires pulling smth (motherboard, speaker, power supply unit) from the narrow crack (or should i say - slit?) at the bottom of your Imac is really not so easy.
And the trick is to first remove a thin metal stripe with some kind of insulation on it which held by 5 small (very small!!) screws at the bottom of your Imac. After you done it - it's easy to pull everything! Pay attention to the fact that one of this 5 screws at the center are more shortly than others.
If you're changing cracked EMC 2638 display to new assembly, there's two more steps:
Step 24: Use the tip of a spudger to flip up the metal retaining bracket on the display data cable.
Carefully pull the display data cable from its socket on the display assembly.
Step 25: Use the tip of a spudger to unplug bracket of the thermal sensor small cable near display data cable.
Carefully remove scotch tape covering thermal sensor. Using iSesamo or flat tip of the spudger carefully peel the thermal sensor away.
omg - forgot to switch the termal sensor from the old display...
now fan runs like crazy...
-
-
-
Beende das Schneiden mit dem iMac Opening Tool unten auf der rechten Seite des Displays.
Yes, do it many times to loosen the adhesive.
Would be good data to show the 3 areas (wifi antennas where the "tape" is larger and covers them. The rest of the "tape" is 1.4" and easy. Also after removing the display, be sure to remove the old "tape" from both the display and the rubber parts of the case. Use the spudger to start an end and it should pull off easily. Careful on the baackside of the display as you can scratch off the black paint/covering.
-
-
-
Beginne in der oberen rechten Ecke und zwänge eine Kunststoffkarte zwischen Display und Rahmen.
this step is extremely important NOT to stick in the cards too far….. doing so, you risk a 600 euro replacement as I experienced………
I drew a 3/8” line on my cards with a marker first.
I’m reading this on the EU store, please change all measurements to cm/mm.
@ifixit The next batch of cards you create should have a line printed on the card 3/8” in from the edges. Would make a nice reference.
Better to remove stand wedge at this point? Can’t see from pics
-
-
-
Verdrehe die Plastikkarte seitlich und vergrößere so den Spalt zwischen Display und Rahmen.
-
Bewege die Karte vorsichtig und langsam, damit das Displayglas nicht zu stark belastet wird - du brauchst nur einen Spalt von etwa 6 mm Breite zu öffnen.
This part must be done very carefully or you can damage the flat cable from display, despite it was under a iron cover.
-
-
-
Schiebe die Karte zur Mitte des Displays hin und schneide so allen Kleber an der rechten oberen Ecke des iMac auf.
-
-
-
Zwänge die Plastikkarte erneut in die obere rechte Ecke ein und lasse sie dort stecken. Damit verhinderst du, dass sich die Teile wieder verkleben.
-
-
-
Setze eine zweite Plastikkarte an der oberen linken Ecke des iMac in den Spalt zwischen Rahmen und Display ein.
-
-
-
Verdrehe die Karte nach oben, vergrößerte so den Spalt zwischen Rahmen und Display ein wenig.
-
-
-
Fahre mit der Karte zur Mitte hin, halte auch hier wieder vor der iSight Kamera an
-
-
-
Verdrehe nun beide Karten seitlich, wie im Bild zu sehen an den Ecken eingesetzt, und vergrößere den Spalt zwischen Gehäuse und Display.
-
Fange an, die Oberkante des Displays vom Rahmen weg zu heben.
-
-
-
Halte das Display mit einer Hand fest und löse mit der anderen Hand das Kabel der Stromversorgung des Displays.
Can this cable be replaced? I am worried mine is damaged. I have no display after the screen fell and stressed the display flex cables following an SSD upgrade.
This step should be done with extreme caution and care, as this step 19 is not described in great detail (sorry, author).
The first (most outward) cable will slide out by gently pulling it by its tabs. The second (inner) cable is more tricky, as the locking lever must be moved backward first, before gently pulling backward on the cable connector. The angled tweezers are useful here, to help lift that locking lever, because fingers are too big for this.
I found the best way to unplug this display power cable was to use my right hand, and the fingernails of my index finger and thumb to grab the ends of the tabs on either side of the connector, squeeze, and pull the connector out gently.
i think the cable nearest the case edge is held in by friction and can be gently pulled, maybe with fingernails or a spudger. The next cable is held by a wire lever clip as described above it unlocks so the cable can be removed. These cables are also fiddly to re-insert, I didn't get one of them home and had no display after power-up, so at the end, don't re-seal the screen until tested.
-
-
-
Halte das Display weiterhin mit einer Hand fest und klappe den metallenen Sicherungsbügel am Displaydatenkabel hoch.
-
Ziehe das Displaydatenkabel vorsichtig aus seinem Sockel auf dem Logic Board.
Cannot seem to find a replacement cable for this, as I suspect mine is damaged. Can’t even find a part number. Anyone know what it might be?
https://www.amazon.com/gp/product/B08TTL...
That's the part I ordered for mine and it seems to work ok. I did make a point of contacting the seller and advising them of my requirement and they ensured I got the right part and it matches the description of the link. Bear in mind I bear no responsibility if yours does not work since I am just sharing what I did and what I ordered. Thanks.
I also need that cable.
It's a little difficult to tell... but looking at the connection to the logic board on the video data cable, are the pins faced up or down?
On the display, same question since it appears you have to "twist" the cable during the reconnection step.
For this particular cable, take a good look before pulling on anything. Plug is locked on its socket with a bracket. You can lift this bracket by holding the small, flat black plastic handle that is attached to it. If you're struggling to grab it, use the end of the pizza roller handle to lift it, or the tweezers. Cable then comes off by pulling parallel to the main board.
How can I tell if either of this cable is bad? My iMac display won't turn on after reconnecting it. I'm using an external display and everything is working except for the iMac display. If I go to settings - display the built-in display is recognize. But again nothing shows up in the screen - not even the apple logo when turning it on.
-
-
-
Hebe das Display nahezu senkrecht hoch.
The best way to remove the chin adhesive is to use the tabs at either end (there are two strips that run from each outside corner to near the centre). Carefully pull the tabs up and the strips should peel off.
-
-
At step 21-22, releasing the adhesive strips from the bottom of the display, I noticed a tab on the outer end of each strip. Pull the tab to remove the whole strip, no need to mess around with the plastic cards!
Instead of the plastic cards, use the flat end of a spudger. Use it as scraper. Be careful as there are antennas mounted on the inside edge of the frame on the right side (facing you), and the top right (facing you). The original adhesive strips are on those as well. - ECJ
A little bit of hot air (eg. hair dryer) will help soften the adhesive. Use a piece of cardboard or equivalent if you want to avoid blowing hot air towards the electronics.
Be careful to remove absolutely everything - any remainder will create a bump and prevent your screen from sticking back to the frame when reassembling.
-
-
Hebe das Display vom Rahmen weg und entferne es vom iMac.
-
Möglicherweise musst du es von einer Seite her langsam anheben, um es von restlichem Kleber abzulösen.
Après l'étape 23, j'ai suivi les instructions de la vidéo intitulée: Upgrade RAM in a mid-2017 21-inch iMac without complete disassembly.
Lien: https://www.youtube.com/watch?v=_k9I7N9B...
J'ai pu upgrader la RAM en enlevant juste le ventilateur.
-
-
-
Entferne folgende fünf Kreuzschlitzschrauben, welche die untere Auflagestütze befestigen:
-
Vier 3,2 mm Schrauben
-
Eine 1,7 mm Schraube
2 notes for reassembly, carful with screws not to strip the heads as they are really really small, make note to cut a gap in the the adhesive over the whole for the microphone.
I managed to strip the head of one of the screws when putting it back in. So be carful with them when putting in / taking out. If you strip it on the way out you will need to take a fine drill and rill it out. Going back in, well as long as you never need to strip it down again not a problem.
The second problem is a real pain, you need to make sure to cut a gap in the adhesive just to the right of Center at the button to allow for the microphone opening. If you don’t, the adhesive tape will stop any real pick up on the Mic, so you just need to cut a small gap in it before putting on the screen. Unfortunately I didn’t find this out (or do my checked before sticking it all back down, so have to pull screen back off and reapply new adhesive
witha cut out in it at an other time.Refer her for more info on the mic / adhesive work around —> Muffled Microphone - iMac 21.5" (mid 2017) - Following Adhesive Strips
-
-
-
Entferne die untere Auflagestütze (auch "Kinnriemen" genannt) vom Gehäuse des iMacs.
Keep this long, aluminium part very straight when pulling it away or you might bend it
-
-
-
-
Entferne folgende Torx T10 Schrauben welche die Festplattenhalterungen am iMac befestigen:
-
Zwei 21 mm Schrauben
-
Eine 9 mm Schraube
-
Eine 27 mm Schraube
At step 26, when reassembling, it's super easy to over-tighten the 9mm screw and strip the brass ferrule out of its hole in the plastic bracket (%#*@).
Mine has 4 different length screws, the two red colored 21mm screws in this guide are actually two differ lengths
buongiorno, l'imac del 2019, non monta alcuna ssd, ma monta una m2 direttamente sulla scheda madre!
pertanto nella guida andrebbe aggiunto il cavo sata con sensore temperatura da aggiungere sulla scheda madre, per poter collegare un nuovo hd ssd altrimenti rimarrete come me bloccati con un imac aperto e non assemblato, in attesa di ricevere il cavo acquistato su internet da amazon o terze parti.
vi consiglio inoltre di aggiungere una foto reale del ò'imac 2019 nella guida in cui manca l'ssd, renderà subito la problematica che avranno in molti!
Hi, mine doesn’t HAVE an HD/SSD to remove, the bay is empty (yes it was fully working yesterday. So what do we do ? I see someone else with the sane issue above….
-
-
-
Drücke abwechselnd mit der Spudgerspitze an jeder Seite des Kabelsteckers der Einschalttaste und lasse ihn so allmählich aus seinem Anschluss herauswandern.
-
-
-
Drücke abwechselnd mit der Spudgerspitze an jeder Seite des Steckers am Kabel der Netzteilsteuerung und lasse ihn allmählich aus seinem Anschluss herauswandern.
-
-
-
Entferne die beiden 7,2 mm Torx T8 Schrauben, mit denen das Netzteil am Rückgehäuse befestigt ist.
-
-
-
Ziehe das Netzteil ein wenig nach oben und aus dem Rückgehäuse heraus.
-
Drehe das Netzteil gegen den Uhrzeigersinn, hebe die rechte Seite dabei etwa 2,5 cm höher an als die linke.
-
-
-
Schiebe das Netzteil nach rechts, um die Schraubenpfosten am Rückgehäuse freizulegen.
-
-
-
Rücke das Netzteil nach vorne und hole es aus seiner Vertiefung im Rückgehäuse heraus.
-
-
-
Um das Kabel abzutrennen, musst du die Verriegelung auf der Rückseite des Steckers, hinter dem Logic Board, drücken, dann kannst du den Stecker gerade herausziehen.
-
-
-
Drücke die Raste an der Seite des Netzkabelsteckers mit dem flachen Ende des Spudgers nach innen.
-
Während du die Raste mit dem Spudger gedrückt hältst, kannst du das Netzkabel fassen und den Stecker gerade aus seinem Anschluss herausziehen.
-
-
-
Ziehe den Stecker am Lüfterkabel gerade aus seinem Anschluss auf dem Logic Board.
-
-
-
Entferne die drei 10 mm Torx T10 Schrauben, welche den Lüfter am Rückgehäuse befestigen.
-
-
-
Hebe die Festplatte am Rand in der Nähe des Logic Board an und ziehe sie etwas aus ihrem Sitz.
The newer drives have rubber ends and an adhesive side, be careful removing them if replacing the drive and be sure they are securely pushed back into the holder
-
-
-
Löse das SATA Combo Kabel für Daten und Stromversorgung, indem du mit dem Spudger vorsichtig seinen großen Plastikverbinder weg von der Festplatte hebelst.
When reconnecting the SATA cable, there is nothing to make the connector hold still, and it is hard to reach, so it took several tries. I ended up taking off the rubber baby buggy bumpers to get more room, and then jamming them back on after getting the SATA connector snugged up.
If by rubber baby buggy bumper, you mean left speaker, then yes, I agree. Reinstall the hard drive before the left speaker.
Kudo to @jerrid_foiles! I was going crazy trying to attach the SATA cable until I took the two screws out of the left speaker and slid the top end of it aside by about 3/4 inch. Make the whole process SO MUCH easier!!
We solved this by removing the hard drive tray screw, then inserting the cable into the SATA hard drive. Then hold the hard drive a bit out of the way to insert the 7.3mm hard drive tray screw.
Agree with this method, found it an impossible task to reconnect the SATA connector until removed the tray screw, then it was relatively easy to reconnect and then replace the tray screw.
Also agree with this method!
-
-
-
Entferne die Festplatteneinheit vom iMac.
When reassembling, I found it easier to loosen the HD tray screw from Step 48 and pull the tray outwards from the left side in order to plug the SATA cable in more easily.
Thanks! I, too, had a hard time reconnecting the SATA cable.
I found this helpful too!
Anwar -
I did loosen the speaker so I could get a tool behind the SATA cable to push it on to the SSD drive. Otherwise hard to align cable.
I found the easiest way to connect the SATA cable was to not screw the plastic hard drive tray down until you plug the drive in. That way you can easily push the connector in and due to the cable you’ve got some wiggle room. You can position the tray then just lift one end of the drive up and secure the screw. Then just push the drive down.
This was the step that I had the most trouble with. I’m used to replacing a hard drive in a MacBook Pro, where the “plug” that you plug the drive into is a rigid thing that you can firmly press the hard drive into.
With the iMac, the plug is situated on the end of a non-rigid cord, so the plug moves back when you try to snap a drive into it. Also, those two rubber gasket things that you adhere to the side of the drive really make it difficult to maneuver the now-overly-chubby drive towards the plug.
After must frustration/concern, what I ended up doing was temporarily removing the rubber gasket things, using the “spudger” as kind of a lever behind the “plug on a cord” so that it didn’t move as much, and then pushed the gasket-less SSD into the plug.
Once I got it connected, I put the rubber gaskets back on the sides of the SSD and kind of coaxed it down into place, using the pointy end of the spudger to get the chubby corner pieces to “sit” correctly in the rigid plastic tray that the SSD kind of rests in.
From another comment elsewhere on this repair, I *highly* recommend removing the two screws holding the left speaker in place, then sliding it just a tad out of the way to be able to easily attach the SATA cable. You don’t have to move it much to make the whole process so much easier!
-
-
-
Entferne die 7,3 mm Torx T8 Schraube, welche den Festplatteneinschub am Rückgehäuse befestigt.
it`s a t10 screw..! ;)
I found it easier to connect SATA cable before fixing tray.
-
-
-
Entferne den Festplatteneinschub.
I am following these procedures for the following: iMac Retina 4K - 21.5" - 3GHz Quad Core - Radeon Pro 555 2GB - 4GB/4GB (8GB total - 2 slots) 2400MHz DDR4 SO-DIMM - Mid 2017 - Model: MNDY2LL/A - iMac18,2 - A1418 - 3069. In my case, the SATA cable is clipped into the bottom of the hard drive tray. Pull the hard drive tray up slightly and angle to reveal clips. SATA cable pops out from the side of each clip.
-
-
-
Ziehe das linke Lautsprecherkabel vorsichtig aus seinem Anschluss auf dem Logic Board heraus.
-
-
-
Hole das Kabel zum linken Lautsprecher aus seiner Halteklammer an der Rückseite des Rückgehäuses heraus.
-
-
-
Hole ähnlich wie im vorigen Schritt das Geflecht aus SATA- und Versorgungskabeln aus der Halteklammer heraus.
-
-
-
Ziehe das Stück Klebeband ab, mit dem der linke Lautsprecherstecker und die SATA Versorgungs- und Datenkabel verbunden sind.
-
-
-
Klappe den metallenen Sicherungsbügel am Stecker des FaceTime Kamerakabels hoch.
-
Ziehe das FaceTime Kamerakabel gerade aus seinem Anschluss auf dem Logic Board heraus.
-
-
-
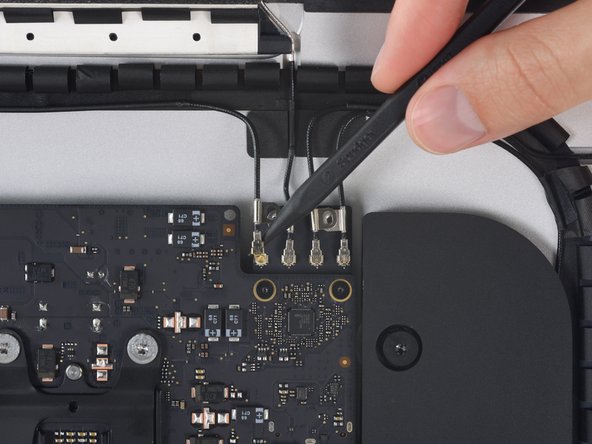
Entferne die beiden 4,0 mm Torx T5 Schrauben, mit denen die vier Antennenstecker an der AirPort/Bluetooth Karte befestigt sind.
-
-
-
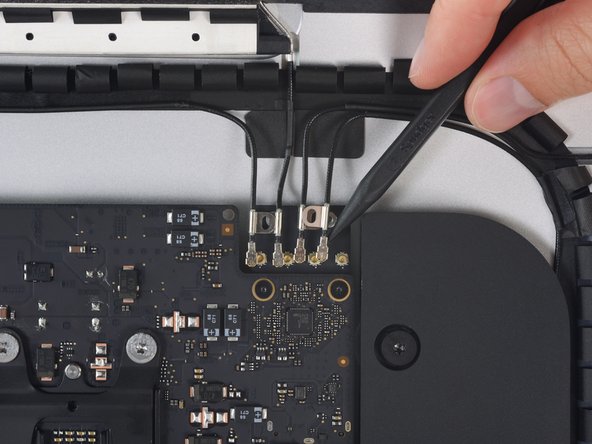
Heble alle vier Antennenstecker gerade nach oben und löse sie von ihren Anschlüssen auf der AirPort/Bluetooth Karte ab.
-
-
-
Ziehe vorsichtig den Stecker am rechten Lautsprecherkabel gerade nach unten aus seinem Anschluss auf dem Logic Board heraus.
-
-
-
Heble den Stecker am Kopfhörerkabel mit dem flachen Ende des Spudgers aus seinem Anschluss auf dem Logic Board heraus.
-
-
-
Entferne folgende Torx T8 Schrauben, mit denen der Abluftkanal am Rückgehäuse befestigt ist:
-
Zwei 6,2 mm Schrauben
-
Zwei 4,7 mm Schrauben
-
-
-
Klappe den Sicherungsbügel am ZIF Verbinder des Mikrofonflachbandkabels mit der Spudgerspitze hoch.
-
Ziehe das Mikrofonflachbandkabel vorsichtig gerade aus seinem Anschluss heraus.
-
-
-
Entferne die vier 7,3 mm Torx T8 Schrauben, mit denen das Logic Board am Rückgehäuse befestigt ist.
-
-
-
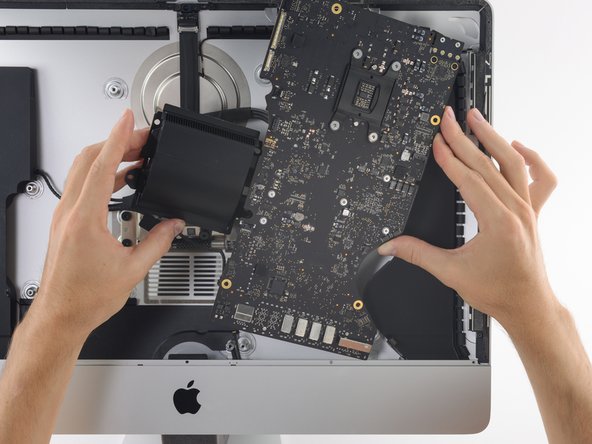
Kippe die Oberkante des Logic Boards vom Rückgehäuse weg.
-
Während du das Logic Board kippst, musst du den rechten Lautsprecherstecker nach rechts aus dem Weg des Boards ziehen.
-
Hebe das Logic Board gerade hoch und aus dem iMac heraus.
When repairing, I accidentally broke a small piece of what it seems to be a resistor. Mac still works fine and diagnostics reports no errors. Be careful when removing the mother carefully so it doesn’t hit the aluminium cover.
-
-
-
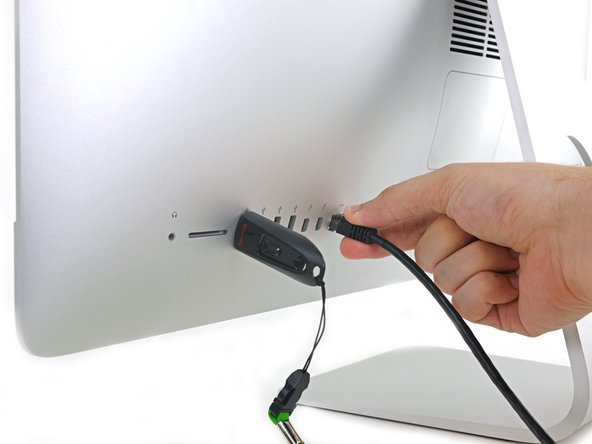
Stecke einen USB-Stick und/oder ein Ethernetkabel ein, so dass das Logic Board beim Festziehen der Schrauben in der richtigen Lage sitzen bleibt.
-
-
-
Drücke die Klammer mit dem Daumen herunter und hebe gleichzeitig den SATA Datenstecker hoch aus seinem Anschluss auf dem Logic Board, um ihn zu lösen.
-
-
-
Fasse den Versorgungsstecker der Festplatte an und ziehe ihn vorsichtig aus seinem Anschluss auf dem Logic Board.
-
-
-
Die Befestigungsschrauben des Kühlkörpers sind mit vier schwarzen Aufklebern zur Originalitätssicherung bedeckt. Löse sie ab.
-
Entferne die vier Torx T10 Schrauben, mit denen der Kühlkörper befestigt ist, von der Rückseite des Logic Boards.
-
-
-
Löse jetzt ganz die drei unverlierbaren Torx T8 Schrauben, mit denen der Kühlkörper an der GPU befestigt ist.
-
Entferne die beiden 5,4 mm Torx T8 Schrauben, mit denen das Wärmeableitungsrohr am Logic Board befestigt ist.
-
-
-
Drehe den Kühlkörper um und heble mit dem Spudger die CPU heraus, achte darauf, dass sie dabei nicht herunterfällt.
-
-
-
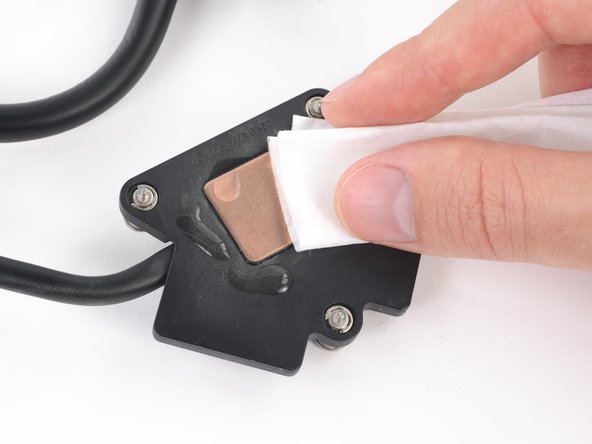
Nimm ein fusselfreies Tuch (oder Kaffeefilterpapier) und entweder Isopropylalkohol oder ArctiClean Wärmeleitpastenentferner und entferne gründlich die Wärmeleitpaste von den Kühlflächen für CPU und GPU am Kühlkörper.
-
Wenn die Oberflächen des Kühlkörpers gut gereinigt sind, entferne alles Fett mit einem neuen fusselfreien Tuch oder Kaffeefilterpapier und einem Tropfen ArctiClean Oberflächenreiniger und bereite so die Kupferoberflächen des Kühlkörpers vor.
-
Lasse den Kühlkörper gut trocknen, während du weiterarbeitest.
-
-
-
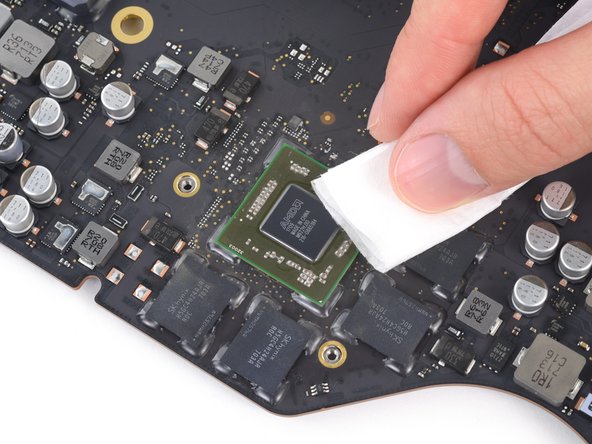
Entferne vorsichtig den Überschuss an Wärmeleitpaste mit einem Spudger von der GPU.
-
Benutze wie zuvor ein fusselfreies Tuch oder Kaffeefilterpapier und die geeigneten Flüssigkeiten, um die Oberfläche der GPU zu reinigen und vorzubereiten.
-
Reinige auch die vier VRAM Chips rund um die GPU von der Wärmeleitpaste.
-
-
-
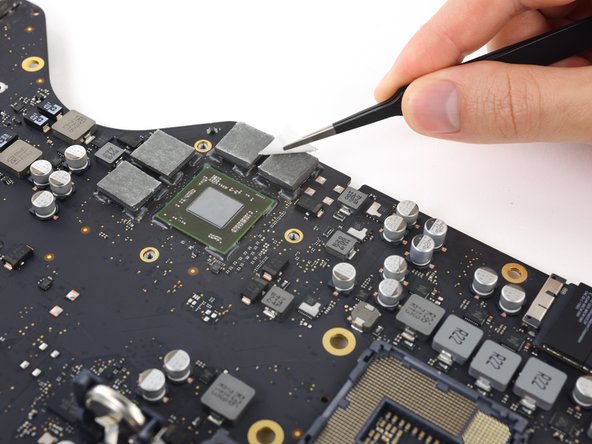
Bringe Wärmeleitpads an den vier VRAM Modulen rund um die GPU an.
-
Ziehe die Schutzfilme mit einer Pinzette von den Wärmeleitpads ab.
-
-
-
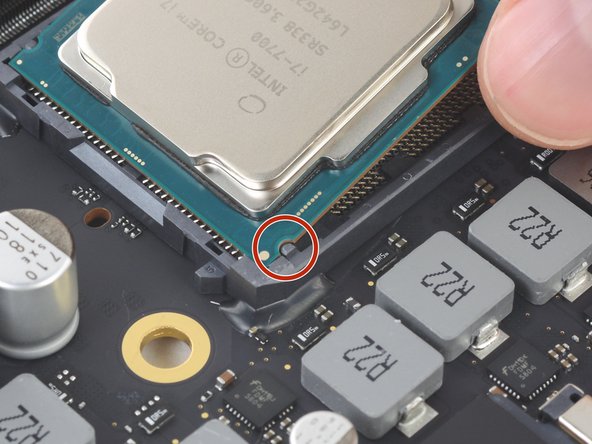
An den Kanten der CPU befinden sich kleine Ausschnitte, die mit den entsprechenden Einkerbungen an den Seiten des Sockels übereinstimmen müssen.
-
Richte die CPU sorgfältig in ihrem Sockel auf der Hauptplatine aus und lege sie in ihre richtige Position.
Is it possible for the 21.5, 4K model to support/handle the i7-7700k processor?
-
-
-
Folge dieser Anleitung entsprechend deines CPU Typs und trage neue Wärmeleitpaste auf die Oberfläche deiner CPU auf.
-


Um dein Gerät wieder zusammenzusetzen, folge den Schritten in umgekehrter Reihenfolge.
Um dein Gerät wieder zusammenzusetzen, folge den Schritten in umgekehrter Reihenfolge.
Rückgängig: Ich habe diese Anleitung nicht absolviert.
19 weitere Nutzer:innen haben diese Anleitung absolviert.
Besonderer Dank geht an diese Übersetzer:innen:
100%

Diese Übersetzer:innen helfen uns, die Welt zu reparieren! Wie kann ich mithelfen?
Hier starten ›

36 Kommentare
Can I upgrade to i7 7700K on iMac 2017 21.5inch ?
looking at the compare on intel’s website:
https://ark.intel.com/compare/97128,9712...
the 7700k being a 130w vs any Apple installed CPU being 65W, I’d think the the likelihood to overheat or draw too much power would be high but I don’t have enough experience to know for certain.
Benjamin -
Hey Mikkser, 8-series (Coffee Lake) CPUs require the Z370 chipset, which to my knowledge isn’t on the 2017 iMac logic boards. The socket is the same as the last generation so you’d be able to plug an 8700K in, but it wouldn’t work.
Intel Core i7-8700K Desktop Processor 6 Cores up to 4.7GHz Turbo Unlocked LGA1151 300 Series 95W BX80684i78700K would that work with it
8th Gen isn’t compatible with chipset. see previous comments.
Benjamin -
The Intel Core i7 8700K is an eighth generation Intel CPU. 8th gen Intel CPU’s aren’t compatible with Socket LGA 1151 revision 1 which is what iMac’s use. 6th and 7th gen Intel Core i3/i5/i7 are compatible, but again not 8th gen.
What are the maximum specs for cpu, gpu and ram available for this device_ thank you
what I mean is: can install a i9? which is the most powerful gpu the computer will hold? is it possible to install ddr4 ram and still dont create a bottleneck in the motherboard? thanks
There are no i9 CPUs on a FCLGA1151 Socket which this iMac model uses.
Benjamin -
The Intel Core i9 uses socket LGA2066 and not 1151 revision 1. Also the GPU is not replaceable in the iMac as replacement GPU’s aren’t available and even if they were I don’t think you can remove the GPU anyway.
hi, can i use the Intel Core i7-7700K 4.2Ghz my iMac 21.5 4k 2017 instead of the 3.6ghz version? thanks a lot.
Hey Vicky, you CANNOT use the i7-7700k for this model as the logic board doesn’t recongize it. I tried it myself and found out the the non k version (i7-7700) does work with it. It would be nice if someone could update this guide for future people trying to upgrade the cpu!
@willran Thanks for this. I had incorrectly stated that we tested the unlocked version—we didn’t. Like you, we used the vanilla i7-7700 and it’s still working great. I’ve removed the 7700k from the parts list. Good catch!
Purchased the kit, maxed to 32GB and i7-7700 (non k version), this thing SCREAMS now with the upgrade! (I do code and a lot of Sketch work…) The whole thing took me 3 hours.. the most time was spent on removing the *!&*^#% adhesive from the screen back panel and the frame. THANK YOU for the guide, the instructions were 100% correct, cheers
Just upgraded from i5-7500 to i7-7700 (also did SSD and RAM). Anyone experiences higher temps or random temp spikes/increase in fan activity?
I have 7700K and I have not seen any issues.
ua2599 -
did you add enough thermal paste? Also @ua2599 do you really have the 7700k working properly on this model imac? Can you tell me about it?
@frankomendozer yes it working for me and been working for a while now. i had to troubleshoot multiple times to get it to work. my Thunderbolt was not working after the install so I had to do installation of the OS multiple times. I changed my HDD to SSD. I had to break the fusion dive and remake the fusion drive and reinstall. It was time consuming.
ua2599 -
I have had no issues with 7700K @4.2 GHz . No heat up issues as its a 91W TDP. Been using to edit in FCP . @frankdoof
iMac Intel 21.5 "Retina 4K Display (2017) Replaced the processor with i7 7700 computer like booting, but no image, the screen does not light up. If you put the i5 processor back, it 's OK. What's the reason?
I have the same issue upgrading to a i7-7700, got the boot chime but the monitor is blank, it will eventually boot into MacOS (the reason I know this is because I can hit the volume level keys and I can hear the feedback when the volume is changed.) but again, no display. Yes, I double-checked the screen connectors to ensure they are firmly installed. Tried nvram & SMC reset. still no display.
UPDATE! So I took a chance and removed the mainboard from the iMac again, removed the coin battery from the mainboard, took a screwdriver, and touched the positive and negative of the battery holder for several seconds (in theory this should hard reset the smc/pram). reinstalled everything and BAM! I got my screen back! and it booted right into MacOS! Checked the system info and it shows an i7 CPU installed!
So this is the processor to buy right guys http://www.tigerdirect.com/applications/... ???????????????
Hello I have done the manipulation of replacing the i5 by i7 7700 k or not k and it does not work I only had a black screen...I had no luck
Hello, I have installed 7700K and its been working for past few years. I had issues as well but my issue was the USB-C ports were not working. I tested different cables, different devices but nothing would connect but mac would start and run smoothly. I had to reinstall OS multiple times and i think that made the ports work. No issues ever since. Goodluck
ua2599 -
Just checking to see if this is comparable:
I am thinking it will work but I will wait for others to respond.
yes it will work. I have 7700K working.
ua2599 -
@ua2599 Awesome thank you! it not being a 65w TDP wont matter? i think i read earlier that you had issues. Would i run into these USB issues with the K vs the non K version?
also, whats the drawbacks or benefits of running a 65w TDP vs 95w TDP
I have not seen any issues with 95w TDP. You gain little speed but 95w will produce more heat so if we keep it in cool environment then you should be okya. Mine is working smoothly, initially i had issues with USB but after redoing it multiple times ( as in putting it back to original setting and then doing the mod) it got fixed…. Not sure how but it was fixed and its been working ever since. Good luck…
ua2599 -
Can the power supply cable going from the psu to the logic board
https://guide-images.cdn.ifixit.com/igi/...
be replaced (bought separately)?
On my iMac EMC 3069 it is different (no connector/adapter as shown on the image) and it is cut (damaged). The leads coming through insulation.
Do they have problems/troubles with this cable when manufacturing/assembling?
Hallo an Alle, ich habe da ein Problem. Mir ist das Flexkabel am Mikrofon durchgebrochen. Nun ist es nicht mehr zu gebrauchen. Habe schon drei Tage danach im Internet gesucht, aber ich finde nichts. Hat jemand von Euch eine Bezugsadresse oder noch ein herumliegen? Besten Dank im Voraus und viele Grüße
The wedge is an extremely tight fit for this model. I was worried that the amount of force needed to use it as shown might damage the stand, so I used it with the long side down instead. It worked fine that way and didn’t need anywhere near as much force to insert.
roberttrevellyan - Antwort
Here’s a good YouTube vid on upgrading the RAM: Can a Normal Person Upgrade the RAM in the 2017 21.5" iMac?
Dan - Antwort
Here are a couple tips from me:
1) Expose the adhesive to extreme temperatures. I did this by transporting my iMac in my car, screen-down on a piece of cardboard on a cold February morning (in Chicago). When I went to pick up the iMac, the screen practically fell off the chassis. I would have been distraught by this if I hadn’t already planned this replacement. So it was a happy accident.
2) Remember to expell the residual power from the power supply by pushing the power button while the iMac is unplugged. This does NOT guarantee it’s safe to touch, but when I accidentally brushed the solder and exposed capacitors, I didn’t get shocked.
jerrid_foiles - Antwort
Instead of using the wedge, I placed the iMac faced up with the top side (web cam) facing me while I ran the pizza roller around. It worked out great!
Sam Fung - Antwort
“All iMacs also come with a traditional hard drive” mine doesn’t!! it’s HDD bay is completely empty, no SATA cable or anything. I guess I’ll have to upgrade the PCIe SSD instead.
Chris Hughes - Antwort
There is no replacement glass for this model, it is part of the LCD and impossible to remove or replace- the entire LCD has to be replaced unfortunately if the glass is cracked or damaged. You will have to Google search for a replacement. Also be careful with some of the lock tight tork screws as I broke one of my screw mounts taking one out.
Phil Tesone - Antwort
I used this service wedge but also found it a very tight fit. The same stabilization can be achieved by using a big rolled up towel.
Ernst - Antwort
While this is a good instruction guide, I recommend to also look at OWC’s instruction video about drive installation, before starting the exercise. Those install videos are very detailed and useful.
Ernst - Antwort
Main advice: TAKE YOUR TIME with the pizza roller.
Make several passes, until you really feel like there's no more sticker in the way. Stay away from the camera though (approx. 1inch / 2.5cm on both sides). This will reduce the work left with the plastic card. Adhesive is really on the edge of the screen so there is absolutely no need to go any further than the recommended 1cm / 3/8inch depth.
Where are the sensitive parts?
Facing your iMac, imagine you're looking at a watch. There are antennas on 1, 2 and 4 o'clock. Do not insert any metal piece there (nor anywhere else, btw). Other than that AND the screen cables underneath the camera, not much danger.
Froggy Manny - Antwort