Einleitung
Mithilfe dieser Anleitung kannst du die Festplatte austauschen.
Was du brauchst
-
-
Löse die einzelne Kreuzschlitzschraube in der Mitte der Zugangsklappe.
-
Entferne die Zugangsklappe von deinem iMac.
-
-
-
Befestige zwei Saugheber in gegenüberliegenden Ecken der Glasscheibe.
Save $15 dollars and use a plunger. Works perfectly.
Perhaps not so elegant but equally effective without any adverse effects to either... try a vacuum cleaner.
The same kind of suction cups are available from Harbor Freight Tools (Item # 62715) for $2.99 each or $5.98/pair (plus sales tax).
-
-
-
Ziehe die Glascheibe vorsichtig gerade vom iMac weg.
The glass panel is somewhat thin and should come away quite easily without much force so be gentle.
To reinstall the glass, I lined up the bottom edge first, then pivoted the top in. The magnets pulled it quickly into place.
-
-
-
Entferne folgende zwölf Schrauben, welche die Frontblende am rückwärtigen Gehäuse befestigen:
-
Acht 13 mm T8 Torx Schrauben
-
Vier 25 mm T8 Torx Schrauben
I only had two 25 mm T8 Torx on my model. (The two inner orange circles as shown in the diagram.)
I don't know if this is different but i am in the process of disassembling a 24' imac emc: 2134. i have only: (2) 25 mm T8 screws the inner two on the bottom of the screen. I have (4) 13 mm t8 screws the outer most holes on the bottom and the 2 holes on the right side of the monitor above the drive entrance and the remaining holes are (6) 11 mm t8 screws
I have the same screws as ccarter on a 2211 except on the bottom row there are only 4 screws total, the longer ones go in the middle two.
My 2211 has a different screw configuration.
2 - 32mm long screws towards the middle of the bottom edge
4 - 18mm long screws (2 at the corners of the bottom edge and 2 along the right edge)
6 - 13mm screws along top and left edges
Mine is the same — two very long, four medium, and six short. Also my T9 worked better than my T8 which was a bit loose.
I have the same screws as Christian. The key is to make sure all screws are flush to the surface, so that the glass can be held up by the magnets.
On mine, for the red circles, I had the six 13mm Torx plus two 25mm Torx. It's not indicated in the picture here, but the 25mm Torx went on either side of the optical drive.
I marked next to each hole with a pencil "S, M or L" to indicate which length screw goes where. No guess work on reassembly.
-
-
-
Hebe die Frontblende vorsichtig an der Oberkante aus dem rückwärtigen Gehäuse. Es hilft, wenn du dabei ganz sanft mit den Daumen auf die Ecken des Displays drückst.
-
Wenn die Oberkante der Frontblende weg vom rückwärtigen Gehäuse ist, dann drehe die Frontblende in Richtung des Standfußes und entferne sie aus dem rückwärtigen Gehäuse.
Looking at the meaning of the LEDS
i've got 3 LEDS on but i don't get a chime or the screen.
i am going to check the inverter voltages but can only find info for the 20" macs iMac Intel 20" EMC 2210 Power Supply Output Voltage Test
does anyone know where i can get info for the 24"
i have the same thing, 3 LEDs on but no chime and no screen.
what is the fix? and problem?
Bill -
-
-
-
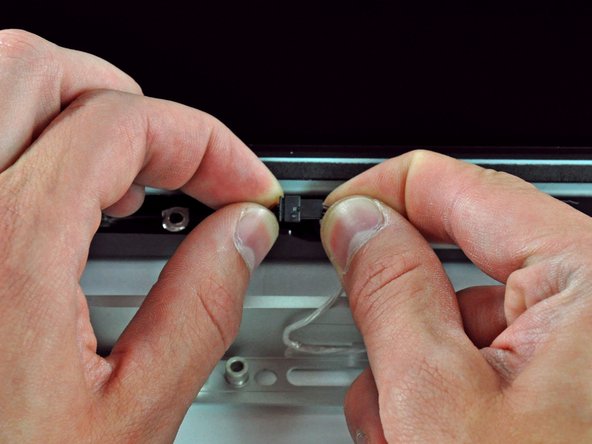
Löse das Mikrofonkabel ab. Entferne dazu das Klebeband, falls notwendig.
I also skipped disconnecting the microphone cable. I have a large table and I stacked some books next to the iMac. There was plenty of cable for the bezel to fold nicely over the top of the iMac.
I used the floor instead of a table and left the cable connected.
-
-
-
Trennt den Temperatursensor des LCD ab, indem du seinen Stecker gerade aus seinem Anschluss auf dem Logic Board ziehst.
The temp sensor on my EMC2134 is located underneath the LCD and the cable is not very long. I propped up the LCD to facilitate removal.
You have to be extremely careful when pulling out the LCD Temp connection as it doesn't want to come easy. I almost pulled the entire connection off the logic board using too much force. I therefore, used a pair of hemostats to grab the male end (the very top of the connector) and used a small screwdriver to hold the base of the connection in-place (female end attached to the logic board) in order to pull the connector apart.
There apparently is a variant of the EMC2134, like Pierre Scerri said. It has its LCD temp sensor underneath the LCD; the thin wires are about 5 in / 13 cm long and taped to the back of the LCD, and only about 2 in free, so lift the LCD gently.
There is a connector on the place where the LCD temp connector is on the iFixit photo, but in this variant it is marked 'CPU FAN' and there is no reason to disconnect it.
The logic boards in my computer are black, not blue.
-
-
-
Entferne die beiden 5,3 mm Torx T6 Schrauben, welche das Displaydatenkabel am Logic Board befestigen.
I used surgical tweezers to put place these two tiny screws back in without dropping them into the computer.
Okay. It was extremely difficult. I had to use precision screw (1.4 m/m). It worked on one of the screw. The other one... I was forced to use a hexagon bit at 1.5 size to a success with extreme precision and careful maneuver. I just hope nobody else experiences this as much as I have. Good luck.
-
-
-
Löse den Stecker am Displaydatenkabel aus seinem Anschluss auf dem Logic Board, indem du seine Plastiklasche zu dir, weg vom iMac ziehst.
For my 2134 iMac, I ended up just (carefully) putting my fingers on the edges of the little board and (gently) pulling up. Did the trick for me (I couldn't get anything to happen when I pulled up on the plastic tab, which I did also have trouble finding purchase on)
Same for me :just pull upwards with your nails on both edges.
Pull up works, no clue why they say pull down because you can’t no room to pull down.
Depends on exactly where the tape was positioned originally; this determines whether it will easily pull “up”. I find that grabbing the connector opposite the screw holes with two fingers and jiggling it free was dead easy. Much easier than keeping a grip on the tape tag.
-
-
-
-
Entferne die acht 12 mm Torx T8 Schrauben, welche das Display am rückwärtigen Gehäuse befestigen.
-
Hebe die rechte Seite des Displays ein paar Zentimeter aus dem iMac heraus.
My T9 bit fits better than my T8 bit.
-
-
-
Während das LCD angehoben ist, kannst du das LCD Kabel nach unten abziehen.
-
Eine andere Möglichkeit ist, das LCD Versorgungskabel am LCD abzulösen und nicht am Netzteil.
I was unable to disconnect the LCD cable, possibly due to fear of breaking the connector. I was able to swap drives with it connected. The iMac was placed on its rear cover on a large table, leaving plenty of workspace to rotate the LCD panel to the left side while still connected. The screen will lay at an angle on the case edge. I verified the LCD cable was clear of the case endue and not pinched.
This also avoids going near high power capacitors with your fingers.
I found it easier to disconnect the LCD cable at the LCD end after lifting the black tape.
Fully agree. Easiest is to remove cable from LCD in stead of trying to pull it off the board
Remove cable from the LCD Display not the board
Fully agree with others. It is easiest is to remove cable from LCD display instead of trying to pull it off the board. It comes off the board very easily, but it is difficult to put it back onto the board. It is easier to snap the cable bad onto the LCD Display itself.
ToddR -
I could not get the LCD power cable disconnected from the board - it is on really hard and there is no way to leverage it off without breaking something. My solution was to leave the screen attached and rotate it away from the work area/computer (granted you need a work surface that is large enough and a soft surface to place the screen on). If you try this method, be careful that you keep clear of the screen during the remaining steps - should not be hard.
It seemed that if I ever got the connection unplugged, there would be no way to get it back under and re-attached properly.
This is probably the toughest step of the entire process that needs a workaround.
As said previously, reconnecting the data cable is really difficult and I managed to bend a pin. Thanks to good support from ifixit staff I managed to bend it back - not sure how as it's so small. Unscrewing the IC board is a good idea. If I ever had to do this again I would avoid disconnecting this cable and just move it out of the way, or disconnect it at the other end as previously suggested.
LIke others mentioned, this was the most difficult step because of the awkward angle. Working alone I managed to get it off but found it much harder to line it up properly for reattachment. What I ended up doing was getting someone to hold the the LCD (resting on the left side, perpendicular to the iMac which was laying down) and I removed the 4 screws that hold the power supply in place. Removing those screws allowed me to lift the power supply a couple inches which made it so much easier to reattach. I wish I had done that when I was trying to remove the cable during disassembly. Good luck!
This was near impossible to remove as there is no room to grip the connector and no easy way to wedge something in there to help remove it. I felt like giving up but the hard drive removal and swap was so easy you just need to get someone to hold the screen for 10 minutes. Don't try removing the cable ... you most likely will get frustrated unnecessarily.
Les commentaires sont tous en anglais à cette étape, et j'aurai dû faire l'effort de les lire avant de perdre 1h à cause de ce connecteur. Effectivement, il n'est pas nécessaire de débrancher le connecteur de l'écran, car c'est une vrai galère à remettre sans risque de le casser. On peut donc laisser l'écran branché, à la verticale, soigneusement incliné sur un mur, l'imac toujours posé sur le bureau. J'espère que ce message sera utile, car j'aurai bien aimé qu'on me le dise avant !
+1 for removing the LCD cable from the screen side, not the mac side.
Not removing it, depending on the lenght of the cable which doesn't seem to be fixed, might not be an option for everybody.
Remove cable from the LCD Display not the board
Fully agree with others. It is easiest is to remove cable from LCD display instead of trying to pull it off the board. It comes off the board very easily, but it is difficult to put it back onto the board. It is easier to snap the cable bad onto the LCD Display itself.
This is really a good way to break the cable! Avoid the stress easily by removing the four screws (T-9) holding the video board down, then lift the edge near the cable before removing. Also, the cable is easily reattached to the board with these four screws removed. Reattaching without doing so is time consuming and quite difficult. This approach is easier than removing the cable from the LCD.
Reconnecting the LCD Connector was the only challenging part of this procedure. I must have bent the pins on the LCD connector when taking it off so was unable to reattach. I ended up taking off a bracket that was adjacent to the LCD connector as well as the other end of the cable....O I disconnected these 2 pieces and was able to examine the other end of the LCD connector I was able to bend the pins back into place and the connector snapped back into place. The display works and the hard drive works as well. Thanks iFixIt!
I wish I had read your comments about not disconnecting the LCD. It was really hard disconnecting and connecting it back was !@#$. I managed to twist some of the pins so in the end I had to unscrew the board, twist the pins back and plug the cable. When I restarted, I really thought that it was never going to work. So a down point for not pointing to comments at step #11. Otherwise great tutorial.
I found a far easier way. Just gently turn the screen 90° to one side and don't disconnect the cable! If all you are doing is replacing the HD, there's plenty of room without disconnecting the cable. At least on my machine the cable is flexible and I didn't have any problem making room. Way, way easier.
I didn't disconnect the LCD cable. I stacked some books on the side and put a blanket on them. I was then able to fold the screen next to the computer LCD still connected. Should some iMacs have a shorter cable this may not be an option to everyone. Thanks for good tips everyone.
No need to remove the LCD panel.
I agree this is the toughest step in the process — and the most unnecessary. I was able to rotate the panel out of the way without disconnecting it, placing a cloth between the chassis and the panel now leaning against it to prevent any inadvertent damage.
As others have stated, disconnecting the inverter cable from the power supply first is NOT the way to go. I ended up damaging the cable trying to get it out before I went to disconnect it from the LCD panel end instead. Much easier to do and much less prone to damaging the cable or it's insertion socket.
The guide needs to be updated and the suggestion to pull the inverter cable downward from the power supply removed. It is not a good idea and will cost you at least a few days and $10 to replace the cable should something go wrong. Please update this guide.
Get the male part out of the female fitting is a standard problem with boards. There are pulling/clamping devices you can get at electronics stores to pull the fitting out. They are like fuse pullers many car fuse boxes are equipped with. IFixit should sell them with the kit. I did it all without any problems, formatted the drive and then installed the operating system and defeated Apple who wouldn't even consider replacing the drive in my "obsolete" machine which my wife now uses instead of a crappy Dell PC.
If you are just changing the HDD, instead of removing the cable at the left, simply pivot the LCD 90 degrees counter-clockwise and gently set it back down. This allows one to access the HDD to swap.
I didn’t find my own solution in the previous comments, so here it is… Oh, I worked on the Apple iMac "Core 2 Duo" 2.8 24-Inch (Early 2008) A1225 EMC 2211.
I simply lift the LCD panel from the other side! Look at the photo in the previous step: after you disconnected that cable (data cable) you can lift the lcd panel and rotate it and the cable is long enough to bring the panel at a 90 degrees position (vertically in the air).
Than it’s up to you. I tried to place the panel side on the table but again the cable was too short. So I placed it on the inside of the case, which is free from other cable and boards. Not elegant, I know.
The important part is that in that position I was able to remove the 4 screws from the Power Supply board and easily disconnect the LCD cable! And it’s equaly easy to reassembly it.
Important note: the LCD panel is pretty heavy! Be very careful with the edges (the metal is sharp). Don’t let it fall. Don’t touch the boards and the other components.
I also bent two pins of the board connector while trying to plug it back in… so I unscrewed the board, managed to bend the pins back with tweezers but I’m afraid I might’ve damaged the connector as I still get a black screen and LED 4 is off, even though everything is back in its place…
-
-
-
Hebe das LCD an der rechten Seite weiter hoch.
-
Entferne das LCD.
Much simpler to remove the LCD cable at the LCD insertion site, rather than trying to remove it as suggested in the manual. Reinsertion is also less traumatic.
-
-
-
Löse den Thermosensor der Festplatte, indem du seinen Stecker nach oben in Richtung Oberkante des iMac ziehst.
-
-
-
Drücke die Festplattenhalterung in Richtung Unterkante des iMac, damit sie vom rückwärtigen Gehäuse frei kommt. Drehe dann die Oberseite des Laufwerks zu dir selbst.
To avoid the pain on my finger tips in applying enough force, I used a bit of microfiber towel as padding under the sharp plastic edge and it was then easy.
I found out that the black plastic bar is a lever, which swings up outwards left side — away from the backside of the casing — and then drops off of the right side, which releases the rubberized bolts, that hold the hard drive! The hard drive then could be lifted easily out of its hinges. Mind the cables!
Using a trigger clamp to compress the black retainer was the easiest method to remove the drive. Move the sensor wires out of the way then position the clamp in such a way that one jaw is on the drive and the other is on the black plastic. Compress it just enough to clear the metal support. Then to reinstall reverse the process.
DON’T do this! you’ll likely hurt yourself. I tried doing this way and it just required more force than i was comfortable applying. just unscrew the HDD off the black “lever” piece. The HDD will just come right out. The side opposite of the black “lever” are secured with pins, don’t bother trying to unscrew from there.
-
-
-
Drehe das Laufwerk zu dir selbst. Hebe es dann aus seinen Haltestiften heraus.
-
-
-
Setze das flache Ende des Spudgers zwischen den Stecker des SATA Versorgungskabels und der Kante der Festplatte ein.
-
Verdrehe den Spudger, damit sich der Stecker von der Festplatte löst.
-
-
-
Löse das SATA Datenkabel, indem du seinen Stecker von der Festplatte abziehst.
This cable was not long enough to reach the SSD connector for me. The adapter I used, and I suspect many used, puts the SSD centred, thus the data and power connectors a bit further away from where the original drive's connector were. The power cable had enough give to plug it in, but not the data cable. I knew the data cable had more give from the other end of it, so I careful pulled it with, ashamed to say, force. I heard tape giving away, so I figured it was taped down underneath. I managed to get just enough length to plug it in.
-
-
-
Entferne das Schaumstoffklebeband über dem Temperaturfühler der Festplatte.
-
-
-
Hebe den Verriegelungsfinger des Temperaturfühlers mit der Spitze eines Spudgers hoch und ziehe dabei leicht am Kabel des Temperaturfühlers.
Anyone know where the thermal sensor should be put if you replace the hard drive with an ssd? I just put it on the metal face, but I was worried that might not be the proper place.
@josephcestone I'd place it as close to the BLDC motor as possible since that's the largest friction point and where most of the energy is used.
-
-
-
Entferne die Halterung des Temperaturfühlers mit dem flachen Ende eines Spudgers von der Festplatte.
-
-
-
Entferne die beiden T8 Torx-Schrauben, mit denen die Festplattenhalterung an der Festplatte befestigt ist.
-
-
-
Entferne das Stück EMI-Schaumstoff mit dem flachen Ende eines Spudgers von der Unterseite deiner Festplatte.
I'm confused about the purpose of the EMI foam in step 25:
Quote: Use the flat end of a spudger to remove the piece of EMI foam from the underside of your hard drive.
Don't forget to transfer this to your new hard drive./Quote
Would you please elaborate about this part?
Is it possible to install two drives? An SSD and a (bigger) HDD? Also possible without sacrificing the Superdrive?
Is it possible to install two drives? An SSD and a (bigger) HDD? Also possible without sacrificing the Superdrive?
-


Um dein Gerät wieder zusammenzubauen, arbeite die Anweisungen in umgekehrter Reihenfolge ab.
Um dein Gerät wieder zusammenzubauen, arbeite die Anweisungen in umgekehrter Reihenfolge ab.
Rückgängig: Ich habe diese Anleitung nicht absolviert.
435 weitere Nutzer:innen haben diese Anleitung absolviert.
Besonderer Dank geht an diese Übersetzer:innen:
100%

Diese Übersetzer:innen helfen uns, die Welt zu reparieren! Wie kann ich mithelfen?
Hier starten ›


49 Kommentare
Thank you Brittany for putting together an awesome guide! I was able to swap in a leftover MBA SSD into my 2007 iMac before gifting it to my father-in-law. This iMac was showing its age with Lion installed, mostly due to 2 GB of RAM and a so-so magnetic drive. I was hesitant to gift a hand-me-down with little usable life. Not anymore! I have no doubt that the 5GB of RAM and a super fast SSD breathed another 5+ years of enjoyment into this iMac. Reuse beats recycling! Thank you!
But without any OSX updates .... Your path is Linux
FYI - The iFixit store links for the Torx screwdriver incorrectly displays the security Torx drivers. I had my own set of regular Torx drivers and competed this successfully. I did not find the security (center post) variant of the Torx screwhead anywhere in my iMac.
Security Torx drivers work on both regular Torx and security Torx bits, so we sell the security drivers to keep people from having to buy two tools.
Excellent guide. The entire process took less than 90 minutes and I was not in a hurry. Everybody told me that the iMacs were designed to be "user-proof" and had to be worked on by qualified technicians. What do they know? Now my computer is back up and running with a 1TB drive and it cost less than $150 - even with shipping costs factored in. Great job guys!!!
The guide was extremely helpful, however, there are a few things that I wanted to mention that might add to the guide:
* Since my work surface was large enough to allow the bezel to sit on a flat surface while working on the CPU, I did not need to disconnect the microphone cable, thus I wasn't required to remove the tape from the plug.
* The iMac I fixed was running for over 4 years, so there was a lot of dust around the fan and stuck to the inside of the bezel. This surprised me. Someone might want to keep a small vacuum handy, or get a can of air. Be warned: This dust will require you to clean the LCD. No getting around it.
* Since I have big fingers, I was finding it almost impossible to reconnect the LCD cable that is underneath the power inverter logic board. So I found it much easier to remove the four screws on that small logic board, lift it up, plug the cable back into the bottom, and reattach the board. Otherwise I would have spent a long time trying to plug the cable.
Thanks again!
Great guide ... managed to upgrade my 320GB to a 2TB drive with no real fuss. NOTES ... you should get a SATA external dock and do the OSX install and TimeMachine recovery so your HDD is ready to go. You should boot test as well before the change out procedure. One recommendation .... when you reassemble the front glass to the LCD its a good idea to let an air purifier run for a few hours in the room first. Wiping the LCD builds a small static charge and dust immediately sticks to the glass or LCD. The air filter trick was magic.
Guide worked perfectly. Wish I would have had some canned air on hand to clean out the innards. Other than that it was great. Only thing I messed up was not getting the front bezel back on perfectly. I had a little foam pushed down over the access door after getting the bezel on making it impossible to get the access door back on. So I just left it off for now. When I am feeling a little more ambitious I may take all those screws off to fix this.
After installing I just put in my original Snow Leopard install CD and rebooted. Had to go to disk utilities and reformat the new drive and then everything installed just fine. I will upgrade to Mountain Lion after Snow Leopard. I opted for this route because I had the Snow Leopard CD handy and just wanted to make sure the hard drive install was proper.
The hard drive I installed was a Seagate 2TB 7200 RPM that I picked up from Crucial for $110. Old hard drive was completely dead.
Excellent guide. I was able to replace the HD in under an hour with distractions.
Great Guide!
I replaced my old hard drive with a Seagate Hybrid Drive ST2000DX001 2TB MLC/8GB 64MB Cache SATA 6.0Gb/s NCQ 3.5 in about an hour. Make sure to to have this drive formatted before you install or have a bootable drive to run disk utility after installation of the hardware.
My ole iMac is running Mavericks, Adobe Creative Cloud versions of Photoshop, Illustrator, After Effects... etc. with no problems.
How is the hybrid drive working out for you? Was there a very noticeable speed gain? thanks!
peakay -
Hi, Is your iMac EMC 2211 1225A model? I brought my iMac to repair to change my hard drive to Western Digital 2TB Green Hard drive with 6GB/s and technician said the hard drive is recognized by the computer while they were booting it. They have upgraded firmware to the newest version of 7.0 (?) but still iMac hasn't recognized the new 2TB hard drive. Do you know anything about this situation?
Qanda -
Thanks Brittany for this excellent guide. I just replaced a crashed 500GB drive with a new 2TB one. Followed the guide step by step, except step 11 where I rotated the LCD panel instead of unplugging it. Found that the plug was not accessible enough and was concerned about breaking it loose, or having problems plugging it back in.
Just replaced the original 120 GB HD with a 1 TB HD. The directions were easy to follow and managed to swap out the HDs with no issue… and saved a few hundred bucks in the process. I purchased the suction cups, spudger, and 54-bit Driver Kit from iFixit and found them very useful. Good tools to have for future repairs on other comps.
Does anyone know if I need to get adaptor cable to install an SSD in the place of the HDD or do they fit in the ssd? SSD on the optical bay doesn't work for me since it is a ATA conection
Really good guide. Took the opportunity to have a good clean out in there whilst it was apart. Some air or a small squeezy thing for cleaning camera lenses would be worth having to hand.
Thanks for giving my 5yr old iMac a new lease of life!
Thank you iFixit and Brittany for this guide. I was able to install a 1TB drive to replace the original 320GB that had failed. Luckily it would still work for a few hours before freezing so I was able to make a Mavericks USB installer and back up to an external Western Digital before it eventually stopped turning on at all.
Thanks for stocking all the items in the EU store as well. One thing I would mention is that as the spudger was not listed under the 'tools needed' section I forgot to buy one, luckily I bought one off Amazon which arrived after the iFixit package and before my hard drive replacement, but in the future it might be an idea to include it under tools needed.
I followed this guide to swap the HD for an SSD, and the main problem was finding a suitable way to mount the SSD. You need a 3.5"-2.5" bracket which has the outer mounting points of a 3.5" drive and accepts the same large-threaded screws as a 3.5" drive. Most are either shorter than a 3.5" drive and/or are threaded for smaller screws.
In the end I found this plastic bracket:
http://www.currys.co.uk/gbuk/computing/i...
But when the drive was mounted properly in the middle of the bracket, the SATA data cable did not reach to it. So I cut away one of the plastic fins, and lashed the drive to the near side of the bracket with one screw and a cable tie right around it. It does the job surprisingly well - I don't think it will shake loose, and nobody can see it anyway :-)
For an exact fit, you can use an SSD to HDD Converter such as the Icy Dock MB882SP-1S-2B or MB882SP-1S-1B (http://www.icydock.com/goods.php?id=77). This is a plastic case with the exact form factor of a 3.5" HDD --- your 2.5" SSD fits inside the converter, then you attach the converter to Apple's HDD bracket and reinstall the same as an HDD. Avoids any jury-rigging or alterations.
Excellent guide, worked like a charm. I too disconnected the LCD cable from the LCD end, much easier. When replacing the thermal sensor, make sure the flat side (with the label on it) and not the rounded side faces down against the drive before you replace the bracket and tape. Also, helps to have a good clean microfiber cloth and can of compressed air on hand. I used the air to clean the insides as best I could, but it really helped with cleaning the LCD before replacing the glass panel. The replacement kicked up a ton of dust onto the LCD that I only noticed with a flashlight, so I alternated cloth and canned air to get it as dust free as possible before replacing the panel. There were streaks under the glass panel I never knew existed, and now my display is brighter now than ever before. My old iMac has a new lease on life, and a week later is running strong. Thanks, iFixit!
All went well until I realized that my new hard drive had no temperature sensor connector. I need to decide whether to attach the sensor lead back to the board and leave the sensor unattached to the hard drive, or just leave both ends of the sensor unattached. Anyone have a recommendation?
Great guide. I used it to install a SSD. The hardest part was make shifting it so the 2.5 drive would fit in the 3.5 slot. I had an adapter but the iMac Sara cable wouldn't reach so I pretty much made a web of zip ties. Don't disconnect the LCD cable unless you have to. It was hard to get it back in without a buddy.
Excellent guide.I just replaced my iMAC(24" 2008 ) HDD to Samsung SSD 250GB within 35minutes.TY
Thank you ever so much for such a comprehensive guide. I upgraded mine to a 500 gb ssd. Unfortuntely the fans inside the machine are spinning like crazy. I have tried using external software to control them but no luck, the hdd temp reading is too high, the optical drive fan is super noisy.
Am I just simply unlucky?
It's surprising the hard drive in my mid-2007 iMac lasted as long as eight years. But it became so slow that even typing often produced the beach ball of death. Memory upgrade to 4Gb had minimal effect. So I nearly spent £1600 on a replacement up to date iMac. Then I spotted the 9to5 guide http://9to5mac.com/2015/02/13/how-to-swa... and subsequently yours.
I have no experience of the insides of computers but could find no local expert to do this work. Trying for help from the nearest Apple dealer was a no-no. They just want you to buy their latest machine.
But, with the help of your guide (and my wife), I did it myself with no problem. The tools cost about £20 and the SSD £250 (a 1Tb Samsung 850 EVO), plus a small amount for the TRIM enabler.
I now have my fantastic iMac back again and don't even have to listen to the whir of a hard drive - or a fan!
Thank you so much for publishing this information.
I forgot to mention that I followed the advice of one of your previous commenters and detached the LCD cable from the LCD end not the other end as in your guide. It was perfectly easy but I had to replace the sticky protector with ordinary sticky plastic tape.
Well done with this guide, which I had next to me as I replaced my 500 Gb HDD (WD5000AAKS SATA) for a 500 Gb SDD unit (Samsung 850 EVO).
However, I now have a fan spinning like mad, trying to cool a disk that is believed to be too hot, and that is due to the fact that my former HDD had a 8 pin port (4 per row), right next to the power and the SATA connectors, in which the HDD temperature sensor wire end of was plugged. That is, the HDD had a built-in temperature sensor. Since I could not connect this to the new SSD drive, leaving it open might be signaling my OS to keep the fan always on.
I would not want to disable the fan completely, however, nor I believe a third party software is really necessary. Ideally I'd disable a "fan on" signal in response to a "hot hard drive" signal. Is there anyone here who tried such a solution ?
It this is impossible, then I wonder what type of probe should I obtain and attach to what is now the loose end of the HDD temperature cable. Is this a thermistor?
Cheers, Max
Ottima guida, molto accurata, grazie. Ho sostituito l'Hard Disk con un SSD da 2,5'', l'unica difficoltà è stata dovuta ai cavi di connessione SATA che sono molto corti.
Problemi con l’adattatore o con la ventola?
Grazie.
Excellent instructions, it took me about 15 minutes to change the hard drive. A few notes:
1. For step 4 on my unit I had two 35mm in the bottom center, two 25mm on the bottom outside and two more 25mm on the right hand side of the screen, leaving me with six 13mm screws on the top and left hand side.
2. If you have someone to hold the display panel, or a way to prop it securely, you can skip steps 7 and 11, this makes the process go very smoothly.
Getting El Capitan on when the previous hard drive was completely shot took about 10 hours. My other Mac was too old to be upgraded to Lion. So I couldn't make a USB install on the live Mac from the App Store. My Snow Leopard DVD was destroyed, and the hard drive which had the recovery partition was dead. The nearest Apple Store is a 320 mile round trip. I found other sources for the El Cap installation, but posting about that is probably against the rules here.
Do not remove the display cable from the board! It is very hard to remove, personal experience, and it is unsettling to try and get it back on without feeling like your going to break something. Either have a buddy hold the display on its edge while you quickly remove the hard drive or remove the LCD power cable from the screen itself. It is very easy to do. Just peel back the tape and pull straight up on the connector to remove it. I had to use a pair of pliers to grip the connector as I have big fingers and was afraid I might pull the cables from the connector. Very easy to then reattach cable and push tape back down.
I made a USB bootable El Cap installation disk after downloading from Apple and it worked fine to install El Cap onto this model iMac. Even with 2GB of Ram it works fine, if a little slow. I just purchases RAM to upgrade it to 4GB which should work fine.
Go for the 6 gig of ram upgrade kit. It's matched and works fine even if apple only rated the machine at 4. Your Mac will thank you for it.
Early 2008 iMac now working fine after a 500gb ssd and 6 meg of ram installed. Who needs to spend another $2500 +.
I have an early 2008 2.4 ghz imac. Had to replace hard drive and selected a 320 go drive. Old drive was 250gb. Called Apple and they were unable to format new drive. Need procedure to format new drive.
Rich. 2/12/2018
I have all the parts for this model… save for the screws. the iMac came to me disassembled and missing the following screws:
STEP 4:
13mm T8 x8 OR 13mm T8 x6 & 25mm T8 x2
25mm T8 x4 OR 25mm T8 outer x2 & 35mm T8 inner x2
STEP 8:
5.3mm T6 x2
STEP 10:
12mm T8 x8
STEP 23:
T8 hard drive bracket x2
STEP 24:
T8 connector side x2
Any tips for finding inexpensive replacements for these (and for determining which I would need for STEP 4)? The inexpensive part being key, or it’s not really worth doing anything more than recycling the poor old machine.
Has anybody had any issues with SSD Samsung EVO 850 with an iMac 24” 2007 model? I’m thinkin of adding it to help boost my iMac read/write speed but not sure?? thanks
Good evening everyone, can someone help me, because I can not configure ssd ......
I changed my 650 GB hd for a 256 SSD, but I can not configure ssd, the boot screen does not bother installing the system
Hi so I followed all the instructions and installed my western digital 500 gig SSD in it, but now all I get when I start to put it up as a white screen I hear the chime and everything. I read on a couple forums that possibly the SSD when connected into the old set of cables for the original hard drive won’t work? I tried using all the possible keyboard configurations but I can’t seem to get to recovery mode, or the disk utility. Any help will be much appreciated !
Hi RJG Productions: I can only guess but the small cables and tiny sockets are quite a challenge when you try to reconnect them. You may want to check on them.
This is awesome. Thank you for the detail instructions and video. I just replace my mid 2007 iMac 7,1 FDD with a 500GB SSD from OWC. I like to share my experience. Other than the microphone cable, you don’t need to remove any cables. I used a shoe box to support the display to give me space to remove the FDD. You only need to remove 2 screws along one side of the FDD and slide the disk out. Remove the SATA and power cables n power cables. Replace with the SSD. Then put everything back n reinstall the OSX. Thank you all for your sharing. Sure make the DIY project much simpler
Great guide. I was able to resurrect my old machine…now, to find a home for it. thanks!
PH2 head necessary to remove screw.
airshack - Antwort
Mine was as written, a PH1.
tpivo - Antwort