Einleitung
Du hast viele Vorteile davon, wenn du ein zweites Laufwerk in deinen iMac einbaust, z.B. höhere Geschwindigkeit, mehr Speicherplatz und weniger Aufregung bei der Installation neuer Software. Hier wird gezeigt, wie du anstelle des optischen Laufwerks ein zweites Laufwerk einbauen kannst.
Was du brauchst
-
-
Lege den iMac mit der Vorderseite nach unten auf einen Tisch, so dass die Unterkante zu dir zeigt.
-
Löse die einzelne Kreuzschlitzschraube in der Mitte der Abdeckung.
-
Entferne die Abdeckung vom iMac.
-
-
-
Befestige zwei Saugnäpfe in gegenüberliegenden Ecken der Scheibe.
A good alternative to the two heavy duty suction cups is a regular household plunger.
Also, 2" wide packing tape. Maybe a 6 or 8" piece, folded in the middle to give you say, a 1-2" "handle". Make a pair of these. They look like a capital T but with a short vertical part (the handle), and a wide top I the sticky wings). Get the good 3M tape, it's strong, and it peels off clean without leaving any glue from the screen.
for me one household plunger did the trick!
-
-
-
Hebe die Glasscheibe vorsichtig gerade weg vom iMac.
Another approach that worked for us was to get 4 small plastic wedges (the kind used in iphone screen replacements). Working one corner at a time you can use a cheap suction cup to pry just that corner up enough to slide the wedge in. Then proceed to the next then next, etc. Once all 4 have the wedges under them the glass should be away from the body all the way around, then just carefully lift it the rest of the way up.
-
-
-
Entferne folgende zwölf Torx Schrauben, welche die Frontblende am Rückgehäuse befestigen:
-
Acht 13 mm T8 Schrauben
-
Vier 25 mm T8 Schrauben
I would strongly suggest taping the screws down on a piece of paper towel or cloth in the same order you take them out, as there are different lengths in no particular order and they don't all fit into just any hole. Unless you keep track of which hole each screw belongs, there is no other way of knowing. I stress taping because I didn't tape mine down and after bumping the table I was working on they scattered, leaving me to guess.
Even better, use an ice cube tray to keep the screws from each step together.
As a rule with iFixit repairs, for years I've been printing the guides, applying scotch magic tape near each picture (which allows me to reutilise the paper prints in the future), neatly putting the appropriate screw next to their picture and taping them down with scotch magic tape.
Even if I have to wait for spare parts, this allows me to neatly file the guide + screws in a copy safe and a binder (or in a cardboard filing box together with the rest of the parts) for later reassembly. Hardly any mistake possible...
I think the caption on the picture is wrong here for 24" iMacs - it says: "On the 24" iMac Intel Model A1225, the bottom center two screws are long (26mm), four on sides (two left, two right) are medium (18mm), and the remaining 6 (four top, two bottom corners) are short (14mm)." I think actually bottom centre two are long, then all the rest are medium apart from the two either side of the CD/DVD drive
I print out the steps. Get a roll of scotch tape ready. Every screw, or set of screws I remove, I lay on some tape, and then tape them to the number on the directions. Then you have each screw labeled, with direction, and in order, or reassembly. Just working backwards in the directions.
I agree with @HBloomfield’s comment overall, but to add to that comment, mine was a little different.
(2) Long: bottom center
(4) Medium: bottom left and right; on either side of the CD/DVD drive
(6) Short: everything else
-
-
-
Hebe die Frontblende vorsichtig vom oberen Rand her aus dem Gehäuse.
-
Wenn der obere Rand frei ist, kannst du die Frontblende zum Fuß hin kippen und aus dem Gehäuse heben.
-
Drehe die Frobtblende weg vom restlichen Gerät und lege sie über die Oberkante des iMac.
Contrary to the pictures, to lift the front bezel off, start at top of the computer screen lifting up while apply a little bit of pressure to the foam in the upper corners of the screen. This will give you the leverage needed to get the bezel to lift up. Be careful to not pull to fast, as the camera cable is still attached.
-
-
-
Löse den Stecker am Mikrofonkabel, entferne das Klebeband, wenn nötig.
During reinstallation of the LCD panel, be sure that the iSight microphone cable does not become trapped behind the panel.
I actually didn't have to remove the cable. With the iMac laying on its back, just rotate the front bezel (bottom edge rotating around top edge) so that it's laying upside down, above the iMac. When reassembling, just rotate back into place.
-
-
-
Entferne die beiden 5,3 mm Torx T6 Schrauben vom LCD Stecker.
-
Greife fest die Zuglasche oben am Stecker und ziehe ihn gerade aus seinem Anschluss.
remove the 8 screws (torx) that is holding the screen.
I actually had to use my 6H torx. my 4/5/6’s wouldn’t grab. Whether its from stripping or whatever the 6H worked fine.
-
-
-
Entferne die acht Torx T8 Schrauben, welche das Displaypanel am Rückgehäuse befestigen.
-
-
-
Fasse die Unterkante des Displays an beiden Seiten mit den Händen an und hebe es soweit hoch, das du an die Stecker gelangst.
-
Halte das Display mit einer Hand hoch; lokalisiere und löse das Kabel des Display-Thermosensors aus seinem Stecker.
I had great success with just propping the top edge of the LCD display up with a box about 8" long. By doing so, I didn't have to remove the thermal sensor wire or the power cable.
The thermal sensor connection is more of a pain than it seems. It's a cramped area and it's not clear when it's properly plugged in during reassembly. It may *feel* like it's in, but then pops free at the slightest touch. I guarantee that if as soon as you start up, fans running max speed instantly is the indication this is the issue. If you're ok with that, then fine, but otherwise, you'll have to pull it apart again.
Unplugging the thermal sensor connection is easier said than done, but using the spudger here is very
helpful
Brian Tsai has it RIGHT! I purchased the OWC SSD and bracket (NewerTech AdaptaDrive). Using the bracket box to support the LCD screen up on the upper left corner and getting adequate illumination it was really easy to change out the drive. Note - i used a knife to pop off the thermal sensor OFF THE DRIVE (not the PCB) as in Step 21, used the knife to pry off the connectors as in Step 16. I suspect you don’t even have to do Step 7.
-
-
-
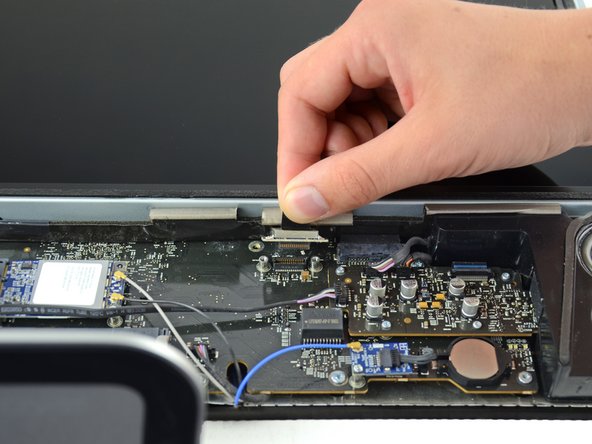
Halte das Display weiter hoch und drücke den Stecker des Stromversorgungskabels fest mit zwei Fingern nach unten aus seinem Sockel.
When putting this back together it can be extremely difficult to plug this cable back in without removing a guard that is held in by 2x T8 Torx screws just next to it.
I will suggest to remove the other end of the socket which is connected to the display panel. You can never imagine how difficult it will be to plug in on the main body, unless you know well about it.
I didn't realize these comments were HERE? Poor web design if you can't see comments in an obvious way. Step 10 will cause you the most trouble in reassembling the computer and I knew it as soon as I popped that connector out off the board. Its really f*cking hard to get that connector hooked back up in the way it should be and I have small hands. I managed to get it at least partly pushed in after several tries. Over all it took over half an hour to get it back in there right and scared the !@#$ out of me because I didn't think I could get it done. Those stupid little plastic things won't help you here, the connector really needs to be pushed hard to get it back in. I ended up using a big beefy screw driver for slotted screws, about a ten inch long screwdriver. I used the blade on each end of the connector and was able to give it a good hard push on one end, then pushed on the other end, slowly rocking the connector back into full flush contact. Be real careful you aren't pushing on the ribbon at all.
Having done this procedure 6+ times now, I can tell you it's much easier if, instead of holding the panel up by the "bottom" as illustrated in the guide, instead raise it by the "left" side. It gives you (me) much more room to get fingers behind the connector.
May have been obvious to some, but this little adjustment didn't jump out at me until the 2nd or 3rd rebuild.
There are four screws holding the power supply in place. Two different thread types so make note! Then lifting the power supply enough to easily plug the power cable back in is MUCH less of a problem. Then put the four screws back and proceed on.
That´s exactly how I managed reassembling this connector very easily: Open the four screws, that hold down the platine and then lift it up a little bit.
info -
It isn't that hard if you start by hold the display panel up perpendicular to the case on the side of this challenging connector. From here you'll be able to connect the cable, then follow through with the two other connectors (two screws on the last one). Worked great for me.
By far this was the most difficult cable to reconnect. I enlisted a second person to hold the display after I unscrewed the power supply (Torx 10, 4 screws) and was able to give my fingers adequate room to securely reattach it. There's no need to do this when disconnecting the power supply, but it would take more nimble fingers than mine to reattach it without loosening the power supply.
Do not remove this cable....! Too hard to get back there... I had to screw and lift up the whole platine to get the f**** cable back there....
EASIER IS:
# just remove the mic-cable (step6),the Thermal sensor (step9) the LCD-connector (step 10)...
# then let someone lift up (works also alone) the screen on the right side (there where Superdrive is)...
# remove Drive and Replace!!!!!
# Reconnect the easy cables....
agree! this cable is really tricky ...
Johann -
This step is TOTALLY UNNECESSARY on a 24" model!
Skip it; you have enough space to lift the panel.
You don't need to do this step at all - you can leave the panel connected to the circuit board while you replace the hard drive. I did this while replacing the drive on my 24" iMac, just resting the panel on a box I had put next to the iMac on my desk, so that the panel stayed at the same level but was just moved and rotated sideways, with the cable still connected.
I had great success with just propping the top edge of the LCD display up with a box about 8" long. By doing so, I didn't have to remove the thermal sensor wire or the power cable.
The power cable actually has a fair amount of play in it IF you peel back the thin black tape that affixes it to the LCD panel side to expose the power cable connector on the LCD side.
Note: SERIOUSLY:
- Disconnect the temp sensor from the iMac
- Lift up the screen from the RIGHT side (as if the iMac were standing up, facing you) to a vertical position
- Peel back the tape on the back of the LCD to expose the power supply connection
- Pull the connection from the LCD
- Attachment is the reverse
MUCH easier
-
-
-
-
Hebe das Display hoch und entferne es aus dem Gerät.
There is (what it looks like) a display ribbon cable attached that is hard to disconnect.
-
-
-
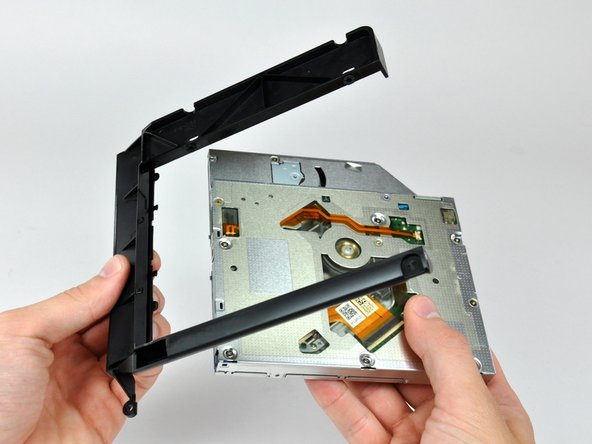
Löse das Klebeband ab, welches das optische Laufwerk festhält.
-
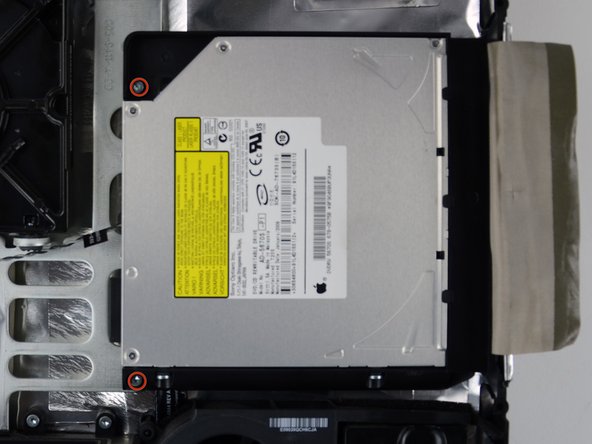
Entferne die beiden 7,1 mm Torx T10 Schrauben.
-
-
-
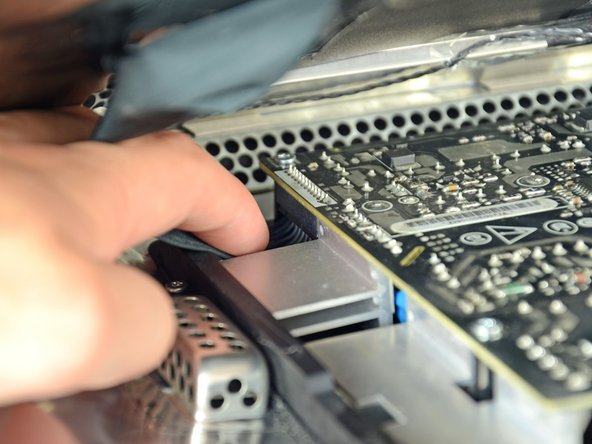
Fasse den Stecker des optischen Laufwerks fest an und ziehe ihn gerade vom optischen Laufwerk ab.
-
Entferne das optische Laufwerk vom Gerät.
The optical drive connector is pretty firmly jammed into its socket. Using the spudger to ease it out made the process much easier.
-
-
-
Entferne das Stück Schaumstoff, das den Thermosensor des optischen Laufwerks bedeckt.
-
-
-
Um den Thermosensor des optischen Laufwerks zu entfernen, musst du erst den mittleren Finger der Halterung am Thermosensor mit der Spudgerspitze hochheben und dann das Kabel zu ihm etwas anspannen.
-
-
-
Hebele die Halterung des Thermosensors vom optischen Laufwerk mit dem flachen Ende des Spudgers aus der Klebeverbindung zum optischen Laufwerk.
-
-
-
Entferne mit einem Spudger das kleine Stückchen EMI Schaumstoff unten am optischen Laufwerk.
-
-
-
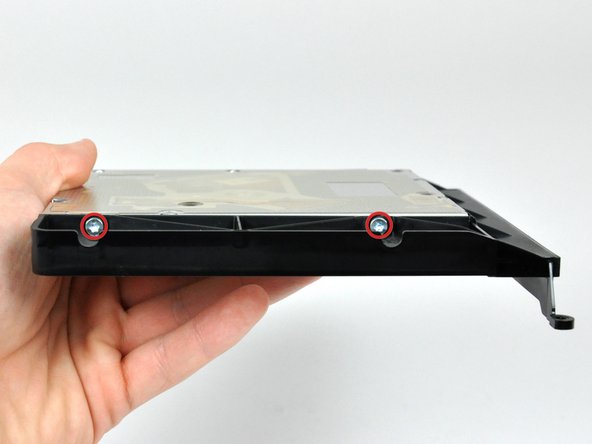
Entferne die beiden Torx T10 Schrauben auf jeder Seite des optischen Laufwerks, also insgesamt vier.
-
-
-
Drücke die Halterasten des optischen Laufwerks mit der Spudgerspitze aus ihren Löchern unten am Laufwerk.
-
-
-
Drehe die Halterung des optischen Laufwerks etwas weg vom optischen Laufwerk.
-
Ziehe die Halterung des optischen Laufwerks vom offenen Ende des optischen Laufwerks weg, achte darauf, dass sich keine Laschen verfangen.
-
-
-
Entferne die drei 3,0 mm Kreuzschlitz #0 Schrauben aus dem Gehäuse des optischen Laufwerks.
Hello, is the sata & power cabla from the mac can directly feet inside the SSD?
plug in the back of the ssd
I'm trying to find out as well. I read elsewhere you need something like this without the bracket: http://www.amazon.com/gp/product/B0056OB...
However I have NOT confirmed this.
If I understand you correctly; the enclosure allows you to use the existing iMac optical cable. Also the enclosure allows for a safe fitting of the optical drive. In my newer machine I had to double side tape the SSD to the back of the iMac and buy a special cable. Note: this was not an optical drive replacement scenario or I would have done exactly as this tutorial suggests.
I bought another caddy, not the one from the description. i had to extract the plastic adaptor from the optical drive and put in on the new caddy 12,7mm
-
-
-
Öffne das Gehäuse, indem du von der linken Kante ausgehend vorsichtig ziehst.
-
Ziehe weiter an den beiden Gehäusehälften, bis sie sich trennen.
This is the 12.7mm caddy.. but, the caddy 9.5 mm fit fine as well? or it doesn't fit on imac mid 2010
My caddy (ordered 5/2019) had two additional screws that needed to be removed from the sides for it to open.
-
-
-
Entferne die beiden 3,0 mm Kreuzschlitz #0 Schrauben, mit welchen die Frontblende am Gehäuse des optischen Laufwerks befestigt ist.
-
-
-
Hebe die schwarze Kunststoff-Frontplatte aus dem Gehäuse der Optical Bay.
-
Baue das Gehäuse des optischen Laufwerks ohne die Frontplatte unter Verwendung der drei originalen 3,0 mm Kreuzschlitz Schrauben wieder zusammen.
Just curious, why is it necessary to remove this black plastic faceplate from the enclosure? It doesn't appear to serve any function in or out of the enclosure.
Maybe because it would interfere with the bracket you have to put back on in step 21?
So I'm confused about the Optical Drive Bracket, the one that originally held the DVD-CD drive. I had an awful time remounting the kit into that bracket as the screws didn't line up correctly. I finally got everything to fit, less one of the four holding screws. Did anyone else experience this problem? I would have expected a much better alignment for this assembly considering the quality of the iFixIt site.
For the record, the upgrade went fine with a SanDisk Extreme II 480GB SSD, but that one step was next to impossible, and not covered in any detail by the instructions.
Yep, I had exactly the same problem. The alignment was way off.
olafgoy -
My kit also did not line up correctly. I had to put all four screws in at an angle cross-threaded to mount the unit.
Kevo -
Same here. managed to get two screws in at a decent angle on one side and couldn't get the others in. Felt solid enough once I'd screwed the original ODD casing back onto the iMac.
I had the same alignment problem, too. I ended up removing the rubber grommets from the plastic enclosure, widening the holes with a small file, then replacing the grommets. All four screws went in, but not in perfect alignment. Should be ok, though.
I bought a different enclosure than the one recommended ($18 instead of $39) and it came with new screws because the old screws were too big to fit in the holes for the new enclosure.
Hi. Which enclosure did you buy? link please.
Alex -
Where did you get the alternative enclosure from?
I completed this guide last night on my iMac and it all worked great until I got to step 26 and none of the holes on the 12.7 mm PATA Optical Bay SATA Hard Drive Enclosure lined up with the black plastic faceplate. Just like what is being commented on by previous fixers, I could only get 2 screws on one side of the enclosure in, but they were crooked and unable to screw in all the way. It was crude, but it worked.
The rest of this guide works flawlessly. This is a great site!
-
-
-
Entferne den Abstandshalter aus Kunststoff vom Gehäuse des optischen Laufwerks, indem du einen der Clips auf beiden Seiten eindrückst und ihn dann nach oben aus dem Gehäuse heraushebst.
What’s the switch for on the inside of the caddy? What position should it be in? Mine came switched to the right (towards SATA connector that disk inserts into).
-
-
-
Stelle sicher, dass die Anschlüsse nach unten zeigen, bevor die Festplatte in das Gehäuse eingesetzt wird.
-
Lege die Festplatte vorsichtig in das Gehäuse.
-
Während eine Hand das Gehäuse an Ort und Stelle hält, drücke mit der anderen Hand die Festplatte an die Anschlüsse im Gehäuse.
-
-
-
Sobald die Festplatte fest sitzt, kannst du den Abstandshalter aus Kunststoff wieder einsetzen. Drücke dabei die Festplatte gegen die Unterseite des Gehäuses.
-
Schließe alle Kabel, die du vom ursprünglichen Laufwerk entfernt hattest, am optischen Laufwerk an.
Why no mention of attaching the new hard drive to the Optical Drive Enclosure using the enclosed phillips screws?
Once you have securely inserted the new hard drive into the Optical Drive Enclosure and replaced the plastic positioner you should attach the drive to the enclosure using two of the provided phillips screws. Two holes on the underside of the enclosure should align with two attachment holes on the underside of the drive.
I suspect that the plastic positioner will secure the drive well enough (for this style of adapter). As I mentioned in earlier comment, this should mean you can replace / upgrade the SATA drive later without needing to remove the adapter, skipping many steps.
Do you need a sata cable to connect the new drive to the board or does it connect via the optical drive cable that we disconnected earlier?
It does connect to the optical drive cable but if you don't use the optical bay enclosure you'll need a 13 pins to 22 pins sata adaptor (and some tape!)
The sata cable for the optical drive has 6 + 7 pins while ssd and hhd have 15 + 7 pins
Can someone please explain why you need to remove the black plastic faceplate from the optical bay enclosure. It is designed to receive the standard SSD. What is gained from removing a part of it?
Thank you! This guy has made upgrading the mid 2010 iMac I inherited from my mom MUCH easier and saved me a lot of time, trial, and error.
I'm a little confused. Do I need the enclosure from ifixit or am I removing the optical drive and installing an ssd in the preexisting op drive enclosure? If using the already existing enclosure what type of ssd do I need as for Sata connectors?
-


Um dein Gerät wieder zusammenzusetzen, folge den Schritten in umgekehrter Reihenfolge.
Um dein Gerät wieder zusammenzusetzen, folge den Schritten in umgekehrter Reihenfolge.
Rückgängig: Ich habe diese Anleitung nicht absolviert.
47 weitere Nutzer:innen haben diese Anleitung absolviert.
Besonderer Dank geht an diese Übersetzer:innen:
100%
VauWeh hilft uns, die Welt in Ordnung zu bringen! Wie kann ich mithelfen?
Hier starten ›


3 Kommentare
Many many many thanks, everything went fine with my iMac early 2009 which is now ready for a second life with my kids :)
Mystery: I have removed and replaced my bezel many times - most recently to repair the vid card. However this time while powering up fine before replacing the bezel - now, once bezel is in place it won’t power on - but I hear a ‘click’ in the lower right corner after pushing the power. But then, if I pull the bezel back about an inch from the top - it starts >Something seems to be ‘shorting’ ?
Many thanks Brittany and ifixit, no problems encountered and it took me about 2 hours only because I checked and double checked everything I did. iMac early 2009, saved it from the scrap heap for a while longer.
The grid won't fall off by itself. You'll have to help it. Use the smallest screwdriver you have; the Torx 6 worked fine for me. It should enter in one of the many holes composing the grid. Use it as a lever to ploy the grid a little bit. You may catch it with your fingers and that's it.
Be carefull not to damage the hole by a too strong leverage.
Laurent - Antwort
much more safer to use duct tape, instead of torx 6. (glue it along the length of the grid and pull). it will loose instantly and smooth;)
Hofmann78rus - Antwort
Anyone know a guide to replace the plastic piece this screw connects to? I accidentally forgot this step - went to remove the front bezel and bent the plastic piece the access door connects to.
Jason Augustin - Antwort