Einleitung
Obwohl Apple den 2010er 27" iMac nicht mit der Option für eine zweite HDD oder SSD verkauft hat, ist doch alles darauf ausgelegt, selbst eine einzubauen. Benutze den zweiten SATA Anschluss auf dem Logic Board und stecke die Versorgung in das Netzteil ein und du hast dein zweites Laufwerk schnell in diesen iMac eingebaut. Diese Anleitung zeigt dir, wie du ein zweites Laufwerk in deinen 2010er 27" iMac, EMC 2390 einbauen kannst.
Was du brauchst
-
-
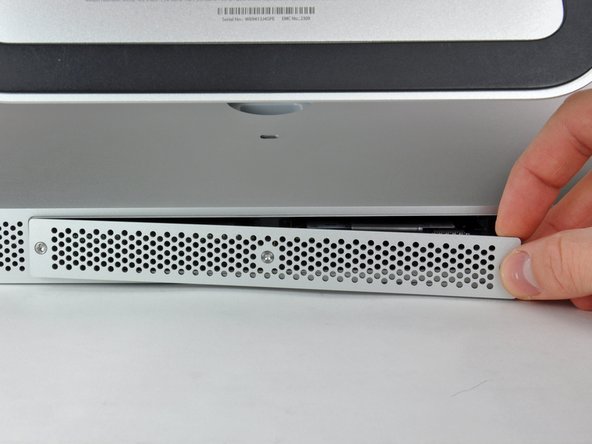
Löse die drei Kreuzschlitzschrauben, mit denen die Abdeckung auf der unteren Seite des iMac befestigt ist.
-
Entferne die Abdeckung des iMacs.
-
-
-
Schiebe mit den Fingern oder der Spudgerspitze die schwarze Zuglasche aus Plastik für die RAM Aufnahme aus der schmalen RAM Öffnung.
Bonjour, j’ai arraché la languette. Conséquence, elle est inutilisable et je ne peux pas retirer la barrette. Comment faire autrement ? Est-ce que cet outil peut être utile ?
-
-
-
Ziehe die schwarze Lasche aus dem iMac heraus, um die RAM Chip aus ihrem Anschluss auszuwerfen.
-
Schiebe den RAM Chip mit den Fingern aus seinem Anschluss.
None. 4mb ram is too old to fit into any computer manufactured after like 1998.
@Brett
I suggest that you learn your unit symbols before you try to appear clever:
4mb == 4 milli bits
4MB == 4 mega bytes
nowsc was obviously meaning 4GB not 4MB, try not to be a dick.
Just for the records :
4 millibits are 0,000000004 MB
There was never any RAM in mb and the question states MB and nobody except you is talking of millibits.
You are also a dick if you try to spread “your knowledge” nobody has asked for
Take care to note which way out the RAM comes - there is a notch in each RAM and it is not centered, therefore either the notch will be on the left or to the right (depending on which way up you have your iMac). This will make it easier to replace the RAM without damaging anything.
If damaged the notch inside one pair of RAM slots, is it fixable ?
its not that hard to say that you can add up to 4GB sticks, bringing a total to 16GB
-
-
-
Befestige je einen Heavy Duty Saugheber in den beiden oberen Ecken der Glasscheibe.
-
Halte den Saugheber leicht an der Scheibe und hebe den beweglichen Henkel bis er parallel mit dem anderen ist (wie im dritten Bild gezeigt).
You can easily lift the glass panel off the magnets with only your fingernails (or something thin like a credit card or a guitar pick). No need to buy suction cups you will only use once.
Yes, you don't need the specific suction cups to remove the display cover - it's held on by magnets, and if you start at the center by the iSight you can work out to the edges and remove it. I had an iPhone screen suction cup around and it helped with balancing the screen when you pull it out fully, but by no ways is it required.
Thanks!!! Worked excellently.
I used a plunger (clean first ;-) to get the screen off, and http://exirion.net/ssdfanctrl/ for fan control.
Then, i did not take out the whole display and left it in the hinges on the bottom side and held it up with two small cardboard boxes. Easy enough to disconnect the hdd then.
I replaced with an ssd, put that into a ssd enclosure. Had to drill an extra hole in it to fasten the pins that hold it in place.
Used Carbon Copy Cloner to make an image from the old hdd, with the sad connected via usb. Checked it of it booted via System Preferences > Startup Disk. It worked so the took the imac apart and replaced the disk. Booted, everything was working as always, only faster!
I'm replacing my optical drive too. what exactly needs to be plugged into the SSD? I don't have the kit - as I am not sure one is required if I buy something like this: http://www.amazon.com/gp/product/B0056OB...
Can you please advise? Can I do it with this piece, or do I need to get the entire bracket kit?
My display data cable forks, with a smaller section going up near the camera board. Where it forks, it is attached to the aluminum plate that attaches around the cpu board. I haven't seen any images that look similar, and I'm stumped at how to remove this second section of the cable. 2010 i7 build to order
Agree with the other comments here. Despite buying suction cups, not sure they were necessary as the screen removed very easily. A sat nav suction cup would do the job fine.
I can confirm that it is possible to remove the front glass using fingernails rather than suction cups. It isn’t easy, but if you try you should be able to pry off the glass.
I did this twice: once at the beginning of the procedure and once again at the end, when I realized that a big pice of lint was trapped under the glass.
Don’t use suction cups. totally unnecessary. screen pops off with fingernails.
The reason for caution about suction cups tends to be making sure you don’t apply uneven pressure on the edges of the glass and crack it in the process of removal. I do agree however that some pretty small suction cups would do fine. These suction cups can be had at your local princess auto (Harbor freight) for a few bucks and are useful elsewhere as well. if you use your fingernails or other items just try and do it evenly :)
A great first step that minimizes that first gust of dust migration when the glass is lifted is to clean the glass, sides *and the back* before lifting the glass, and then lift SLOWLY. Most of that dust is already trapped inside and pulled up as the screen lifts, but with care you can keep it there (or gently vacuum out with a micro vac…).
Thanks for the instructions. Before doing this the first time, suggest to everyone, read through at least twice. This is the easiest step, as you’ll soon see. As for removing the glass, USE suction cups, either the ones the sell here, or others. DON’T skimp. Also wear gloves when handling the glass. Don’t take chances.
-
-
-
Hebe die Glasscheibe rechtwinklig so weit vom Display weg, dass sich die metallenen Befestigungsstifte an der Unterseite der Oberkante lösen.
-
Ziehe die Glasscheibe weg von der unteren Kante des iMac und lege sie vorsichtig beiseite.
you should do this mac up, because, for me, one of the suction cup failed, and the glass fall into the lcd screen. Now there is a big hole in it...
do you still have this panel?
Reassembly: After powering on and running for a few minutes, found a large whitish patch on the screen. Persists after powerdown.
Turned out to be condensation, though it didn't look like it - more like fine white powder rubbed in. Humidity is very high this time of the year. Fix: start airconditioner in a room, leave it running a while, take iMac in, prise open the glass again. Condensation vanishes instantly. Keep it out for a ~15 minutes running infinite loops to get iMac nicely heated up and fans running. Snap glass back.
I used a Swiffer dry cloth to get all the dust off the screen while just blowing with my mouth at a steep angle. I know I didn't get every speck, but the screen looks perfect once assembled and lit again. Removing the glass from the screen is pretty easy if you need to re-clean it.
I used a microfiber cloth instead, which worked well. The same type as yo use to clean eye glasses, but in a larger form factor.
Daniel -
The Swiffer idea worked great! I just brush it over the LCD and glass panel lightly, and all dust particles are gone quickly. The screen after boot up looked beautiful. Thanks!
dtsai2 -
I didn't crack the screen, but it popped out of the shims and then popped back in, as if the glass edge is magnetic or has steel in it to connect to magnets. Be careful with this step — it is pretty nerve-wracking, but doable!
You need a big clean surface free, or at least 2 or more free surfaces because the iMac, the glass and the LCD display are quite bulky. You'll also probably need space for a tablet or a laptop to read this guide while you are working. And don't forget room to work on the optical unit and for the tools you are going to use. I covered a large table with a double layer of bubble wrap. In my opinion it's better to put the glass face down to limit powder sticking on the internal surface.
Thanks good advice! I was wondering exactly about the working space issue!
I am doing this repair now. After successfully lifting off the glass panel (yay!), dust blew out of the lower open edge. So I sprayed a can of air around edges. But a poof of the “air” condensated on the LCD. Does anyone know if I can clean the LCD same as how the glass is cleaned (damp cloth with equal parts white distilled vinegar/distilled water) and if not then how?
Hi Amy,
To clean the LCD panel, I would suggest using a clean microfiber cloth and rubbing alcohol. Distilled water can be used, but avoid regular water, which contains minerals. Make sure the microfiber cloth is absolutely clean and has no hard particles sticking on the surface, which will scratch your LCD when you wipe it.
Wet the surface with some alcohol and gently wipe with the microfiber cloth. Wipe in one direction.
I find that the LCD is not as fragile as we all think. they are very much like any LCD on a tv or monitor. There is no extra glass on the front of a monitor. Not the 23 HP Pro Displays I have anyway. I know this because I punctured one moving my video wall. so I took it apart to know how its put together. I will say, there are several 'lens’ like sheets and a reflective (silver} sheets that are the same size as the panel. and a 1/8”piece of acrylic, all behind the LCD panel. Take care with them and clean as you would your monitor.
My suggestion is to stand the iMac up after the panel is secured back into the body of the iMac and clean while its vertical. took me 3 attempts before I realized that while laying flat the surface is large and collects dust with mind blowing speed.
If the LCD glass is badly cracked and broken you need to be extra careful removing as the sharp shard of broken glass can scratch/harm the underlying screen as they may “fall in or onto” the screen below.
I found that strategically putting sheets of 8x11 paper(s) under the sharpest, largest broken sections help protect the underlying screen. A vacuum was also helpful removing some of the small glass shards.
Be advised: I did a perfect replacement of the hard drive, temperature sensor to the SSD, LCD screwed in, glass cleaned. I went to put back the final glass, I set the bottom edge in place and as I slowly moved to have the magnets take hold, they pulled the screen out of my gingerly held fingers, and smacked into place……cracking the glass! Ugh! So, on this last step, hold tight as you put the glass back in slowly. It will cost you about 40-50 bucks for a new glass (mine is on it’s way).
Yikes... that sucks. thanks for sharing this information. I took everyone's advice and removed and placed this back very very carefully.
Don't trust the suction cups after you remove the screen cover. Used both hands to hold this piece carefully!
As far as the last point of step 2 goes, I would add to the parts list a can of compressed air to get rid of all the dust on the screen frame and the interior body once the lcd is off). When the magnets clip back in dust will shower down onto the lcd and glass if you do not clean the frame well. It will not matter how much you clean the LCD and inside of the glass panel.
-
-
-
Entferne die acht T10 Torx Schrauben, die das Display am Rahmen befestigen.
The replacement display I received did not have a bracket around the edges so I can reinstall it. On the old display, it seems the bracket is screwed in, but even with all screws removed, I cannot get it to budge. Is there a trick? Is this even possible?
Reassembly: be careful with the screws! The magnets attract them and the screwdriver as well! Better to use a screwdriver without replaceable end insert. I had to use one of this second type and I struggled a lot!
https://m.youtube.com/watch?v=nB172HJeM0...
Try this easy GPU fix before buying a new graphics card! It fixed the white screen issue on my EMC 2374.
Mine has T9 screws.
-
-
-
Lege den iMac vorsichtig mit der Rückseite flach hin.
-
Hebe eine der oberen Ecken des Displays mit einem dünnen Haken am Metallrahmen leicht an.
Be careful with any tool while lifting the edge of the display. Under the top left edge of the display sits the bluetooth-antenna-connector. I pulled it out while lifting. It was not such a great problem, cause i could just plug it in again. But maybe you could cut the small cable depending on the tool you use to lift.
The display is quite heavy, an is fitted with a tight tolerance. I found it very difficult and dangerous, lifting it with any tool in one corner while the iMac was lying down. Instead, after removing the T10 screws, it was quite easy pulling the display out of the iMac with my fingers on both sides, while the iMac was in the upright position. By doing that, you can easily hold the display with one hand and reach for the connecting cables with the other
I broke the short ribbon cable that attaches to the inner top of the display but all the pics show the display completely removed after all cables are disconnected without the short ribbon cable intact. Does this short ribbon cable have a purpose and does it need to be reconnected? If so, how? Or is it just some worthless control put in by Apple to show its been messed with when brought back for repair? Thanks
Simple tool to use here is long nose pliers on the corners. safer, better control.
I just used my suction cup and pulled it out.. Slowly. No need to dig. We have to clean the screen anyway.
-
-
-
Ziehe vorsichtig mit deinen Fingern das vertical Sync-Kabel aus der Steckverbindung auf dem LED-Treiberboard nahe der oberen linken Ecke deines iMac.
This cable is very small and fiddley to remove if you don't have much in the way of finger nails. The cables are very thin and fragile.
It took me a bit of work to remove this cable, it was a hassle actually. What worked for me, without any tools, was to use your index and middle fingers' nails and pull it. That worked better than the index and thumb. Took me like 15 minutes, more than what it should take.
Yes, me too! It stuck terribly hard and I spent most of the time for the repair for this s**** little connector. I thought all the time, I'm gonna break it or tear off these tiny cables... All the other cables were *rather* easy-going. In the end I finally got a new SanDisk Ultra II 480 GB SSD working.
And thanks to the SDD Fan Control app it is sooo silent. Thanks to Exirion!
When the cable comes out, make note of which side has the gold contacts visible. On my cable, you could only see them from the "top" side (aka, as you look down on it). From the "bottom" or back side of the cable, you could NOT see any gold contacts. This will help to orient the cable when reconnecting it.
From this point onwards I found very useful a flashlight to illuminate inside the iMac.
FYI; Cable in 27 EMC 2390 I just worked on looked different. Was simple flat connecter with nothing other than blue coloring on end. Just flat gold connectors on bottom side. These kinds are very tricky to extract and even trickier to reinsert as there is too much flex and not enough slack/room for finger/tool to get back in.
My solution is unconventional but works. I do not remove the cables (!). I work on the floor, lying on my belly. I open slowly and carefully only as far as the cables inside will allow. Use a flashlight so you can really see clearly. Then I prop up the both sides of the display using anything the right size (box, a pair of boots…) It is crucial of course that you have things propped up securely so screen can stay a few inches up without hands! I use a very short #10 Torx so I can remove the old HD. There is barely enough room to work but it is do-able with care (and light!). As I am usually putting in an SSD these days, I simply use electrical tape to secure it. Close slowly. Test
READ ABOVE ^^^. Don’t risk the other cable removals, just remove and replace drive here. Saved me a ton of worry
Perfect Idea. Even better if you use a table, quite traditional but still today useful invention: you don’t have to work lying in the floor. Makes it a lot more comfortable. To keep the screen propped up I used two wooden sticks of about 20 cm length with small feet made out of cork to make the construction more stable. I only removed the vertical Sync-cable, otherwise you cannot lift the screen that high.
The rest was quite easy. Thanxalot.
My cable was also taped to the inside of the case which made the cable VERY tight. Make sure to pull the cable loose from the case before lifting the display much at all.
-
-
-
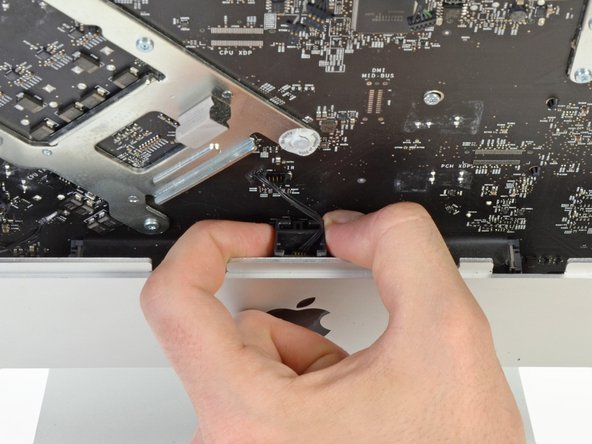
Drücke die beiden Pins des Displaykabels zusammen, um es aus seinem Anschluss auf dem Logic Board zu befreien.
-
Ziehe den Stecker des Displaykabels aus dem Anschluss auf dem Logic Board.
In my iMac the cable was stuck to the structure of the computer with a piece of foam tape. Pulling it very gently, gradually it detached with no damages.
I managed to damage mine also .. but, it was probably already damaged by Apple when they replaced a recall hard drive. I managed to fix it like Wojtek. had to re-solder tabs to the logic board. Would like to find a dead logic board and de-solder the connector for a spare; however, I think all the little pins fall out if you try that … SIGH!
I also broke this socket. I am able to fit it back over all the pins correctly and reattach the thing using electrical tape to hold i down. However, I see no display (nor backlight) when I turn on the computer. It does chime. Not sure if I got contact with the outer tabs (non pints). Should the backlight turn on even if this cable is unplugged since there is a separate back light cable?
I had the exact same thing happen. Were you able to get it working?
meburt02 -
Be VERY CAREFUL when removing this cable and also putting it back.
Attention avant de déconnecter la prise de la carte mère, le câble peut être collé sur la partie métallique de la carte vidéo (le bras en aluminium avec des croisillons). Le mieux (de mon point de vue) est de chauffer avec un sèche-cheveux la colle sous de la nappe pour la faire ramollir, tout en insérant un médiator afin de décoller la nappe petit à petit en descendant vers le fond du mac (du haut vers le bas) puis d’exercer une pression sur les deux bras du connecteur pour le libérer de la prise sur la carte mère.
-
-
-
Hebe das Display weit genug aus dem Gehäuse, um das Kabel der LED Hintergrundbeleuchtung vom LED-Board zu trennen.
Here I used the flat end of a spudger to unlatch the connector top.
-
-
-
Hebe das Display weit genug an, um das Kabel des LCD-Temperatursensors von seinem Anschluss auf dem Logic Board trennen zu können.
Hi Leute, Ich habe bei mir mal die Wärmeleitpaste auf dem Prozessor erneuert und auch Ich habe eine SDD verbaut.
Leider ist nach dem Zusammenbau der Fehler aufgetreten, dass beide Lüfter bis zum Anschlag drehen.
Ich gehe sehr stark davon aus, dass alles korrekt angeschlossen ist. Was ist denn hier die Lösung?
Ich habe die Anschlüsse alle gecheckt. Ich habe den iMac ohne Display hier vor mir stehen und egal welchen Pin ich wo rausziehe die Lüfter bleiben auf der Geschwindigkeit.
Ich brauche Hilfe :D
Grüße ! -
-
-
-
Ziehe das Display vorsichtig Richtung oberer Kante des iMac und hebe es aus dem Gehäuse.
And if the panel has no frame? How you unattach the frame from the old panel to place it on the new one?
-
-
-
Entferne die vier Torx T10 Schrauben, welche das optische Laufwerk am äußeren Gehäuse befestigen.
-
-
-
Ziehe den Verbinder des Thermosensors vom optischen Laufwerk gerade aus seinem Sockel auf dem Logic Board heraus.
This step is not necessary. I have problems with the pulling out, and found that it's not necessary to out it in this case.
Agreed. Leave it plugged in and peel the buffer tape and temp sensor off the optical drive assembly while it's still in the computer.
What problems did you have?
Don't do that! It's not necessary to pull the sensor cable out. And it cost me an hour to find out that it was this sensor cable and not the LCD sensor cable that made the fans spin at 3000+rpm. The less sensor cables you remove, the easier to find the culprit if you stumble into fan issues.
-
-
-
Setze einen Spudger zwischen dem Stecker des optischen Laufwerks und dem optischen Laufwerk ein.
-
Verdrehe den Spudger, um den Stecker leicht vom Laufwerk zu lösen, ziehe ihn dann mit den Fingern ganz ab.
Hello, is the sata & power cabla from the mac can directly feet inside the SSD?
There is another SATA connector on the back side of the logic board for an SSD.
-
-
-
Hebe die linke Kante des optischen Laufwerks etwas an und ziehe es von der rechten Seite des äußeren Gehäuses weg.
-
Achte beim Zusammenbau darauf, dass sich in der Frontplatte des optischen Laufwerks zwei Löcher befinden. In diese müssen zwei recht dicke Plastikzapfen passen, damit das Laufwerk richtig sitzt.
-
-
-
Schiebe vorsichtig das hintere I/O Flachbandkabel beiseite, um den Stecker zum Lüfter des optischen Laufwerks, der darunterliegt, freizulegen.
-
Löse den Stecker, indem du ihn aus seinem Sockel auf dem Logic Board ziehst.
-
-
-
Eine einzelne Torx T10 Schraube befestigt den Lüfter des optischen Laufwerks am Gehäuse. Drehe sie heraus.
-
Ziehe den Lüfter des optischen Laufwerks weg vom Gehäuse, um ihn so aus den drei Plastikstiften an seinem Rand zu heben.
-
Bewege den Lüfter des optischen Laufwerks vorsichtig aus dem iMac, achte dabei daruf, dass sich keine Kabel verfangen.
-
-
-
Entferne mit den Fingernägeln oder dem flachen Ende des Spudgers folgende drei Stecker an der rechten Seite des Logic Boards:
-
SD Kartenleser
-
Hintere I/O Karte
-
Linker und rechter Lautsprecher
There is a small missing step here!
Just on the bottom left part of the red box in the first picture you can find a MIC connector.
It needs to be unplugged and replugged back.
I suggest to add this part to the guide.
-
-
-
Entferne mit den Fingernägeln folgende in einer Reihe liegende Stecker oben am Logic Board. Ziehe dabei parallel zum Logic Board.
-
Oberflächentemperatur
-
Festplattentemperatur
-
Festplattenlüfter
-
Kamera
-
Bluetooth
-
Umgebungstemperatursensor
-
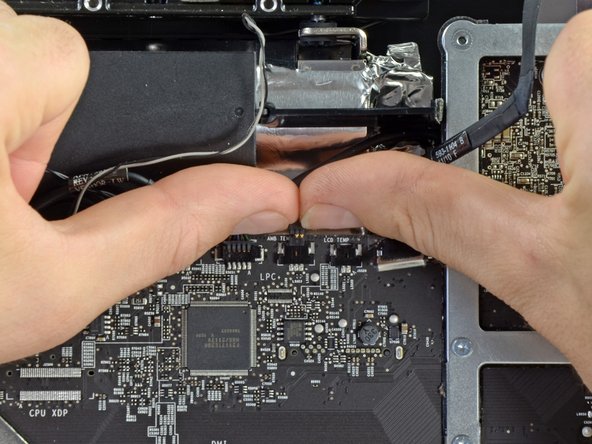
Heble das AirPortkabel mit einem Spudger gerade nach oben und entferne es vom Logic Board.
One of the 5 pin connectors’ plastic disintegrated during disassembly and now all the pins are loose. Is there a replacement connector I can get?
The bluetooth connector was impossible to remove. I damaged a corner, and had I insisted, I would have irredeemably damaged it. So I left it plugged in, and managed to complete the job in spite of that.
-
-
-
Entferne mit den Fingernägeln auf die gleiche, wie eben beschriebene Art die beiden Kabelstecker an der linken Seite des Logic Boards.
-
Einschalttaste
-
Prozessorlüfter
Everything going fine until I tried to remove the power button connector to the board. The connector on the wire came apart. What do I do now? Anyone sell these connectors? Can I just solder it? Wires are same colour. Not sure which is which.
The power button connector was impossible to remove. I damaged a corner, and had I insisted, I would have irredeemably damaged it. So I left it plugged in, and managed to complete the job in spite of that.
-
-
-
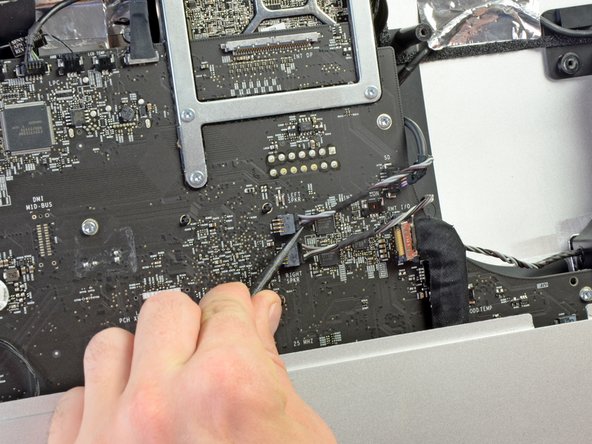
Entferne wie eben beschrieben, das Kabel zur Infrarotsensorplatine aus seinem Anschluss auf dem Logic Board.
-
Ziehe die Infrarotsensorplatine vorsichtig nach oben aus dem iMac heraus.
Best NOT to disassemble this connector when you can just pull out the IR sensor from the frame and tape it gently onto the logic board for doing your work. I found this connector to be stuck so hard, that even the use of one spudger on each side of the plug pulled the connector apart and the wires came out. I wish I had known how unnecessary this part was. Now I will have to buy the customer a new one.
-
-
-
Entferne folgende acht Torx T10 Schrauben, mit denen das Logic Board am iMac befestigt ist:
-
Vier 25 mm Schrauben
-
Zwei 21,4 mm Schrauben
-
Eine 9,3 mm Schraube
-
Eine 7,2 mm Schraube
-
-
-
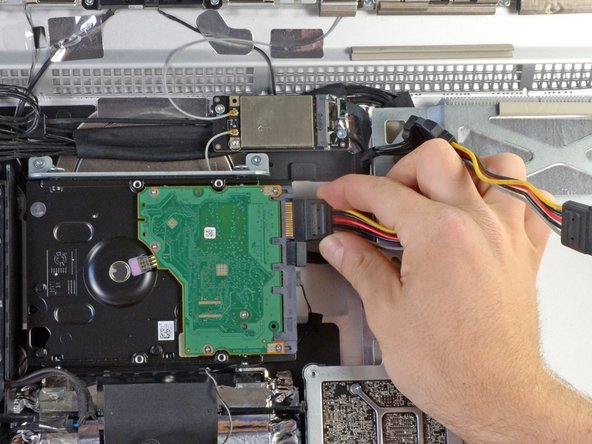
Löse mit dem flachen Ende des Spudgers das SATA Versorgungskabel aus seinem Anschluss auf der Festplatte.
-
-
-
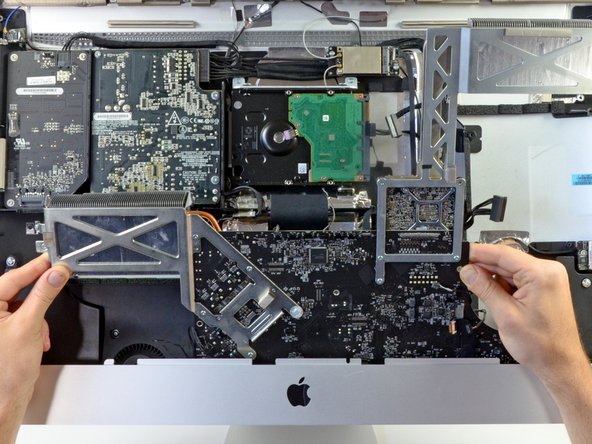
Hebe das Logic Board hoch und drehe es gleichzeitig aus dem Mac heraus.
-
Lehne das Logic Boards vorsichtig an die Frontseite des iMac, so dass es aus dem iMac herausschaut.
When reinstalling the board, look through the access door to check that the RAM slots are properly lined up with the grooves in the case. Sometimes the board looks like it is properly installed from the front, but if you look from below you can see that it is misaligned,.
-
-
-
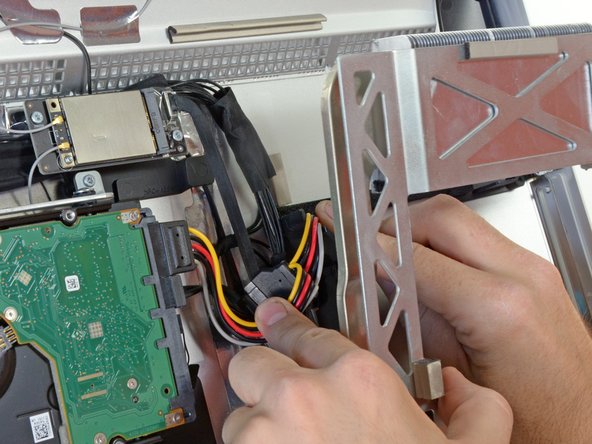
Verbinde den männlichen Anschluss an der Verzweigung des SATA Leistungsverteilers mit dem ursprünglichen Festplattenversorgungskabel.
-
Stecke eine der Abzweigungen in die Festplatte ein.
-
-
-
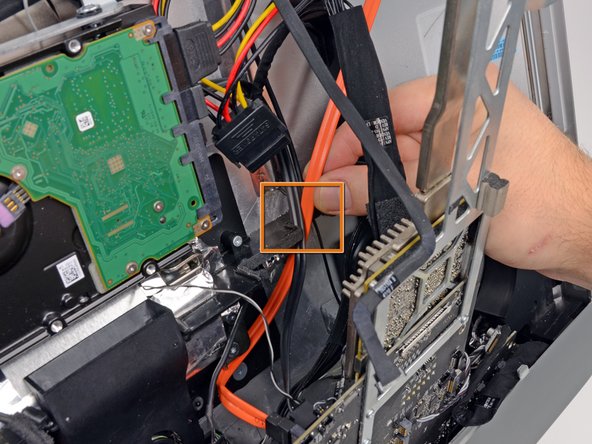
Führe sorgfältig die andere Verzweigung des SATA Leistungsverteilers unter dem GPU Kühlkörper entlang.
-
Im Kunstoff nahe am Rahmen des optischen Laufwerks befindet sich ein Ausschnitt. Führe das Versorgungskabel durch diesen Ausschnitt durch.
-
-
-
Lehne das Logic Board vorsichtig nach vorn, gerade genug, um an die Rückseite zu gelangen.
-
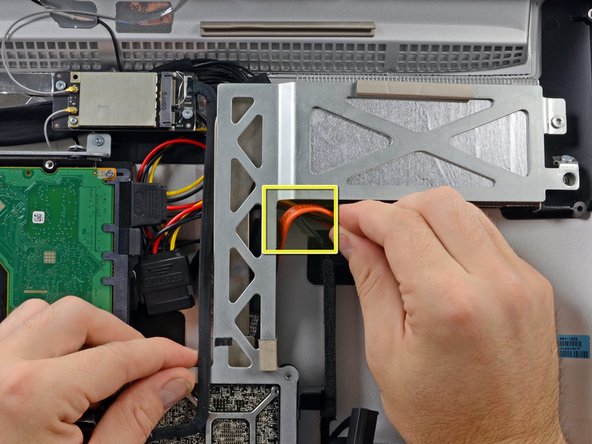
Verbinde ein Ende des SATA Datenkabels mit dem zweiten SATA Datenanschluss auf dem Logic Board.
I was going to just do a replacement but my kit didn’t have a new temperature sensor for the SSD. Instead, I tried the dual drive install only to find out that the “spare” SATA data socket was already being used by the existing HD. Had to punt and leave the existing drive connected to power so the thermal sensor would work and put in the new SSD under the optical drive as instructed. A lot of wasted steps, but a learning process.
-
-
-
Lehne das Logic Board wieder in den iMac zurück.
-
Führe das SATA Datenkabel unter der Kante der Metallplatte hinter dem Logic Board entlang.
-
Führe das SATA Kabel oben weiter durch den Schlitz im Kunstoffrahmen.
-
Beende das Verlegen des SATA Kabels, indem du es durch den Ausschnitt im Kunstoffrahmen nahe beim optischen Laufwerk führst, direkt unter dem GPU Kühlkörper.
I succeeded with this guide and an upgrade kit from ifixit, however the sata cable was VERY VERY short and almost too short (way shorter then in the guide's pictures). a couple of extra centimeters would have made the process much easier.
besides that, thanks for the detailed guide. took me about 2 hours until the mac was booting from the ssd successfully.
After haveing completed the installation of the dual Hard Drive, I have to say that routing the SATA cable was the most difficult part of the whole procedure. The SATA cable is quite short, there is little space in the cable slot, which makes the power cable already there to leave its position. The Airport Cable is always in the way. Finally, I had to cut a piece in the cutaway in the plastic frame near the optical drive, just below the GPU heat sink, so that the SATA Cable fits. Perhaps a slightly longer cable would be more helpful.
SATA cable is very short, 3-5 cm more will be enough.
I had the kit as well and also had a spare sata data cable that terminating with a L connector and was about 2” longer. Made routing the cable substantially easier.
-
-
-
Wenn du die Schutzfolie von den Klebepads abgezogen hast, kannst du die zweite Festplatte fest an den Aluminiumrahmen des iMac andrücken.
Just replaced the ODD as suggested by iFixit.
I suggest to follow this guide because, in my honest opinion, the air flow is not blocked by the SSD (which is by far thinner than the ODD). Moreover the space below the GPU heat pipes is very tight and it requires some more tweaks to properly set the SSD with the sticky tapes.
I am also going to add a SSD under the superdrive. A data cable has been plugged in the secondary onboard SAT A (27" mid2010) since I had to remove the mainboard and everything else to remove the dust from my iMac and check the PSU and backlight (noisy backlight) due to a non working iMac (no diag led switched on on the mainboard.).
I have ordered a PSU but finally found out that mine was working and it was mainly due to a bad grounding of the PSU... No more backlight noise since then...
Anyway, thank you for your tutorials. The 27" iMac mid 2010 is quite simple to take part (more than a standard laptop).
-


Um dein Gerät wieder zusammenzusetzen, folge den Anweisungen, beginnend mit Schritt 20 in umgekehrter Reihenfolge.
Um dein Gerät wieder zusammenzusetzen, folge den Anweisungen, beginnend mit Schritt 20 in umgekehrter Reihenfolge.
Rückgängig: Ich habe diese Anleitung nicht absolviert.
114 weitere Nutzer:innen haben diese Anleitung absolviert.
Besonderer Dank geht an diese Übersetzer:innen:
100%

Diese Übersetzer:innen helfen uns, die Welt zu reparieren! Wie kann ich mithelfen?
Hier starten ›


27 Kommentare
Adding a SSD drive for the system was a simple process and has completely transformed my old i3 iMac - definitely worth the money and effort
5 hours an IT support officer. This task is not for the feint hearted. A guide from OWC suggested locating SSD near HDD and this proved easier for me. This guide was accurate and the many images were very helpful. Thanks.
Great guide. I followed it but found after removing the logic board there was no secondary sata port!!! Either way I hooked up the original hard drive to power and temp sensor to stop the fan spin up and used the sata for the SSD so works great. One problem! My sound is now greyed out? Any physical reason for this? When the imac powers on it makes a sound but no sounds in Mac OS. I feel it must be physical not software related.
Great guide. I installed an SSD behind the optical drive, plugged it into the primary SATA port and used a different cable to plug the 3.5" HDD to the secondary SATA port. Now for some reason my iMac can see the SSD but the HDD is invisible, as if it wasn't connected. I checked all cabling and it is most definitely connected to the motherboard. Any suggestions?
Check to make sure your iMac has the ports on the motherboard for this expansion. Not every iMac has them. For additional consideration, large solid-state capacity hard drives are available now; it's easier to simply replace your existing hard drive with a terabyte solid-state.
Oh and, make every possible effort to avoid fingerprints on the inside of your glass or the front of the LCD.
I removed the OLD ODD/DVD Drive and put an Laptop HDD 1gb from an old MacBook that met with a tragic death. It jumped off our 4th floor balcony. The HDD survived, but not any other part. But that 750GB Laptop Drive was put in the place of the ODD with a ODD to HDD conversion part. (I figured that the last time I had put a disk in the ODD had been over a year ago) the other 2 SATA ports were occupied by 2 SSD’s each 240GB So I Could have VM’s on one HDD and segmented from the primary OS and the Media (documents, Pictures, videos on the HDD) The first time I booted it I though for sure I had some failure. Rather than the normal crawl across the screen of the progress bar it zipped across in under 3 seconds. One of the best upgrades I could ever do. (besides replacing fans that are starting to be loud (their warning they are starting to fail)
If I do it like this and leave the old hard drive in even if my old hard drive is on the verge of death, will my iMac still rely on the new SSD and work fine?
>Jacob Robinson, I am about to attempt this upgrade and this is what i found out.. You will need to use software such as Carbon Copy Cloner to copy your entire HDD (including Operating System) onto the new SSD. Then (using Disk Utility) set the new SSD as your boot drive. You can use your old HDD as storage for non essential data. Always make sure you back up. Make sure you switch on TRIM for the new SSD before cloning. Google is your friend. :)
@jacob_robinson I’m about to attempt this upgrade myself. What I have learnt online so far; Once installed, format the SSD using Disk Utility. Switch on TRIM for your new SSD to ensure data is written to it correctly. Use software such as Carbon Copy Cloner to clone your entire old HDD (including operating system) to the new SSD. Use Disk utility to make the new SSD your boot drive. Now you can use the old HDD for non essential files. Make sure you back up first and (if you don’t also replace the HDD while you have the case open) back up regularly to prevent data loss. Good luck!
Does this guide apply to 2010 27" iMac only? I have a late 2009 iMac (iMac11,1) and wonder if I can add a new SSD without removing the HDD or the optical drive . Thanks!
You’ll need to swap out your optical drive for a special carrier to hold the 2.5” SSD Installiere iMac Intel 27" EMC 2309 und 2374 Zweite Festplatte. Unlike this model which has three SATA connections, yours only has two SATA connections.
Dan -
Great guide, just completed adding an 1T SSD. I have taken the opportunity to clean both heatsinks (oh boy were they filthy) and clean install macOS High Sierra. Btw this tip (https://discussions.apple.com/docs/DOC-7...) show how to unmount the old drive volume at boot. Now I have a quiet and fast PC (quite an experience). Too bad macOS Mojave will not support this trusty old friend…
After having reassembled everything, at power on, the fans were running at maximum speed.
To return to a normal situation, it was necessary to reset the SMC.
To do this, disconnect the power cable for 15 seconds.
Reconnect the power cable, wait 5 seconds and press the start button. The Mac restarts normally.
To reassemble your device, follow these instructions in reverse order, starting from Step 20 should read
To reassemble your device, follow these instructions in reverse order, starting from Step 23? Fortunately, this is where the link takes you.
Why go through all of this instead of just putting the ssd in an optical drive adapter caddy and then just putting the ssd in place of the optical drive? This seems overly complicated unless there’s a technicality that I’m not considering….
I installed a second hard disk according these instructions a couple of years ago. A while back, I started getting alerts about the health of the original hard disk (never about the health of the secondary SSD I installed, which was also the startup disk). I recently bought a new iMac, and when I moved the old one out of my workspace and installed the new one, the old iMac now no longer powers on. There's several possibilities of course, one being the power supply (which broke down in 2017, and which I also replaced). I wonder if, when the original hard disk is defect, the second hard disk, which I think is connected in sequence to the first one (?) - I don't really remember the details - can no longer be powered by the system? Thanks in advance for shining your light on the matter.
SATA connections are star wired unlike PATA which is chained. Basically one drive should effect the other, the only exception is a some sort of Malware which is designed to destroy your data.
Dan -
I asked the question above about a year ago, and I thank you for your reply. However, I don't exactly understand what your reply implies. Does it mean that, when the original HDD, which is connected to the SSD, fails, the current (from the power supply?) no longer can pass through to the SSD (which is the startup disk), meaning that, when the computer is powered on, nothing happens, everything stays black?
A couple of weeks after I wrote my previous comment, I manipulated the iMac, and, lo and behold, it once again started up, and continued to do so until last week, when I managed to sell it. Unfortunately, when the buyer got home with it, it once again no longer powered up (he brought it back, and I reimbursed him).
Thank you in advance for your input.
There are two connections on drives sometimes it’s hard to see as in the case of 2.5” drives. Power is typically star wired (hub to spoke or chained) while the given drives data connection as in the case of PATA drive is chained and a SATA drive is star wired
So in your case the data connection can’t directly effect the drive physically via the data lines but malware could and a bad power cord could effect things
In other words one drive can’t be the cause of the other failing if each is independent.
Dan -
I am going to put a very important comment here. Before you start this process listen to the fans on your iMac do any of them sound obviously loud (think about how quiet your iMac used to sound as a reference) If you notice one or more of them sounding substantially loud compared to the others consider locating a replacement fan prior starting this process. After all if you are already “in the neighborhood” it is a shame to do all this work only to have to disassemble your imac a couple weeks later because you realize the fan is failing. I speak from my own personal learning experience of having to disassembly my iMac 3 weeks later because the HDD was failing and apparently the moving the fan around was just enough to push it to start really under performing.
Wizbang FL - Antwort
I’m not sure why it is necessary to remove the RAM. As far as I can tell, it can remain in place during this procedure.
gordonhamachi - Antwort