Einleitung
Ersetze mit Hilfe dieser Anleitung die Festplatte deines iMacs. Dazu musst du das Display ablösen und den linken Lautsprecher verschieben.
Bei dieser Reparatur wird in einigen Schritten auch beschrieben, wie du die Festplatte durch eine SSD aufrüsten kannst. Insbesondere wird gezeigt, wie der Temperatursensor der SSD installiert wird, so dass der Lüfter des iMac mit der richtigen Drehzahl arbeitet.
Bevor du am iMac arbeitest: Ziehe den Stecker raus, drücke und halte dann den Einschaltknopf 10 Sekunden lang, um die Kondensatoren im Netzteil zu entladen.
Sei sehr vorsichtig! Berühre keine Kondensatorleitungen und offenliegenden Lötstellen auf der Rückseite des Netzteils.
Was du brauchst
-
-
Reparaturen sind relativ schwierig, wenn der iMac aufrecht steht und man keine iMac Reparaturhilfe verwendet. Man kann den iMac für Reparaturen zwar auch hinlegen, jedoch ist es einfacher und schneller, den iMac in aufgerichtetem Zustand zu reparieren.
-
Wenn du die Reparaturhilfe aus Karton von iFixit hast, dann baue sie erst mit Hilfe dieser Anleitung zusammen.
-
-
-
Beginne an der linken Seite des Bildschirms, auf der Seite der Ein-/Aus-Taste, und schiebe das iMac Opening Tool zwischen Bildschirm und Gehäuse.
-
-
-
Benutze das Werkzeug wie einen Pizzaschneider - rolle es entlang der Fuge zwischen Display und Gehäuse, um den Schaumkleber zu durchschneiden.
-
Fahre mit dem Werkzeug an der linken Displayseite entlang.
-
-
-
Fahre mit dem Werkzeug um die obere linke Ecke.
-
-
-
Schneide den Rest des Klebers an der rechten Seite des Displays bis ganz nach unten durch.
-
-
-
Lege den iMac mit dem Bildschirm nach oben auf einen Tisch.
-
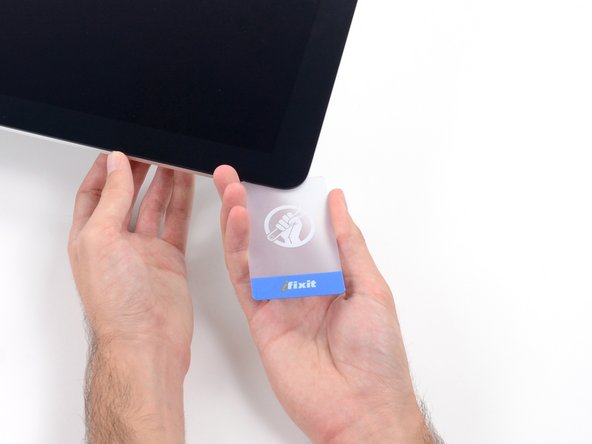
Beginne an der oberen rechten Ecke des iMacs und schiebe eine Plastikkarte zwischen Display und Gehäuse.
-
-
-
Verdrehe die Plastikkarte leicht, um den Abstand zwischen Bildschirm und Gehäuse zu vergrößern. Trenne allen Kleber in der Nähe der Ecke auf.
-
-
-
Schiebe die Karte in Richtung der Bildschirmmitte, um den Rest des Klebers durchzutrennen.
-
-
-
Schiebe die Karte wieder zurück in die Ecke des Bildschirms und lasse sie dort stecken, um zu verhindern, dass sich der Kleber wieder verbindet.
-
-
-
-
Schiebe eine zweite Karte zwischen Bildschirm und Gehäuse an der oberen linken Ecke des iMac.
-
-
-
Drehe die Karte leicht nach oben, um den Abstand zwischen Bildschirm und Gehäuse zu vergrößern.
-
-
-
Schiebe die Plastikkarte zur Mitte hin. Halte vor der iSight Kamera an, damit sie nicht beschädigt wird.
-
-
-
Fange an die beiden Karten, die wie im Bild gezeigt, in die Ecken stecken, leicht zu drehen, um den Abstand zwischen Gehäuse und Bildschirm zu vergrößern.
-
Wenn Teile des Bildschirms sich nicht zu lösen scheinen, dann nimm eine weitere Karte, um in diesen Bereichen den Kleber ein weiteres Mal durchzutrennen.
-
Beginne, die obere Seite des Bildschirms nach oben vom Rahmen zu heben.
-
-
-
Halte das Display mit einer Hand fest und löse mit der anderen Hand das Kabel das Display-Netzkabel.
This is not a picture of the 2019 model. On the 2019, the cable is angled and very close to a metal part that looks like it could be a wireless card. This makes it difficult to squeeze in the edges required to release the cable. I was able to unfasten it using my fingernail, doing one side at a time.
Same issue. You can't just pull it out. I used a plastic "spudger" to push the clips in. The photo here shows where to press
https://www.icloud.com/sharedalbum/#B0qG...
See also my comment in step 20
-
-
-
Halte das Display weiterhin mit einer Hand fest und klappe den metallenen Sicherungsbügel am Displaydatenkabel hoch.
-
Ziehe das Displaydatenkabel vorsichtig aus seinem Sockel auf dem Logic Board.
on the 2020 model there is also a connector from the camera that is connected ted to the screen.
This isn't the photo of my IMac 27 2019.
To remove this clip, lift up the plastic tag sticking down & the metal clip will lift too
-
-
-
Greife die kleine Lasche am Ende von einem der unteren Displayklebestreifen und ziehe die Streifen nach oben, um ihn zu entfernen.
-
Wiederhole den Schritt mit dem anderen Klebestreifen und entferne ihn.
-
-
-
Hebe den Bildschirm aus dem Rahmen nach oben und entferne ihn anschließend aus dem iMac. Lege das Display mit der Oberfläche nach unten auf eine flache, weiche Fläche.
-
Möglicherweise musst du an einer Seite anfangen, den Bildschirm langsam anzuheben, um den Rest des Klebestreifens zu lösen.
-
-
-
Entferne die beiden 10 mm Torx T10-Schrauben, mit denen der linke Lautsprecher befestigt ist.
-
-
-
Schiebe den abgelösten linken Lautsprecher soweit nach links, dass die Schrauben der Festplattenhalterung sichtbar werden.
-
-
-
Ziehe das SATA-Kombokabel gerade nach oben, um es von der Festplatte abzulösen.
-
-
-
Entferne die beiden 7,3 mm Torx T8 Schrauben, mit denen die linke Festplattenhalterung am Rückgehäuse befestigt ist.
-
-
-
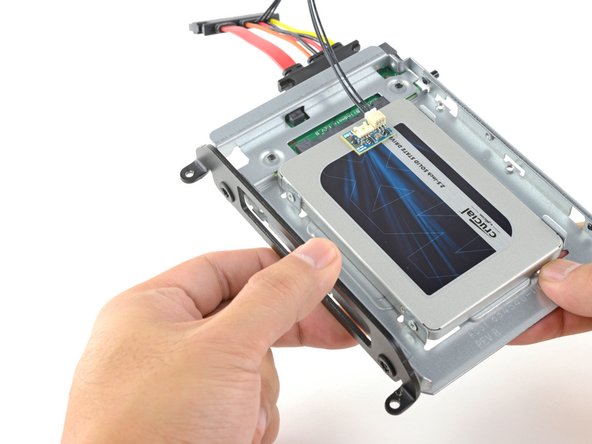
Fasse die Festplatte und die linke Festplattenhalterung zusammen an.
-
Kippe die linke Seite vom Rückgehäuse weg und schiebe die Einheit nach links.
-
Entferne die Festplatte und die linke Festplattenhalterung vom iMac.
-
-
-
Entferne die vier 8,1 mm Torx T8 Einschraubstifte von der Festplatte und übertrage sie auf die neue Festplattenhalterung.
-
-
-
Richte die Steckkontakte der SSD mit den Anschlüssen des Metall-Einschubs aus.
-
Drücke das Laufwerk fest gegen die Anschlüsse des Einschubs, bis die SSD gut sitzt.
what if I’m installing a hard drive?
Didn’t bother with the SSD caddy. Some 3M sticky pads did the trick!
Been using them for years...works great.
Two thoughts on SSD replacement/upgrade:
1) It would help if some references were made to help us determine what we need in terms form factors. I’ve never used an SSD and see a 2.5” one that would work, but I don’t know if 2.5” SSDs are different (in form factor) from 2.5” HDs. A lot of us are still learning about SSDs and isn’t that what this site is about? (Learning new things about hardware and using hardware?)
2) I’m not clear if I definitely need a new temperature sensor if I put in an SSD or if
Can I buy the kit without the SSD. I'm thinking of replacing my 3TB hard drive with a 4TB SSD.
Also, would you happen to know what the maximum hard drive dimension that can fit inside of this iMac? I may try a 14TB hard drive instead.
A 14Tb HDD does not represent any problem. But I will care about rising temperature. Must attach a heat sensor. If rise to high, it will suddenly shutdown to protect it.
-
-
-
Benutze einen Kreuzschlitzschraubendreher, um die vier silbernen Schrauben (zwei auf jeder Seite) an den Kanten der SSD einzusetzen, um sie am Einschub zu befestigen.
-
-
-
Stecke das sensorfähige Kombo-Kabel in den Anschluss am Einschub ein.
Is the thermal sensor needed? I fitted a replacement SSD and it’s all back together and the iMac’s fans are fine. They don’t go into full max speed mode.
If you have a problem with the fans, you can always use Macs Fan Control (free) to set the speed. The sensor is not needed.
-
-
-
Ziehe die weiße Schutzfolie von der kleinen Platine des Thermosensors ab, so dass die Klebefläche frei wird.
-
Bringe die Platine an einer freien Stelle der Metalloberfläche der SSD nahe beim SATA-Anschluss an.
-
Biege die überschüssigen Kabel des Thermosensors aus dem Weg, so dass sie den Einbau des Einschubs nicht behindern.
Great pics ! Is that “temp sensor board” is already on my HDD IMAC ?? Or must I buy one ?
Don’t bother with the thermal sensor. I didn’t fit one and the iMac is working fine and no fans are kicking in.
Instructions say to attach sensor to the SSD, but all pictures show it being attached to the SSD carrier. This may not represent accurate SSD temp as much of the carrier dissipates the heat absorbed from the SSD
Confirmed, no need for the extra temp sensor on Mid-2015 iMac. (EMC 2806, Mid-2015 27" iMac). Just changed the old 1TB HDD to SSD, no extra fan RPM after power on.
-
-
-
Übertrage die Montagestifte der alten Festplatte mit Hilfe eines Torx T8 Schraubendrehers auf die Seiten des Einschubs.
-
-
-
Übertrage alle Halterungen, die an der alten Festplatte angebracht waren, auf den Einschub.
i don't have a combo cable.i also didn't have asata drive. just a blade ssd. i don't see wwhere i could add a cable
-
-
-
Verbinde das Kombo-Kabel des iMacs mit dem neuen thermosensorfähigen Kombo-Kabel.
-
-
-
Schiebe den SSD-Einschub anstelle der alten Festplatte ein.
-
Führe die Kabel so, dass sie keine anderen Bauteile stören.
The SATA cable on my Late 2012 was not long enough to comfortably attach to the end of the temperature sensor array after it was plugged into the new SSD. I had to fold the array and slide it under the SSD and housing. There was much resistance to the folding so I took it slowly to let the wires adjust gradually to the fold so they would not break.
Unfortunately, the adapter that comes with it isn't long enough to avoid pushing against the screen in the front. One week after upgrading to SSD my screen fell off shattering and breaking the power connector on the systems board. A new screen is ordered but I'm hoping the power connector isn't damaged beyond repair. I'm going to try to adhere the HD adapter to the back inside of the case with 3m adhesive to avoid pressure against the screen.
As a newbie, the only other upgrade I have done is to replace my iPhone 7 battery. I had trouble on reassembly.
This is a great upgrade guide, but it would be important to me to see the reassembly instructions including the cautions.
For example, I had issues with reattaching the plugs in the phone. I could see having an issue with them here, as well as repositioning the display back into the cabinet.
I do PCB board repair work and repair pinball machines. But I won’t try this.
Try 3m double sided tape from Amazon, it available in 3mm width which is ideal for iMac screen. It has a very thin foam and is much better quality than the cheap Chinese kits available on Amazon. You will have to trim it to size with a sharp craft blade as you fit. Don’t risk your screen falling off from using cheap tape in the so called fitting kits!
In my Late 2012 27" iMac I Scotch-taped the SATA connector to the case to stop it from pushing against the screen after reassembly.
Only 39 steps!
Is it possible to clone the internal disk and have the imac boot off the external SSD?
The extension cable is too long. I folded it over carefully & stuck it down to the case using a double sided sticky pad. Photo here
-


Vergleiche dein Ersatzteil mit dem Originalteil - möglicherweise musst du fehlene Bauteile übertragen oder Schutzfolien abziehen, bevor du es einbauen kannst.
Um dein Gerät wieder zusammenzusetzen, folge den Schritten in umgekehrter Reihenfolge.
Entsorge deinen Elektromüll fachgerecht.
Hat die Reparatur nicht ganz geklappt? In unserem Forum findest du Hilfe bei der Fehlersuche.
Rückgängig: Ich habe diese Anleitung nicht absolviert.
21 weitere Nutzer:innen haben diese Anleitung absolviert.
Besonderer Dank geht an diese Übersetzer:innen:
100%

Diese Übersetzer:innen helfen uns, die Welt zu reparieren! Wie kann ich mithelfen?
Hier starten ›

11 Kommentare
Hola.
¿Es realmente necesario colocarle el sensor de temperatura al iMac A2115 de 2019?
Gracias. Saludos
A great and very carefully and detailed instruction. But what about glueing the glass pane back to the iMac? How does that work?
Thanks for any hint!
Hi Hans,
The instructions on how to glue the display back is embedded in step 23. Here is a quick link to the instructions!
If I replace a factory 1T SSD with a new 2T SSD . . .
am I correct in assuming it will already have the temperature sensor attached?
Would I need to replace the adhesive?
If you purchase the bundle from iFixit, the bundle will come with a temperature sensor. You can’t re-use the existing adhesives and will need to replace them. They are also included in the bundle.
Cual es el part-number del cable Sata? Sabéis si el iMac 27” 2019 con disco duro pci-express 512gb viene con el cable Sata para instalar un disco duro Sata?
gracias
What is the part-number of the Sata cable? Do you know if the iMac 27 ”2019 with 512gb pci-express hard drive comes with the Sata cable to install a Sata hard drive?
Thank you
Can I install an additional SSD to my blade? Is the SATA cable already in or has Apple saved a few cent¿
My 2019 iMac had a 2tb Fusion drive. This consisted of a 128gb blade and a 2tb SATA Seagate spinning HDD. I replaced the spinning disk with a SATA Samsung SSD + temp sensor, and then recreated a Fusion drive with the blade SSD and SATA SSD. As per this guide, I re-used the original SATA cable. Not sure if this would be different if your original spec was SSD only.
I am using the late 2019 version of iMac 27". Currently, the iMac has installed 3TB fusion drive but I want to replace the larger capacity of the HDD. So what is the maximum storage capacity of the HDD? Is it possible to install a 16TB HDD like NAS HDD? Thank you for the feedback in advance.
iMac19,1,3.6 GHz Core i9 (I9-9900K)。可以,我更换的型号是:HDD西部数据WDC WUH721816ALE6L4,NVME海康威视(慧荣主控)HS-SSD-C2000Pro 2048G。融合硬盘,缺点是更换HDD没有加装温度传感器风扇狂转,不知道更换希捷的硬盘会不会好点,我现在的解决办法是Macs Fan Control。还有就是更换硬盘前需要做U盘系统。
大木木 -
Die Anleitung ist wirklich sehr gut geschrieben und funktionierte bei mir soweit problemlos.
Allerdings heißt es zum Zusammensetzen lediglich, dass man die Schritte in umgekehrter Reihenfolge durchgehen soll. Dabei muss man aber natürlich die Kleberreste entfernen und neue Klebestreifen verwenden
UND: Man muss dabei darauf achten, das Mikro nicht zu überkleben! An der Kante über dem Apfel-Logo, wo das Display aufgesetzt wird gibt es etwas rechts von der Mitte zwei kleine Löcher - das sind die Mikros und diese dürfen nicht vom Klebestreifen verdeckt werden.