Diese Version enthält möglicherweise inkorrekte Änderungen. Wechsle zur letzten geprüften Version.
Was du brauchst
-
-
Wenn das Glas deines Displays gesprungen ist, klebe es mit Klebeband ab, um weitere Brüche zu verhindern und Körperverletzungen während der Reparatur zu vermeiden.
-
Lege überlappende Streifen durchsichtiges Packband über das Display des iPads, bis die gesamte Fläche abgedeckt ist.
-
Versuche, den Rest der Anleitung genau wie beschrieben zu befolgen. Wenn das Glas jedoch einmal zerbrochen ist, wird es wahrscheinlich weiter zerspringen, während du arbeitest, und du musst eventuell ein Werkzeug aus Metall zum Hebeln verwenden, um das Glas herauszuholen.
-
-
-
Setze einen Spudger aus Metall zwischen der rechten Kante der Displayeinheit und der Rückabdeckung ein.
-
Drehe den Spudger von dir weg, um die Laschen an der oberen Kante des Displays zu lösen.
-
-
-
Setze einen zweiten Spudger aus Metall zwischen die obere Kante der Displayeinheit und die Rückabdeckung, damit die Laschen nicht wieder einrasten.
-
Heble die Displayeinheit von der Rückabdeckung ab.
-
-
-
Heble die Display Einheit entlang der unteren und linken Kante des iPads weiter von der Rückabdeckung ab.
-
-
-
Benutze das flache Ende eines Spudgers, um den Antennenstecker, der sich am nächsten an der Unterseite des iPads befindet, aus seinem Anschluss auf der Kommunikationsplatine zu hebeln.
-
-
-
In den folgenden Schritten wirst du die drei Kabel, die die Displayeinheit mit dem Logic Board verbinden, abtrennen. Die Kabel sind für die folgenden Komponenten:
-
Digitizer
-
Umgebungslichtsensor
-
Display-Datenkabel
-
-
-
Benutze die Kante eines iPod Öffnungswerkzeugs, um die Halteklappen hochzuklappen, die die Flachbandkabel des Touchscreens in ihren Anschlüssen auf dem Logic Board halten.
-
Ziehe die Flachbandkabel des Touchscreens gerade aus ihren Anschlüssen heraus.
-
-
-
Verwende ein iPod Öffnungswerkzeug, um den Stecker des Umgebungslichtsensors aus seinem Anschluss zu entfernen, indem du ihn vorsichtig nach oben hebelst.
-
-
-
Trenne das Datenkabel des Displays von der Hauptplatine, indem du die Metallhalterung an der schwarzen Kunststofflasche hochklappst.
-
Ziehe den Stecker des Kabels von seinem Anschluss ab.
-
-
-
-
Verwende die Kante des iPod-Öffnungswerkzeugs, um die Platine des Umgebungslichtsensors vorsichtig vom Kleber zu lösen, mit dem sie am Displayrahmen befestigt ist.
-
Wenn du ihn ausreichend gelöst hast, ziehe den Umgebungslichtsensor vorsichtig vom LCD ab.
-
-
Dieser Schritt ist noch nicht übersetzt. Hilf mit, ihn zu übersetzen!
-
While holding the digitizer cable down, carefully peel back the piece of tape connecting the digitizer cable to the display frame.
-
-
Dieser Schritt ist noch nicht übersetzt. Hilf mit, ihn zu übersetzen!
-
Use the edge of an iPod opening tool to peel the antenna off the adhesive securing it to the top edge of the display.
-
-
Dieser Schritt ist noch nicht übersetzt. Hilf mit, ihn zu übersetzen!
-
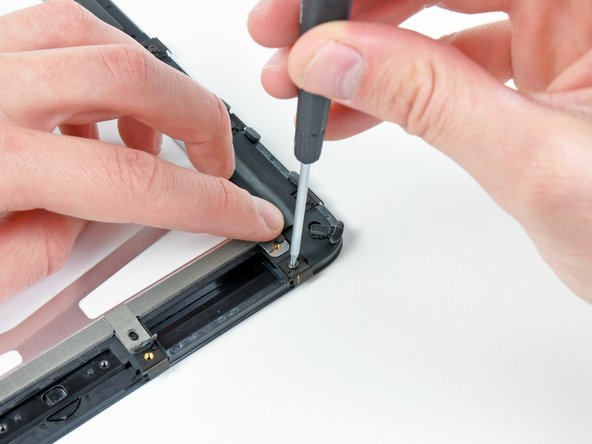
Remove the three T5 Torx screws securing the clips and LCD brackets covered in EMI tape near the home button switch.
-
Carefully peel the display clip and its attached tape off the black plastic display frame.
-
-
Dieser Schritt ist noch nicht übersetzt. Hilf mit, ihn zu übersetzen!
-
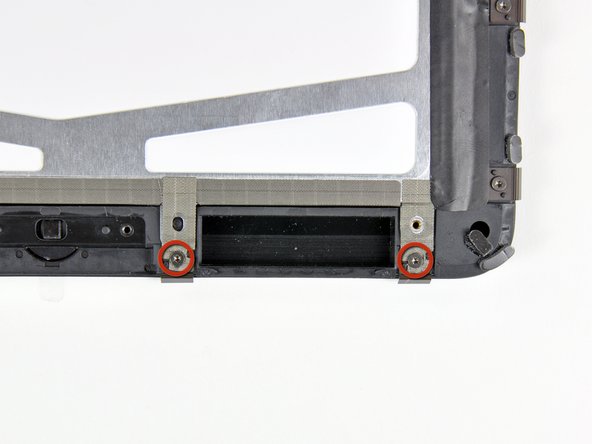
Remove the remaining T5 Torx screws securing the LCD to the black plastic display frame.
-
-
Dieser Schritt ist noch nicht übersetzt. Hilf mit, ihn zu übersetzen!
-
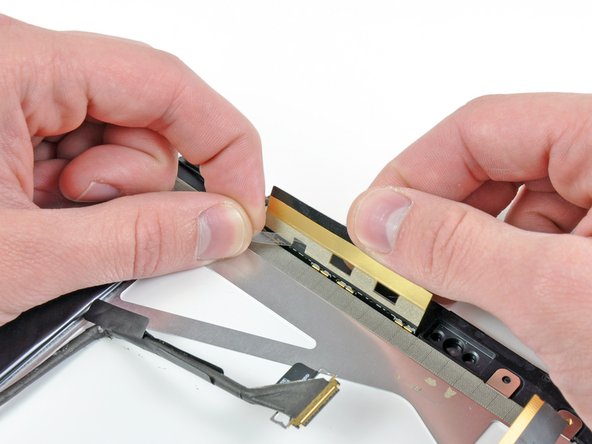
Remove the small strip of tape securing the antenna lead to the LCD.
-
-
Dieser Schritt ist noch nicht übersetzt. Hilf mit, ihn zu übersetzen!
-
Insert the edge of an iPod opening tool under one of the ears attached to the steel LCD frame.
-
Twist the iPod opening tool to gently pry the LCD up off the adhesive securing it to the front glass panel.
-
-
Dieser Schritt ist noch nicht übersetzt. Hilf mit, ihn zu übersetzen!
-
Repeat the process detailed on the previous step to pry up the display around the three sides opposite the digitizer cable side of the display.
-
-
Dieser Schritt ist noch nicht übersetzt. Hilf mit, ihn zu übersetzen!
-
Lift the LCD from its free end, and remove it from the display frame.
-
Carefully peel the adhesive securing the long side of the LCD to the display frame, then remove the LCD.
-
-
Dieser Schritt ist noch nicht übersetzt. Hilf mit, ihn zu übersetzen!
-
If it is still stuck to the front panel, remove the strip of EMI tape near the ambient light sensor socket.
-
-
Dieser Schritt ist noch nicht übersetzt. Hilf mit, ihn zu übersetzen!
-
If they are still in good shape, transfer the clips and EMI tape near the bottom of the LCD to your new LCD.
-
-
Dieser Schritt ist noch nicht übersetzt. Hilf mit, ihn zu übersetzen!
-
Remove the two T5 Torx screws securing the home button switch to the plastic display frame.
-
Remove the home button switch board from the front panel assembly.
-
-
Dieser Schritt ist noch nicht übersetzt. Hilf mit, ihn zu übersetzen!
-
If you are reusing your LCD, use the edge of a plastic opening tool to lift up a corner of the foam tape attached to the LCD.
-
Remove the tape from the perimeter of the glass face of the LCD.
-
-
Dieser Schritt ist noch nicht übersetzt. Hilf mit, ihn zu übersetzen!
-
Stick the tape down to the frame of the front panel assembly along the long edge of the LCD.
-
Carefully lower the LCD down into its recess in the new front panel frame, being sure it is properly positioned.
-
-
Dieser Schritt ist noch nicht übersetzt. Hilf mit, ihn zu übersetzen!
-
Hold back the strips of EMI tape along the lower edge of the LCD as you remove the two T5 Torx screws securing the retaining clips shown.
-
Stick the tape down against the new clips and reinstall the two T5 Torx screws.
-
-
Dieser Schritt ist noch nicht übersetzt. Hilf mit, ihn zu übersetzen!
-
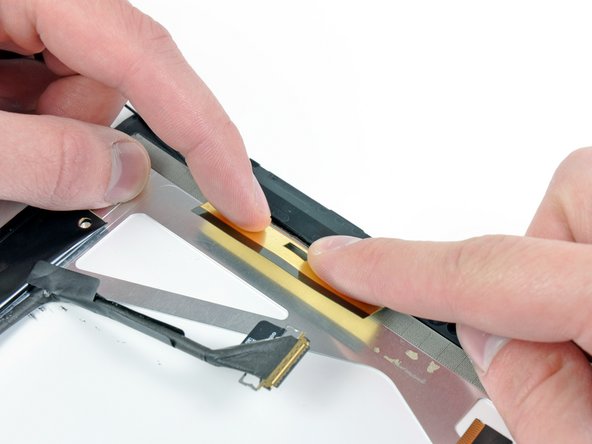
Remove the two pieces of protective film from the inner side of the GPS antenna.
-
Stick the GPS antenna down against the LCD.
-


Rückgängig: Ich habe diese Anleitung nicht absolviert.
58 weitere Nutzer:innen haben diese Anleitung absolviert.
