Zum Hauptinhalt wechseln

iPad 4 Wi-Fi Power & Volume Button Assembly Replacement

Grundständige Anleitung
Dies ist eine grundständige Anleitung, die nur als Teil einer anderen Anleitung verwendet werden sollte.

Was du brauchst

  1. iPad 4 Wi-Fi Power & Volume Button Assembly Replacement, Power & Volume Button Assembly: Schritt 1, Bild 1 von 1
    • Remove the following screws securing the power & volume button cable to the aluminum frame:

    • Two 5.5 mm Phillips #0

    • One 2.6 mm Phillips #0

    • Two 2.6 mm Phillips #0

    • The two screws located on top are angled into the aluminum frame. Be sure to always hold the screwdriver in line with the screw.

  2. iPad 4 Wi-Fi Power & Volume Button Assembly Replacement: Schritt 2, Bild 1 von 1
    • Remove the piece of plastic covering the volume buttons.

  3. iPad 4 Wi-Fi Power & Volume Button Assembly Replacement: Schritt 3, Bild 1 von 1
    • Remove the single 2.6 mm Phillips #00 screw holding the volume button frame to the aluminum frame.

    • This screw is angled into the aluminum frame. Be sure to always hold the screwdriver in line with the screw.

  4. iPad 4 Wi-Fi Power & Volume Button Assembly Replacement: Schritt 4, Bild 1 von 1
    • Wedge the edge of a plastic opening tool underneath the sleep/wake sensor, being careful to not damage the fragile cable.

    • Move the plastic opening tool around the sensor, releasing the adhesive.

  5. iPad 4 Wi-Fi Power & Volume Button Assembly Replacement: Schritt 5, Bild 1 von 2 iPad 4 Wi-Fi Power & Volume Button Assembly Replacement: Schritt 5, Bild 2 von 2
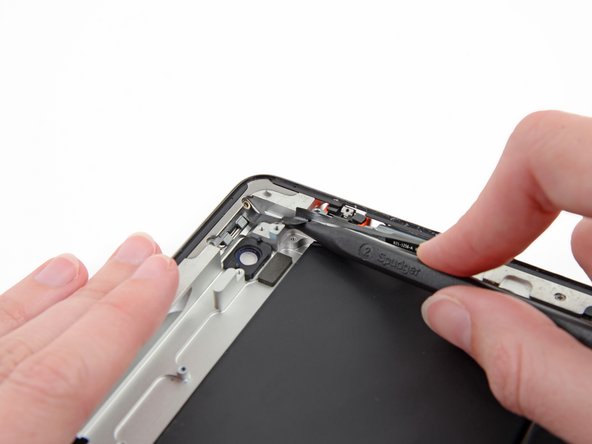
    • Slide the tip of a spudger underneath the power & volume cables, releasing the adhesive.

  6. iPad 4 Wi-Fi Power & Volume Button Assembly Replacement: Schritt 6, Bild 1 von 3 iPad 4 Wi-Fi Power & Volume Button Assembly Replacement: Schritt 6, Bild 2 von 3 iPad 4 Wi-Fi Power & Volume Button Assembly Replacement: Schritt 6, Bild 3 von 3
    • Using the tip of the spudger rather that the wide edge, release the adhesive underneath the volume button branch of the ribbon cable.

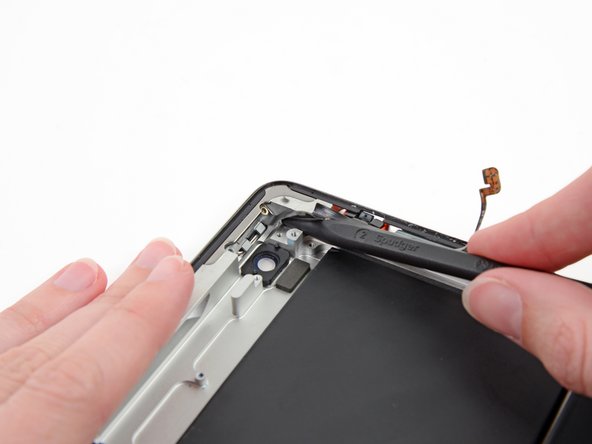
    • Continue sliding the tip of the spudger toward the top of the iPad, releasing the adhesive.

    • With the tip of the spudger still underneath the ribbon cable, gently lift the power button out of its socket in the aluminum frame.

  7. iPad 4 Wi-Fi Power & Volume Button Assembly Replacement: Schritt 7, Bild 1 von 1
    • Lift and remove the power & volume button cable out of the iPad.

Abschluss

To reassemble your device, follow these instructions in reverse order.

0 Kommentare

Kommentar hinzufügen

Seitenaufrufe:

Letzte 24 Stunden: 2

Letzte 7 Tage: 14

Letzte 30 Tage: 15

Insgesamt: 53