Zum Hauptinhalt wechseln

iPad Mini CDMA Wi-Fi/Bluetooth Antenna Replacement

Grundständige Anleitung
Dies ist eine grundständige Anleitung, die nur als Teil einer anderen Anleitung verwendet werden sollte.

Was du brauchst

  1. iPad Mini CDMA Wi-Fi/Bluetooth Antenna Replacement, Wi-Fi/Bluetooth Antenna: Schritt 1, Bild 1 von 1
    • Remove the following three screws securing the bottom left antenna to the rear case:

    • One 1.2 mm Phillips #00

    • One 1.1 mm Phillips #00

    • One 2.5 mm Phillips #00

  2. iPad Mini CDMA Wi-Fi/Bluetooth Antenna Replacement: Schritt 2, Bild 1 von 2 iPad Mini CDMA Wi-Fi/Bluetooth Antenna Replacement: Schritt 2, Bild 2 von 2
    • Use the flat end of a spudger to loosen the foam adhesive securing the Wi-Fi antenna to the left speaker.

  3. iPad Mini CDMA Wi-Fi/Bluetooth Antenna Replacement: Schritt 3, Bild 1 von 2 iPad Mini CDMA Wi-Fi/Bluetooth Antenna Replacement: Schritt 3, Bild 2 von 2
    • Use the flat end of a spudger to fold the left-hand wide piece of tape away from the left speaker.

  4. iPad Mini CDMA Wi-Fi/Bluetooth Antenna Replacement: Schritt 4, Bild 1 von 1
    • The antenna cable is secured with two pieces of tape: the wide tape that continues onto the rear case, and its own small piece of tape that is covered by the wide tape.

    • In the next steps you'll be separating the wide tape from the antenna cable's tape with the tip of a spudger in the gap between the two pieces.

  5. iPad Mini CDMA Wi-Fi/Bluetooth Antenna Replacement: Schritt 5, Bild 1 von 3 iPad Mini CDMA Wi-Fi/Bluetooth Antenna Replacement: Schritt 5, Bild 2 von 3 iPad Mini CDMA Wi-Fi/Bluetooth Antenna Replacement: Schritt 5, Bild 3 von 3
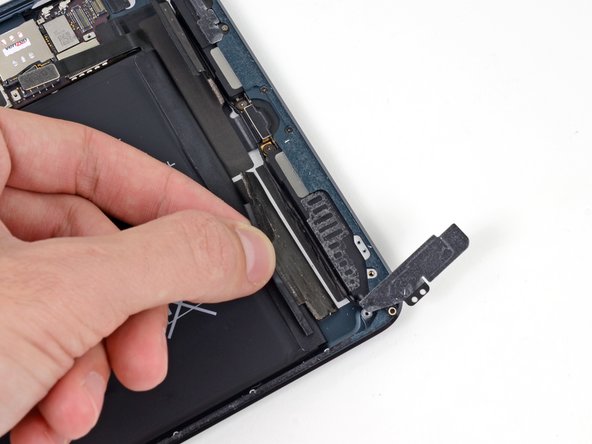
    • Pull the wide tape toward the top of the iPad, applying constant force to release it from the antenna cable between it and the speaker.

    • Slide the tip of a spudger through the gap between the wide tape and the antenna cable, to break the adhesive connecting the two.

    • Continue pulling the wide tape until it is no longer covering the antenna cable.

  6. iPad Mini CDMA Wi-Fi/Bluetooth Antenna Replacement: Schritt 6, Bild 1 von 1
    • The right-hand wide piece of tape covers the antenna cable in the same way as the left.

  7. iPad Mini CDMA Wi-Fi/Bluetooth Antenna Replacement: Schritt 7, Bild 1 von 3 iPad Mini CDMA Wi-Fi/Bluetooth Antenna Replacement: Schritt 7, Bild 2 von 3 iPad Mini CDMA Wi-Fi/Bluetooth Antenna Replacement: Schritt 7, Bild 3 von 3
    • Pull the wide tape toward the top of the iPad, applying constant force to release it from the antenna cable between it and the speaker.

    • Slide the tip of a spudger through the gap between the wide tape and the antenna cable, to release the adhesive connecting the two.

    • Continue pulling the wide tape until it is no longer covering the antenna cable.

  8. iPad Mini CDMA Wi-Fi/Bluetooth Antenna Replacement: Schritt 8, Bild 1 von 3 iPad Mini CDMA Wi-Fi/Bluetooth Antenna Replacement: Schritt 8, Bild 2 von 3 iPad Mini CDMA Wi-Fi/Bluetooth Antenna Replacement: Schritt 8, Bild 3 von 3
    • Use the tip of a spudger to pry the antenna cable tape up from the rear case of the iPad.

    • Gently pull the antenna cable out of the way as you work along the piece of tape, to keep it from resealing.

  9. iPad Mini CDMA Wi-Fi/Bluetooth Antenna Replacement: Schritt 9, Bild 1 von 2 iPad Mini CDMA Wi-Fi/Bluetooth Antenna Replacement: Schritt 9, Bild 2 von 2
    • Pull the antenna cable from the slot behind the Lightning connector.

  10. iPad Mini CDMA Wi-Fi/Bluetooth Antenna Replacement: Schritt 10, Bild 1 von 2 iPad Mini CDMA Wi-Fi/Bluetooth Antenna Replacement: Schritt 10, Bild 2 von 2
    • Use the tip of the spudger to pry the antenna cable tape up from behind the right speaker as well.

  11. iPad Mini CDMA Wi-Fi/Bluetooth Antenna Replacement: Schritt 11, Bild 1 von 3 iPad Mini CDMA Wi-Fi/Bluetooth Antenna Replacement: Schritt 11, Bild 2 von 3 iPad Mini CDMA Wi-Fi/Bluetooth Antenna Replacement: Schritt 11, Bild 3 von 3
    • Use the tip of a spudger to remove the small piece of tape securing the antenna cable in the bottom right corner of the iPad.

  12. iPad Mini CDMA Wi-Fi/Bluetooth Antenna Replacement: Schritt 12, Bild 1 von 2 iPad Mini CDMA Wi-Fi/Bluetooth Antenna Replacement: Schritt 12, Bild 2 von 2
    • Pull the antenna cable away from its recess in the rear case.

  13. iPad Mini CDMA Wi-Fi/Bluetooth Antenna Replacement: Schritt 13, Bild 1 von 3 iPad Mini CDMA Wi-Fi/Bluetooth Antenna Replacement: Schritt 13, Bild 2 von 3 iPad Mini CDMA Wi-Fi/Bluetooth Antenna Replacement: Schritt 13, Bild 3 von 3
    • Use the tip of a spudger to pry the small metal retaining clip off the antenna cable.

    • De-route the antenna cable from the clip.

Abschluss

To reassemble your device, follow these instructions in reverse order.

0 Kommentare

Kommentar hinzufügen

Seitenaufrufe:

Letzte 24 Stunden: 0

Letzte 7 Tage: 0

Letzte 30 Tage: 0

Insgesamt: 96