Zum Hauptinhalt wechseln
Gemeinsam reparieren - Jetzt registrieren

iPad Wi-Fi Dock Connector Cable Replacement

Was du brauchst

  1. iPad Wi-Fi Dock Connector Cable Replacement, Display Assembly: Schritt 1, Bild 1 von 3 iPad Wi-Fi Dock Connector Cable Replacement, Display Assembly: Schritt 1, Bild 2 von 3 iPad Wi-Fi Dock Connector Cable Replacement, Display Assembly: Schritt 1, Bild 3 von 3
    • If your display glass is cracked, keep further breakage contained and prevent bodily harm during your repair by taping the glass.

    • Lay overlapping strips of clear packing tape over the iPad's display until the whole face is covered.

    • This will keep glass shards contained and provide structural integrity when prying and lifting the display.

    • Do your best to follow the rest of the guide as described. However, once the glass is broken, it will likely continue to crack as you work, and you may need to use a metal prying tool to scoop the glass out.

    • Wear safety glasses to protect your eyes, and be careful not to damage the LCD screen.

    Frag FixBot

    Kommentar hinzufügen

  2. iPad Wi-Fi Dock Connector Cable Replacement: Schritt 2, Bild 1 von 2 iPad Wi-Fi Dock Connector Cable Replacement: Schritt 2, Bild 2 von 2
    • In this guide you will be prying the iPad's display assembly away from the aluminum body. Read ahead and follow the directions closely to avoid damaging the display assembly or the fragile clips holding it in place.

    • There are 14 metal clips holding the display assembly in place, shown at left. As you pry in the following steps, do your best to pry around these clips and not slice through them with your opening tool.

    • If you do happen to break some clips, you can buy replacements here.

    Frag FixBot

    Kommentar hinzufügen

  3. iPad Wi-Fi Dock Connector Cable Replacement: Schritt 3, Bild 1 von 2 iPad Wi-Fi Dock Connector Cable Replacement: Schritt 3, Bild 2 von 2
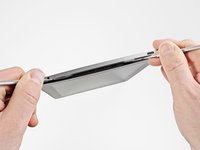
    • Insert a metal spudger between the top edge of the display assembly and the rear panel assembly.

    • Rotate the spudger away from you to release the tabs along the top edge of the display.

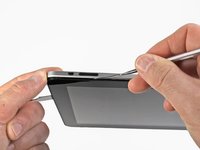
    • Insert a second metal spudger between the top edge of the display assembly and the rear panel assembly to keep the tabs from snapping back into place.

    Frag FixBot

    Kommentar hinzufügen

  4. iPad Wi-Fi Dock Connector Cable Replacement: Schritt 4, Bild 1 von 2 iPad Wi-Fi Dock Connector Cable Replacement: Schritt 4, Bild 2 von 2
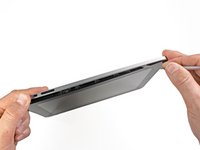
    • With one spudger, work your way along the right edge of the iPad.

    • The front panel is held to the aluminum back by metal clips on the top, bottom, and left sides. The right side has plastic tabs which slide into recesses in the backplate.

    • Once the clips are released, lift the left side of the front panel up and slide it to the left to clear the tabs from the aluminum backplate.

    • Pry carefully and gently—if you feel resistance, stop and pry at another spot.

    Frag FixBot

    Kommentar hinzufügen

  5. iPad Wi-Fi Dock Connector Cable Replacement: Schritt 5, Bild 1 von 1
    • Lift the display assembly away from the rear panel assembly by its bottom edge.

    • Do not attempt to remove the display at this time, as it is attached to the rear panel assembly.

    Frag FixBot

    Kommentar hinzufügen

  6. iPad Wi-Fi Dock Connector Cable Replacement: Schritt 6, Bild 1 von 1
    • In the following steps, you will disconnect the three cables attaching the display assembly to the logic board. The cables are for the following components:

    • Digitizer

    • Ambient Light Sensor

    • Display Data Cable

    Frag FixBot

    Kommentar hinzufügen

  7. iPad Wi-Fi Dock Connector Cable Replacement: Schritt 7, Bild 1 von 3 iPad Wi-Fi Dock Connector Cable Replacement: Schritt 7, Bild 2 von 3 iPad Wi-Fi Dock Connector Cable Replacement: Schritt 7, Bild 3 von 3
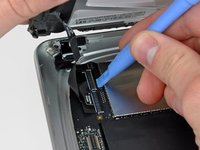
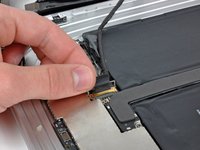
    • Use the edge of a plastic opening tool to flip up the retaining flaps holding the digitizer ribbon cables in their sockets on the logic board.

    • Be sure you are flipping up the retaining flap, not the socket itself.

    • Pull the digitizer ribbon cables straight out of their sockets.

    Frag FixBot

    Kommentar hinzufügen

  8. iPad Wi-Fi Dock Connector Cable Replacement: Schritt 8, Bild 1 von 1
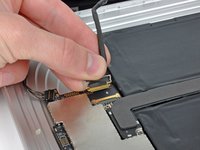
    • Use a plastic opening tool to remove the ambient light sensor connector from its socket by gently prying upward.

    Frag FixBot

    Kommentar hinzufügen

  9. iPad Wi-Fi Dock Connector Cable Replacement: Schritt 9, Bild 1 von 2 iPad Wi-Fi Dock Connector Cable Replacement: Schritt 9, Bild 2 von 2
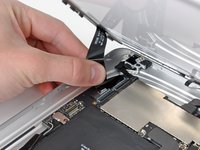
    • Disconnect the display data cable from the main board by flipping up the metal retainer by its black plastic pull tab.

    • Pull the cable connector away from its socket.

    • Pull the connector parallel to the face of the logic board.

    Frag FixBot

    Kommentar hinzufügen

  10. iPad Wi-Fi Dock Connector Cable Replacement: Schritt 10, Bild 1 von 1
    • Remove the display assembly from the rear panel assembly.

    Frag FixBot

    Kommentar hinzufügen

  11. iPad Wi-Fi Dock Connector Cable Replacement, Dock Connector Cable: Schritt 11, Bild 1 von 1
    • Remove the two 4.56 mm T5 Torx screws securing the dock connector cable to the main board.

    Frag FixBot

    Kommentar hinzufügen

  12. iPad Wi-Fi Dock Connector Cable Replacement: Schritt 12, Bild 1 von 1
    • Remove the single 2.84 mm T5 Torx screw connecting the dock connector cable to the rear case assembly.

    Frag FixBot

    Kommentar hinzufügen

  13. iPad Wi-Fi Dock Connector Cable Replacement: Schritt 13, Bild 1 von 1
    • Remove the two 2.84 mm T5 Torx screws securing the dock connector cable to the rear panel assembly.

    Frag FixBot

    Kommentar hinzufügen

  14. iPad Wi-Fi Dock Connector Cable Replacement: Schritt 14, Bild 1 von 1
    • Carefully remove the plastic cover over the WiFi/Bluetooth board and dock connector cable using a plastic opening tool.

    Frag FixBot

    Kommentar hinzufügen

  15. iPad Wi-Fi Dock Connector Cable Replacement: Schritt 15, Bild 1 von 1
    • Pry the Wi-Fi and Bluetooth antennas up off their respective sockets on the Wi-Fi/Bluetooth board.

    • Remove the dock connector cable from the rear panel assembly.

    Frag FixBot

    Kommentar hinzufügen

Abschluss

To reassemble your device, follow these instructions in reverse order.

Rückgängig: Ich habe diese Anleitung nicht absolviert.

36 weitere Personen haben diese Anleitung absolviert.

4 Kommentare zur Anleitung

I am not sure what I did wrong, but I broke 4-5 clips when trying to open the iPad with the spudger.

jason - Antwort Teilen

I think this guide is incorrect. I bought a T5 Torx screwdriver and it was too big for the screws in my iPad. I believe you need a T4 Torx screwdriver.

markdorey - Antwort Teilen

How much if I repair my ipad air 1 for the damaged 30-pin dock here in the philippines

christine anigan - Antwort Teilen

Will this work on a iPad 1 wifi?

Joe Wong - Antwort Teilen

Kommentar hinzufügen

Seitenaufrufe:

Letzte 24 Stunden: 2

Letzte 7 Tage: 20

Letzte 30 Tage: 152

Insgesamt: 66,063