Einleitung
Folge dieser Anleitung, um das Logic Board des iPad zu entfernen.
Was du brauchst
-
-
Wenn dein Displayglas Risse aufweist, dann musst du die Bruchstellen sichern und Verletzungen verhindern, indem du ein Klebeband auf die Glasscheibe klebst.
-
Lege überlappende Streifen durchsichtigen Klebebands über das Display des iPad, bis die ganze Scheibe bedeckt ist.
-
Tu dein Bestes, den Anweisungen genau zu folgen. Wenn das Glas jedoch zerbrochen ist, wird es wahrscheinlich weiter brechen, während du daran arbeitest. Du musst möglicherweise einen Metallspatel und eine Pinzette verwenden, um Glassplitter herauszuziehen.
-
-
-
Das Display wird von 14 Metallklammern am Gehäuse gehalten. Achte darauf, dass du mit dem Spatel um diese Klammern herum arbeitest und ihn nicht durch sie hindurch schiebst.
A clearer explanation of the orientation is needed here. The bar code is at the top left of the iPad when you are looking at the screen.
-
-
-
Setze einen Metallspatel zwischen die Oberkante der Display-Einheit und die Rückwandbaugruppe ein.
-
Drehe den Spatel von dir weg, um die Laschen entlang der oberen Kante des Bildschirms zu lösen.
-
Setze einen zweiten Metallspatel zwischen die Oberkante der Displaybaugruppe und die Rückwandbaugruppe ein, damit die Laschen nicht wieder einrasten.
-
-
-
Arbeite dich mit einem Spudger an der rechten Kante des iPads entlang.
-
Die Frontplatte wird durch Metallklammern oben, unten und links am Aluminiumrücken gehalten. Die rechte Seite hat Plastiklaschen, die in Aussparungen in der Rückplatte gleiten.
-
Sobald die Clips gelöst sind, hebe die linke Seite der Frontplatte nach oben und schiebe sie nach links, um die Laschen von der Aluminium-Rückplatte zu entfernen.
Its seems easier to undo the clips on the left and bottom by levering them with an iPad tool and pusing the clips in from the edge with another tool when i can visually see them. One the right side, bottom and most of the left side is done there isnt much need to do the top as it will slide off if moved about a centimeter
-
-
-
Hebe die Display-Einheit an der Unterkante von der Rückwandbaugruppe weg.
-
-
-
-
In den folgenden Schritten trennst du die drei Kabel, mit denen die Display-Einheit am Logic Board befestigt ist. Die Kabel sind für folgende Komponenten vorgesehen:
-
Touchscreen
-
Umgebungslichtsensor
-
Display Datenkabel
It would be easier to detach the Display Data Cable at its connector on the far right in the picture, since there doesnt seem to be much play to undo the suggested one.
-
-
-
Verwende die Kante eines Kunststofföffnungswerkzeugs, um die Halteklappen, die die Touchscreenkabel in ihren Buchsen auf dem Logic Board halten, hochzuklappen.
-
Ziehe die Touchscreen Flachbandkabel gerade aus den Sockeln heraus.
Adding this comment in its proper place:
After flipping up the metal retainer, pull it sideways.
Do not pull it up vertically.
-
-
-
Verwende ein Kunststofföffnungswerkzeug, um den Verbinder des Umgebungslichtsensors aus seinem Sockel zu entfernen, indem du ihn vorsichtig nach oben hebelst.
-
-
-
Löse das Display-Datenkabel von der Hauptplatine, indem du die Metallsicherung an der schwarzen Plastikzuglasche hochklappst.
-
Ziehe den Verbinder aus dem Sockel.
IMHO, unhooking data display cable from the other end is preferable to the above location, since the cable itself is sealed or taped onto the assembly.
-
-
-
Verwende die Kante eines Kunststoff-Öffnungswerkzeugs, um
-
den Verbinder der Seitentaste unter den Drähten vom Logic Board herauszuhebeln.
-
den Lautsprecheranschluss unter den Lautsprecherkabeln vom Sockel auf dem Logic Board herauszuhebeln.
-
Klappe vorsichtig die Halteklappe des ZIF-Flachbandkabels am Sockel in der Nähe der Kopfhörerbuchse hoch.
-
Ziehe das Flachbandkabel des Kopfhörers in Richtung der linken Seite des iPads, um es so aus dem Sockel zu lösen.
Just skip removing the “side button connector” as you may instead sever the small solder connections to the socket. It’s not a necessary step and is more dangerous than anything.
I wish I had understood your post a little better, the socket popped off of the logic board for me. Is there any way to reconnect it or did I just waste my money trying to fix my own device? Thanks for any suggestions, listen to Max, good advice, there’s no reason to remove that connection and it just puts you in danger of doing what i did. Good luck to all.
-
-
-
Entferne folgenden Schrauben, mit denen das Logic Board an der Rückgehäuseeinheit befestigt ist.
-
Zwei 4,56 mm T5 Torx Schrauben.
-
Zwei 3,76 mm T5 Torx Schrauben.
确定是T5吗,为什么在这个拆解里是写T4,我都糊涂了
-
-
-
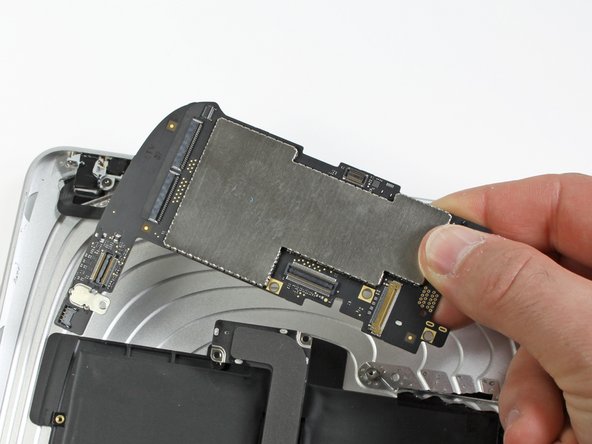
Verwende die Kante eines Plastiköffnungswerkzeugs, um den Dockkabelstecker vorsichtig vom Logic Board zu lösen.
-
Hebe das Logic Board aus der Rückwandbaugruppe heraus.
-


Folgen den Anweisungen in umgekehrter Reihenfolge, um das Gerät wieder zusammenzubauen.
Folgen den Anweisungen in umgekehrter Reihenfolge, um das Gerät wieder zusammenzubauen.
Rückgängig: Ich habe diese Anleitung nicht absolviert.
27 weitere Nutzer:innen haben diese Anleitung absolviert.
Besonderer Dank geht an diese Übersetzer:innen:
100%

Diese Übersetzer:innen helfen uns, die Welt zu reparieren! Wie kann ich mithelfen?
Hier starten ›

3 Kommentare
Isn't the firmware containing the serial number on the logic board? If so you would need to add the serial number back in right?
Can I change the logic board from another iPad to this one?
Hi my gen 5 ipod touch( yep had it forever) screen broke yet that far back replacing that not worth the effort. Want to try and use any hardware it didn't ruin when i sat on it. try to connect to my hp monitor from 2003? Maybe? thanks for reading. cheers
1) Are you recommending to cover the display with clear packing tape even if it is intact (not cracked)?
2) If so,will the tape take the display’s oleophobic coating with it when removed?
Mitch Stary - Antwort
Hola necesito comprar
Alsone Michel - Antwort
Hola, ¿no estoy seguro si te refieres a las gafas de protección o a la pantalla? Te dejo los dos enlaces aquí:
iPad LCD Panel
Safety Glasses
Sandra Hiller -