Einleitung
Kein Audio mehr? Dann tausche die Kopfhörerbuchse aus!
Was du brauchst
-
-
Stecke zum Entfernen der SIM-Karte ein Werkzeug oder eine Büroklammer in das kleine Loch neben der Kopfhörerbuchse.
-
Drücke vorsichtig, bis der SIM Karteneinschub herauskommt.
-
-
YOU NEED TO PUT THE OPENER TOOL BETWEEN THE ANTENNA COVER AND THE DOCK CONNECTOR FIRST, THEN YOU WILL HAVE SPACE TO OPEN IT.. MY 2 CENTS
You better lay off the caps.
Very hard to remove and the plastic is very fragile
Take care when removing
When you get stuck follow this guy guide
Great Guide.
My dad banged his iPhone in a table after arguing with someone and got the aluminum cover next to the volume control bent in such a way as it got the volume control stuck in the max position. I used this guide to remove all parts out of the way so I can get the shape of that region and corrected it the "Han Solo" Way. It was an excellent opportunity to get the phone cleaned up as well
The biggest problem I had was screwing some of the screws back. The screwdriver that I had was not magnetized, so I used a little bit of superglue to bind the screw and the screwdriver until I had it screwed tightly.
The second biggest problem I had was that I lost a screw twice, but was lucky enough to find it quickly on the floor next to me.
I am very happy as I waited more than a month to get the confidence to get this iPhone repaired.
Zitat von Ivanfrost:
how do i know what part is in my phone? There are 2...
Once you have the phone apart and have gently unplugged the power ribbon, read the part number on the ribbon. If it's in the 821- family, you can safely use corresponding 821 headphone assembly. If it is the other part number, use the newer replacement. Many sites list both parts and let you order the appropriately numbered part. Otherwise (if you order the wrong part) it won't work or you'll have to [unnecessarily] hack the part to get it to work.
Zitat von Steve:
Once you have the phone apart and have gently unplugged the power ribbon, read the part number on the ribbon. If it's in the 821- family, you can safely use corresponding 821 headphone assembly. If it is the other part number, use the newer replacement. Many sites list both parts and let you order the appropriately numbered part. Otherwise (if you order the wrong part) it won't work or you'll have to [unnecessarily] hack the part to get it to work.
I bought the wrong one.... how do I hack it?
My iPhone is very first model. It doesn't have any of the four tabs shown.
The very first model does not have the four tabs. To open this version, use a plastic opener tool and push it into the middle of the tiny space between the rectangular dock connector and the antenna cover. Move the tool to the side and push it in a little deeper. A small gap should open up at the bottom of the antenna cover, where it meets the metal. Continue using the plastic opener tool in there, pushing it in and forcing it around the edge so that the antenna cover further separates. Then repeat this on the other side. To me it seems like a very brittle piece of plastic, so be careful. But now that it's loose at the bottom you can lift it with your fingers and work it off.
-
-
Führe den Metallspudger in den Spalt zwischen Dockanschluss und Antennenabdeckung. Schaffe vorsichtig mit einer leichter Drehbewegung in der Nähe der beiden Klammern einen Spalt zwischen Antenneabdeckung und der silbernen vorderen Einfassung.
Take heed to the note about getting the spudger between the dock connector and the cover. The dock connector is black plastic, as is the antenna cover, so it's difficult to see any gap between them. Putting the spudger between the metal shielding of the connector and the plastic is incorrect.
-
-
-
Schiebe ein iPod Öffnungswerkzeug in den Spalt zwischen Antennenabdeckung und vorderer Einfassung. Der Keil des Werkzeugs sollte zur Antennenabdeckung zeigen. Schiebe das Werkzeug um die Ecke herum und dann nach oben bis zur Metallrückseite.
-
Wiederhole diesen Vorgang auf der anderen Seite des Dockanschlusses.
-
-
-
Fasse die Antennenabdeckung auf beiden Seiten und schiebe sie nach oben und weg vom iPhone. Das erfordert etwas Kraft. Falls sie sich nicht lösen lässt, kontrolliere, ob die Antennenabdeckung ausreichend angehoben wurde, so dass sie von den Rasten gelöst wurde.
It was released very hard on my iPhone 2G but the problem comes when i have to put it back.
It remains a little more space between the dock and the Antena cover and maybe that's because the two tabs between the mic and the speaker are not entered under the gold board?
If someone knows please tell me how to put it back.
Thanks
There is a very easy way to remove the cover by simply sticking duct tape on it and pulling the tape away of the phone.
It will leave no marks and it didn't damage my antenna cover as much(my "chinese" repair tools were to weak).
Thanks, using the tape was quick and easy, no damage at all.
Roeland -
Brilliant. Works perfectly. 20 seconds of work.
-
-
-
Entferne die drei Kreuzschlitzschrauben #00, die die Rückabdeckung am iPhone befestigen.
-
-
-
Das kleine eckige Loch ist der Ort, wo du im nächsten Schritt einen Zahnstocher hineinschieben musst.
-
Schiebe das spitze Ende eines Spudgers in die Lücke zwischen der grauen Metallleiste und der Rückabdeckung. Heble die Abdeckung soweit hoch, dass du die Spitze eines iPod Öffnungswerkzeugs in den Spalt zwischen der vorderen Einfassung und der Rückabdeckung schieben kannst.
-
-
-
-
Fange an, die Rückabdeckung auf der Seite mit den Tasten zu entfernen.
-
Schiebe den Zahnstocher ganz in das eckige Loch. Unter Umständen musst du das Werkzeug hin-und herruckeln und ziemlich kräftig drücken, um es ganz hinein zu bekommen.
Zitat von soporte:
Dental pick??? which other tool can be used to replace it? thanks!
At Lowes (and probably Home Depot) you can buy a set of 4 tools from Kobalt for about $6. They look like small icepicks with differently bent tips. They are much stronger than the dental picks you get at the local chain drugstore.
-
-
-
Heble die Rückabdeckung hoch, indem du den Zahnstocher mit eine schnellen Bewegung gegen den Uhrzeigersinn ziehst. Wende Kraft senkrecht zur Oberfläche der Displayeinheit an. Du hast vielleicht Angst, die Bewegung so schnell auszuführen, aber durch eine langsame Bewegung ist das Risiko höher, dass das Gehäuse verbogen wird.
-
-
-
Benutze einen Spudger, um die Rückabdeckung an der Ecke und entlang der Oberkante vom iPhone zu lösen.
-
-
-
Wiederhole diesen Vorgang auf der anderen Seite des iPhones. Schiebe den Zahnstocher ganz in das eckige Loch. Unter Umständen musst du das Werkzeug hin-und herruckeln und ziemlich kräftig drücken, um es ganz hinein zu bekommen.
-
-
-
Heble die Rückabdeckung hoch, indem du den Zahnstocher mit eine schnellen Bewegung gegen den Uhrzeigersinn ziehst. Wende Kraft senkrecht zur Oberfläche der Displayeinheit an. Du hast vielleicht Angst, die Bewegung so schnell auszuführen, aber durch eine langsame Bewegung ist das Risiko höher, dass das Gehäuse verbogen wird.
-
Die Rückabdeckung ist mit dem restlichen iPhone immer noch durch das Kabel des Kopfhöreranschlusses verbunden, entferne die Rückabdeckung also noch nicht ganz vom iPhone.
-
-
-
Benutze einen Spudger, um das Kabel des Kopfhöreranschlusses vom Logic Board zu trennen.
-
-
-
Entferne die zwei Kreuzschlitzschrauben #00, die den An-/Aus-Schalter an der Rückabdeckung befestigen.
-
-
-
Entferne folgende drei Schrauben:
-
Zwei Kreuzschlitzschrauben #00, die den Vibrationsmotor an der Rückabdeckung befestigen.
-
Eine längere Kreuzschlitzschraube #00 mit grösserem Kopf, die den Kopfhöreranschluss an der Rückabdeckung befestigt.
-
-
-
Nimm die metallene Schraubplatte, die am An-/Aus-Schalter befestigt ist, und hebe sie etwas an und weg von der Rückabdeckung. Die Taste sollte sich mit ablösen.
-
Löse vorsichtig das Flachbandkabel des An-/Aus-Schalters ab. Achte darauf, dort zu ziehen, wo das Kabel an der Rückabdeckung festgeklebt ist.
-
-
-
Der Kopfhöreranschluss liegt in einer kleinen Vertiefung in der Rückabdeckung. Schiebe zuerst den Kopfhöreranschluss aus seiner Vertiefung heraus und hebe ihn dann etwas an (nur einen halben Zentimeter), sodass er sich nicht länger in der Rückabdeckung befindet.
-
-
-
Fasse den Kopfhöreranschluss oben an und hebe ihn vorsichtig hoch, und ziehe so den Vibrationsmotor mit aus der Rückabdeckung.
-
-
-
Entferne die zwei Kreuzschlitzschrauben #00, die den Stumm-/Klingel-Schalter an der Rückabdeckung befestigen.
-
Heble die Metallabdeckung mit den Schraublöchern ab und hebe sie für den Ersatzschalter auf.
-
-
-
Hebe den Stumm-/Klingel-Schalter leicht an, um die Schraube darunter freizulegen.
Does reinstallation of the vibrator motor get it back working. If not, does the Gen 1 replacement headphone jack include a new vibrator motor?
Zitat von BrooklynTed:
Does reinstallation of the vibrator motor get it back working. If not, does the Gen 1 replacement headphone jack include a new vibrator motor?
Yes, i have bought two off ebay, they come with the silent switch, volume button, power, vibrate and headphone jack, they cost between $10-$15
-
-
-
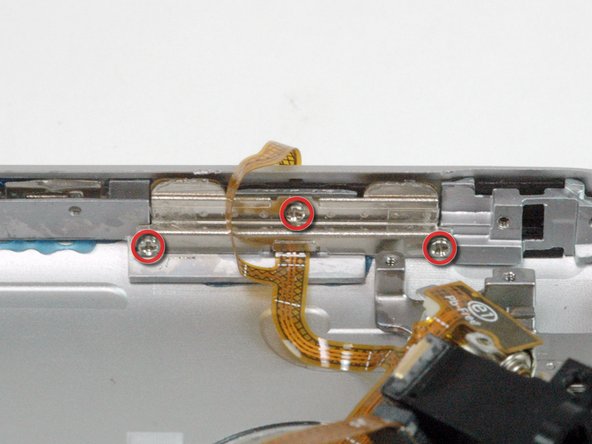
Entferne die drei Kreuzschlitzschrauben #00, mit denen der Lautstärkeregeler an der Rückabdeckung befestigt ist.
-


Um dein Gerät wieder zusammenzubauen, folge dieser Anleitung in umgekehrter Reihenfolge.
Um dein Gerät wieder zusammenzubauen, folge dieser Anleitung in umgekehrter Reihenfolge.
Rückgängig: Ich habe diese Anleitung nicht absolviert.
52 weitere Nutzer:innen haben diese Anleitung absolviert.
Besonderer Dank geht an diese Übersetzer:innen:
100%

Annika Faelker hilft uns, die Welt in Ordnung zu bringen! Wie kann ich mithelfen?
Hier starten ›

2 Kommentare
Keep in mind there is two different models - always check part number on actual flex - if you'll replace it with wrong one audio will work "other way around" - if you plug in headphones - speakers will start to work, if you unplug them speakers will not work.
I bought a iphone 2g off ebay and it has this problem.. :( Please is there anyway to fix it? There is 0 information on the internet about this problem.
Robert -
To remove the SIM, insert the end of a SIM eject tool or a small thin paper clip into the hole on the SIM tray. Press firmly and push the tool straight in until the tray pops out.
http://support.apple.com/kb/ht1438
neuronetix - Antwort
I put the SIM card back in, and the slide to unlock does not work.
dean -
The only carrier to accept this iPhone was AT&T, they have discontinued use of that baseband. Nobody else in the world except for early renegade reverse engineers such as Geohot can get the device to work as a really old iPod no use unlocking the device because the technology inside the most recently OEM sold/refurbed iPhone 1st gen fails universally. You should only buy a screen assembly and snap it onto the back and call it a dummy phone and put it in a museum.
Alexander Weinhart - Antwort