Diese Übersetzung enthält möglicherweise noch nicht die neuesten Änderungen der Original-Anleitung. Hilf mit, die Übersetzung zu aktualisieren oder sieh dir die Original-Anleitung an.
Einleitung
电池不耐用了?换了一个新的吧。(链接为英文视频)
Was du brauchst
Einführungsvideo
-
-
-
删除下面的8个螺丝:
-
五2.3毫米的菲利普斯# 00螺丝部分螺纹固定逻辑板后的情况。
-
两个2.3毫米的菲利普斯# 00全螺纹螺钉固定逻辑板和摄像头。
-
一个2.9毫米的菲利普斯# 00螺杆从下面的“不删除”的标签。
-
重新装配说明:
-
螺丝,摄像头旁边(右下橙色高亮螺丝)也有一个金属条保存相机的地方。
-
-
-
将逻辑板朝码头连接器和出iPhone。
-
在安装电池后更换逻辑板,将相机连接到逻辑板,然后将其插入盒中。然后,在设置板的其余部分之前,请确定逻辑板的顶部(SIM盘在那里)到位。这是很重要的,因为有时SIM卡槽不会调整到位。一旦顶部到位,底部可以开到位置。你会知道逻辑板安装正确时,SIM托盘对准打开的iPhone的情况下,相机模块座位整齐地放在它的位置。
-
-
-
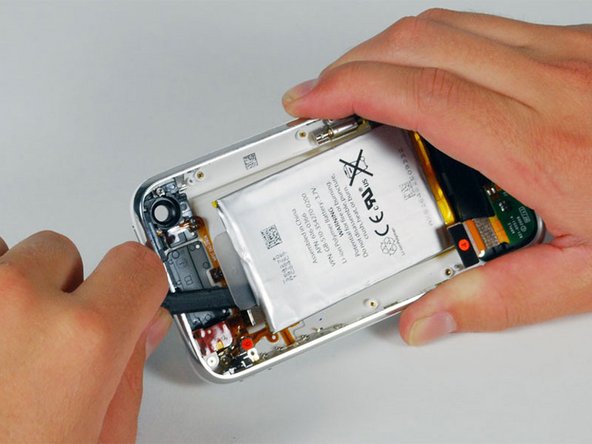
使用spudger撬电池从后盖。电池连接在电池周围的胶条。防止电池在去除过程中弯曲,我们不推荐使用的塑料拉环。*注意:拆卸电池不必要更换GPS天线。它只是给你更多的空间去耳机组件(也没有必要完全删除)。
-


要重新组装您的设备,请按照相反的顺序执行这些指示。
要重新组装您的设备,请按照相反的顺序执行这些指示。
Rückgängig: Ich habe diese Anleitung nicht absolviert.
933 weitere Nutzer:innen haben diese Anleitung absolviert.
Besonderer Dank geht an diese Übersetzer:innen:
54%

Diese Übersetzer:innen helfen uns, die Welt zu reparieren! Wie kann ich mithelfen?
Hier starten ›

35 Kommentare
I replaced the battery in both my iPhone and my wife's in the same session. Using the slideshow and directions I was able to successfully do the replacement. Of course my iPhone was the first one done so as to gain some experience before tackling my wife's iPhone. I had two minor issues in reassembling mine. Firstly, I completely missed re-installing the number 3 cable. It wasn't till I was reassembling my wife's iPhone that I realized I'd missed it. Not sure what it supports as I had my phone up and running, checked the GPS, etc while it wasn't connected. Secondly, my camera wasn't seated properly and I got the strangest imagery when I launched it. All green and black, looking like one of those ghost buster reality shows using night vision. Fortunately, both issues were easy to correct. Outstanding directions and slides! Oh yeah finally, the kits for the battery comes with both a #00 Phillips screwdriver and a spudge, however, I ordered the extra spudge and got one that is better suited for prying the battery up.
Hey,
first of all - BIG UPS AND THX for everything.
That means FAST shipping to germany and the great tutorials, manuals etc.
I did change the battery in less than 15 minutes whit ur manual this was easy as.... dunno :).
the "hardest part" was to remove the battery from the cover - but with a bit of tact it works fine.
So thx :)
Incredibly easy to make the swap. Thanks for the great writeup. I was able to complete the battery replacement within about 20 minutes. I've swapped an iPod battery before and although this was a bit more complex it really wasn't that tough. Anyone who's a bit handy should be able to complete it with no trouble at all. Thanks.
Great instructions, very clear. A couple points:
1) The screwdriver I had wasn't working that well, so I had to use a different one. I found that a 0# worked fine (although I suspect a 00# would work better.0
2) When I reassembled the phone, the home button didn't work. You really need to press down on the bottom of the screen when you screw the bottom screws (by the dock connector) back in. Otherwise, the contacts for the home button won't reliably hit.