Diese Version enthält möglicherweise inkorrekte Änderungen. Wechsle zur letzten geprüften Version.
Was du brauchst
-
-
Falls das Displayglas gesprungen ist, halte die Bruchstücke zusammen und vermeide Verletzungen während des Reparaturvorgangs, indem du das Glas mit Tape zusammenhälst.
-
Lege sich überlappende Streifen von durchsichtigen Klebestreifen über das Display des iPhones, bis die gesamte Vorderseite bedeckt ist.
-
-
-
Entferne die beiden Kreuzschlitzschrauben #00 vom Dock-Anschluss Ende des iPhones.
-
-
-
Entferne den Metallgriff vom Saugnapf. Es ist einfacher und sicherer, die Saugnapf-Unterseite statt des Metallgriffs zu packen.
-
Verwende einen kleinen Saugnapf bei dem Home Button, um vorsichtig den unteren Teil der Display Einheit zu ziehen.
-
-
-
Halte die Display Einheit weiter mit einer Hand und trenne mit dem Spudger in der anderen Hand das schwarze Flachbandkabel mit dem Label "1".
-
Das Flachbandkabel "1" ist mit einem Steckverbinder verbunden. Der Block am Ende des Kabels ist der Stecker, der einfach in die Buchse auf der Platine gesteckt wird. Es wird kein anderer Verriegelungsmechanismus verwendet.
-
-
-
Klappe das Display nach oben, so dass es ungefähr vertikal steht. Dies erlaubt leichteren Zugang zu den übrigen Kabeln, die getrennt werden müssen.
-
Trenne das schwarze Flachbandkabel, das mit einer "2" gekennzeichnet ist, mit einem Spudger.
-
-
-
Hole das Flachbandkabel aus der Buchse und entferne die Display Einheit vom iPhone.
-
-
-
Entferne die beiden Kreuzschlotzschrauben von der rechten Seite der Display Einheit.
-
-
-
-
Drehe das Display herum. Wenn sich ein dünner Streifen von schwarzem Tape am Rand der Display Einheit befindet, löse dieses vorsichtig ab.
-
-
-
Entferne die drei Kreuzschlitzschrauben von der linken Seite der Display Einheit.
-
-
-
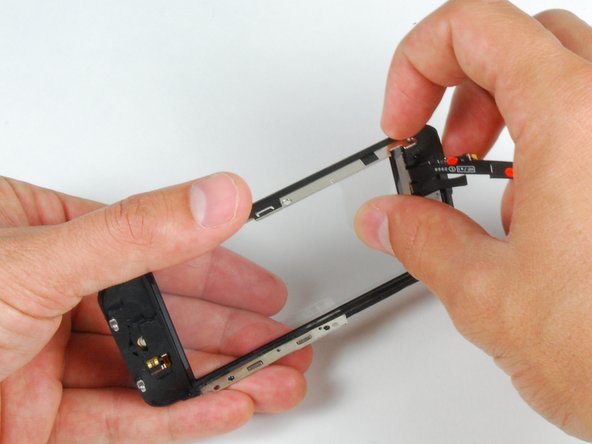
Drehe die Display Einheit herum und führe vorsichtig einen metallenen Spudger zwischen die beiden Schienen, die entlang der Seitenwand der Display Einheit laufen. Drehe den Spudger vorsichtig, um das LCD vom Glas anzuheben.
-
-
-
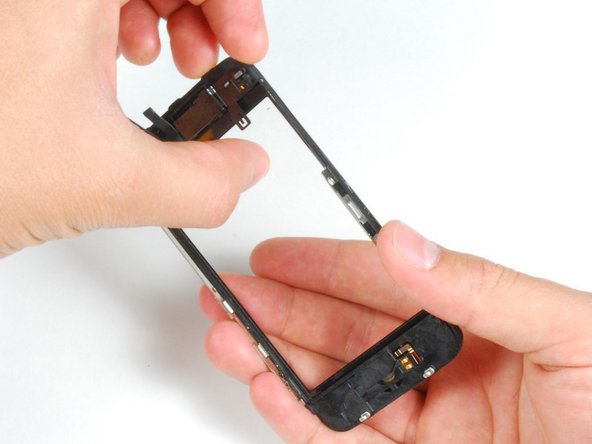
Trenne das LCD und Glas, indem du das LCD Panel weg von den Flachbandkabeln auf dem Glasd schiebst.
-
-
Dieser Schritt ist noch nicht übersetzt. Hilf mit, ihn zu übersetzen!
-
If the glass has shattered at the top or bottom be especially patient and gentle when removing fragments. In extreme cases you may have to pick off any glass shards that remain glued to the plastics.
-
Using a heat gun or hairdryer, heat the top left area of the touch screen.
-
Use your fingernails to slowly lift up the left corner. The touch screen plastics are held to the touch screen with adhesive. It may take some work to free the corners.
-
Heat and repeat for the right side.
-
-
Dieser Schritt ist noch nicht übersetzt. Hilf mit, ihn zu übersetzen!
-
Once the top is free, use the heat gun to heat the sides of the touch screen.
-
Use a spudger to free the sides of the touch screen plastics.
-
-
Dieser Schritt ist noch nicht übersetzt. Hilf mit, ihn zu übersetzen!
-
Heat the bottom corners with the heat gun.
-
Again, use your fingernails to free the corners.
-
Remove the touch screen plastics from the touch screen.
-
-
Dieser Schritt ist noch nicht übersetzt. Hilf mit, ihn zu übersetzen!
-
In order to adhere the new panel, peel as much of the existing adhesive off of the front panel frame as you can.
-
-
Dieser Schritt ist noch nicht übersetzt. Hilf mit, ihn zu übersetzen!
-
Place custom fit adhesive strips or double stick tape on the upper area of the front panel plastics.
-
Use the flat end of a spudger to press the adhesive strips to the plastic frame.
-
-
Dieser Schritt ist noch nicht übersetzt. Hilf mit, ihn zu übersetzen!
-
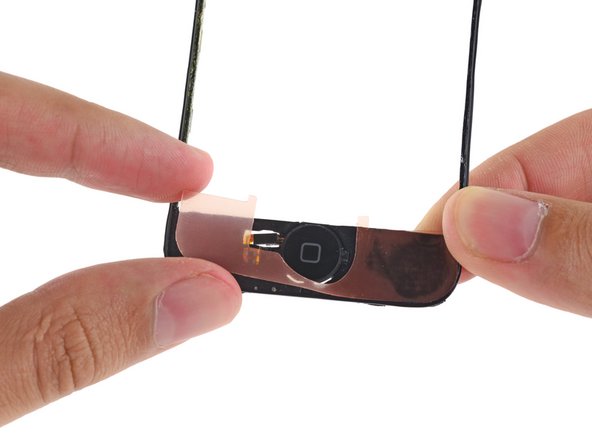
Place the second adhesive strip or double stick tape on the home button end of the front panel frame.
-
Run the flat end of a spudger over the strip to stick it down and push bubbles out from under the sticker.
-
-
Dieser Schritt ist noch nicht übersetzt. Hilf mit, ihn zu übersetzen!
-
Using the tip of a spudger to start, peel the adhesive backings off of the strips on the front panel plastic.
-
-
Dieser Schritt ist noch nicht übersetzt. Hilf mit, ihn zu übersetzen!
-
Peel the protective plastic off of the inside of the front panel glass.
-
-
Dieser Schritt ist noch nicht übersetzt. Hilf mit, ihn zu übersetzen!
-
Fold the front panel cables down toward the home button recess to get them out of the way.
-
-
Dieser Schritt ist noch nicht übersetzt. Hilf mit, ihn zu übersetzen!
-
Ensuring that the upper cables are folded clear, align the top of the front glass with the front panel frame.
-
-
Dieser Schritt ist noch nicht übersetzt. Hilf mit, ihn zu übersetzen!
-
Press the front panel and front panel frame together, ensuring the the home button ends are aligned.
-
-
Dieser Schritt ist noch nicht übersetzt. Hilf mit, ihn zu übersetzen!
-
Firmly press both ends of the phone to ensure the attachment of the adhesive.
-
Rückgängig: Ich habe diese Anleitung nicht absolviert.
540 weitere Nutzer:innen haben diese Anleitung absolviert.
8 Kommentare
Step 15:
the screen sort of sits in the plastic because of the band of material running around the perimeter of the assembly being more firmly attached to the plastic than the screen. I found this step much easier to complete the second time around because i knew to dig my nail in between the screen and the material running around the perimeter of the assembly in a front to back motion. Then i pivoted my nail up 90 degrees so it was between the plastic and the screen and was able to gently pry them apart while heating.
i second that, it should really be another bulletpoint because its really hard to see if you are not looking for it. Something like:
Push gently on the thin plastic bezel surrounding the frontpanel, do not try to push into the side of the assembly. It can look like there is a seam but there is not!
Its really the only way to get it done without ripping off any parts of the plastic bezel... it does not show when reassembled but its creating a wide portal for dust particles.
NOTE: Just completed the installation and was supremely frustrated when the screen didn't turn back on. My first inclination was that the 3rd connector wasn't seated properly...so I opened up and re-attached 3 times. With girlfriend peering over my 'soon to be a failure of a bf' shoulder, I asked her to google up a 'hard reset'. Eureka. Hold down the black nav button and the top power button at the same time until the silver apple reappears. Crisis averted, great tutorial otherwise!
When removing the broken glass, be sure to remove adhesive from the side rails of the iPhone front panel assembly, otherwise your front panel won't fit as snugly as it should.
When reassembling, take care to properly insert ribbon cable 3, as it is much easier to remove it than it is to install it. Having an extra set of hands was invaluable for this repair.
I wish the instructions warned me to make sure a sim card is in the socket before reassembling, and/or they gave detailed reassembly instructions, and/or had higher quality pictures (I zoomed in on the pictures multiple times while reassembling, and could not see exactly how things were supposed to fit back together). My replacement went well, and all was working perfectly, but a piece of the cable was apparently sticking down into the sim card socket, and when my 21 yr old son forced the sim card it, it destroyed the cable that is attached to the plastic speaker assembly. Now I get to buy the more expensive repair kit that includes that part, and try again. D amn, I'm frustrated. -Bill


