Diese Version enthält möglicherweise inkorrekte Änderungen. Wechsle zur letzten geprüften Version.
Was du brauchst
-
-
Schalte dein iPhone aus, bevor du es auseinanderbaust.
-
Deine iPhone Rückabdeckung ist entweder mit zwei Kreuzschlitzschrauben #000 oder Pentalobeschrauben von Apple befestigt. Schaue nach, um welche Schrauben es sich handelt, um sicher zu gehen, dass du den richtigen Schraubendreher zum Lösen hast.
-
Entferne die beiden 3,6 mm Pentalobe oder Kreuzschlitzschrauben #000 neben dem Dock Anschluss.
-
-
-
Entferne das hintere Panel von Hand vom iPhone. Verwende alternativ einen Saugheber.
-
-
-
Entferne die einzelne 1,5 mm Kreuzschlitzschraube, die den Akkustecker am Logic Board befestigt (falls vorhanden).
-
-
-
Benutze die Kante eines Plastiköffnungswerkzeugs um den Akkustecker vorsichtig aus seinem Anschluss auf dem Logic Board nach oben zu hebeln.
-
Entferne die Metallklammer, die den Antennenstecker bedeckt.
-
-
-
Ziehe die freiliegende durchsichtige Plastiklasche nach oben, um den Akku von dem Klebeband zu lösen, mit dem er am iPhone befestigt ist.
-
Wenn noch Reste vom Alkohol im Smartphone verblieben sind, dann wische sie sorgfältig weg oder lasse das Gerät gut austrz, bevor du einen neuen Akku einbaust.
-
Entferne den Akku.
-
Reinige vor dem Wiederzusammenbau alle metallenen Kontaktpunkte mit einem fettlösenden Reiniger wie Windex. Die Öle an deinen Fingern können drahtlose Interferenzen verursachen.
-
Führe nach dem Wiederzusammenbau einen Hard Reset durch. Dies verhindert diverse Probleme und vereinfacht eine eventuell trotzdem notwendige Fehlersuche.
-
-
-
Dieser Schritt ist noch nicht übersetzt. Hilf mit, ihn zu übersetzen!
-
Remove the two 1.8 mm Phillips screws securing the dock connector cable cover to the logic board.
-
Remove the metal dock connector cable cover.
-
-
Dieser Schritt ist noch nicht übersetzt. Hilf mit, ihn zu übersetzen!
-
Use the edge of a plastic opening tool to pry the dock cable up from its socket on the logic board.
-
-
Dieser Schritt ist noch nicht übersetzt. Hilf mit, ihn zu übersetzen!
-
Peel the dock connector cable off the adhesive securing it to the logic board and the side of the speaker enclosure.
-
-
Dieser Schritt ist noch nicht übersetzt. Hilf mit, ihn zu übersetzen!
-
Remove the 1.6 mm Phillips screw securing the pressure contact to the logic board near the vibrator.
-
Remove the pressure contact.
-
-
Dieser Schritt ist noch nicht übersetzt. Hilf mit, ihn zu übersetzen!
-
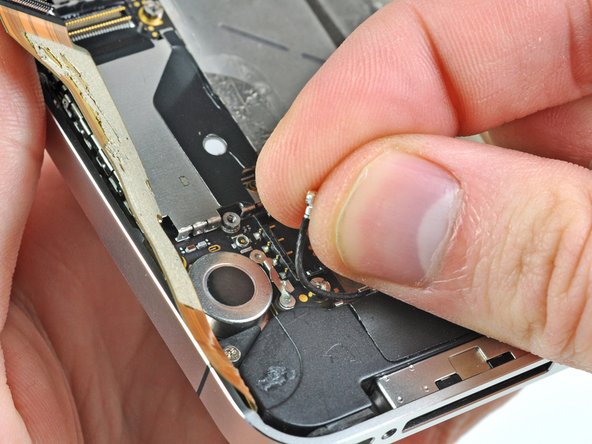
Use the edge of a plastic opening tool to pry the Wi-Fi antenna cable up from its socket on the logic board.
-
De-route the Wi-Fi antenna cable out from under the metal fingers attached to the logic board.
-
-
Dieser Schritt ist noch nicht übersetzt. Hilf mit, ihn zu übersetzen!
-
Remove the two 2.4 mm Phillips screws securing the speaker enclosure assembly to the outer case.
-
-
Dieser Schritt ist noch nicht übersetzt. Hilf mit, ihn zu übersetzen!
-
Remove the small black spacer that was under the Phillips screw near the vibrator.
-
-
Dieser Schritt ist noch nicht übersetzt. Hilf mit, ihn zu übersetzen!
-
Use a plastic opening tool to lift the speaker enclosure assembly out of the case, being sure not to damage the EMI fingers on the attached Wi-Fi antenna.
-
Remove the speaker enclosure assembly.
-
-
Dieser Schritt ist noch nicht übersetzt. Hilf mit, ihn zu übersetzen!
-
Remove the two 1.6 mm Phillips screws securing the cellular antenna to the speaker enclosure.
-
-
Dieser Schritt ist noch nicht übersetzt. Hilf mit, ihn zu übersetzen!
-
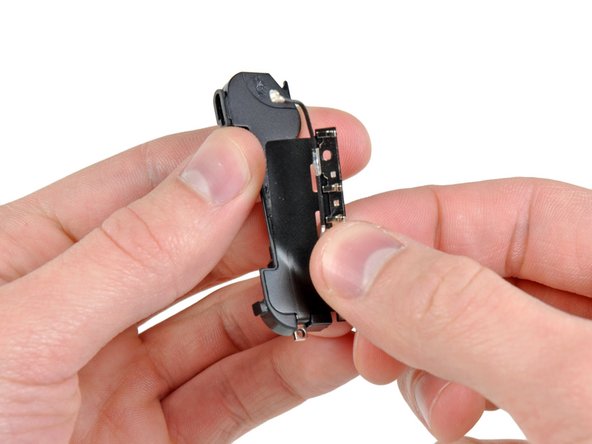
Starting near the cellular antenna cable, use the edge of a plastic opening tool to peel the antenna off the speaker enclosure.
-
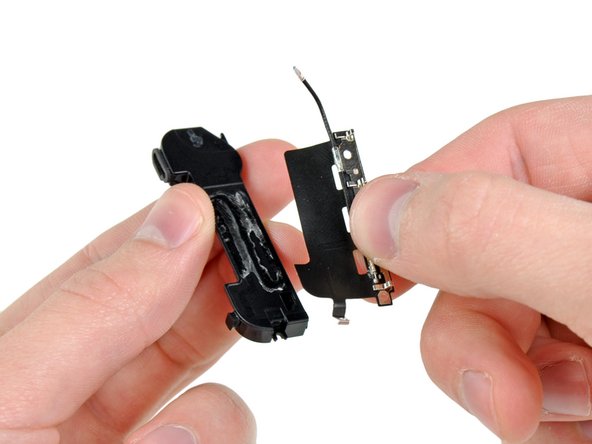
Continue peeling the cellular antenna off the speaker enclosure, being careful not to rip the gold bracket attached to one of its edges.
-
Remove the cellular antenna.
-


Rückgängig: Ich habe diese Anleitung nicht absolviert.
20 weitere Nutzer:innen haben diese Anleitung absolviert.
