Diese Version enthält möglicherweise inkorrekte Änderungen. Wechsle zur letzten geprüften Version.
Was du brauchst
-
-
Schalte dein iPhone aus, bevor du es auseinanderbaust.
-
Deine iPhone Rückabdeckung ist entweder mit zwei Kreuzschlitzschrauben #000 oder Pentalobeschrauben von Apple befestigt. Schaue nach, um welche Schrauben es sich handelt, um sicher zu gehen, dass du den richtigen Schraubendreher zum Lösen hast.
-
Entferne die beiden 3,6 mm Pentalobe oder Kreuzschlitzschrauben #000 neben dem Dock Anschluss.
-
-
-
Entferne das hintere Panel von Hand vom iPhone. Verwende alternativ einen Saugheber.
-
-
-
Entferne die einzelne 1,5 mm Kreuzschlitzschraube, die den Akkustecker am Logic Board befestigt (falls vorhanden).
-
-
-
Benutze die Kante eines Plastiköffnungswerkzeugs um den Akkustecker vorsichtig aus seinem Anschluss auf dem Logic Board nach oben zu hebeln.
-
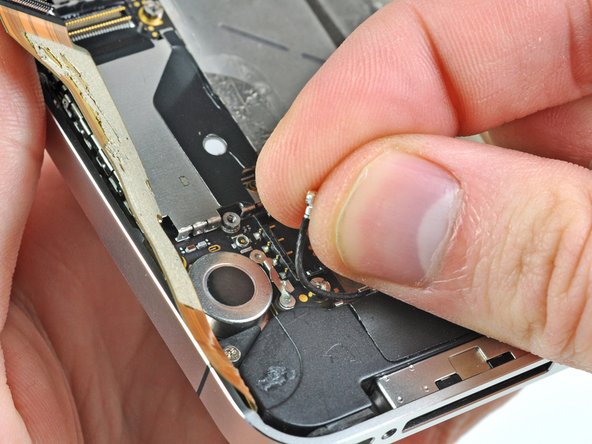
Entferne die Metallklammer, die den Antennenstecker bedeckt.
-
-
-
Ziehe die freiliegende durchsichtige Plastiklasche nach oben, um den Akku von dem Klebeband zu lösen, mit dem er am iPhone befestigt ist.
-
Wenn noch Reste vom Alkohol im Smartphone verblieben sind, dann wische sie sorgfältig weg oder lasse das Gerät gut austrz, bevor du einen neuen Akku einbaust.
-
Entferne den Akku.
-
Reinige vor dem Wiederzusammenbau alle metallenen Kontaktpunkte mit einem fettlösenden Reiniger wie Windex. Die Öle an deinen Fingern können drahtlose Interferenzen verursachen.
-
Führe nach dem Wiederzusammenbau einen Hard Reset durch. Dies verhindert diverse Probleme und vereinfacht eine eventuell trotzdem notwendige Fehlersuche.
-
-
Dieser Schritt ist noch nicht übersetzt. Hilf mit, ihn zu übersetzen!
-
Remove the two 1.8 mm Phillips screws securing the dock connector cable cover to the logic board.
-
Remove the metal dock connector cable cover.
-
-
Dieser Schritt ist noch nicht übersetzt. Hilf mit, ihn zu übersetzen!
-
Use the edge of a plastic opening tool to pry the dock cable up from its socket on the logic board.
-
-
-
Dieser Schritt ist noch nicht übersetzt. Hilf mit, ihn zu übersetzen!
-
Peel the dock connector cable off the adhesive securing it to the logic board and the side of the speaker enclosure.
-
-
Dieser Schritt ist noch nicht übersetzt. Hilf mit, ihn zu übersetzen!
-
Remove the 1.6 mm Phillips screw securing the pressure contact to the logic board near the vibrator.
-
Remove the pressure contact.
-
-
Dieser Schritt ist noch nicht übersetzt. Hilf mit, ihn zu übersetzen!
-
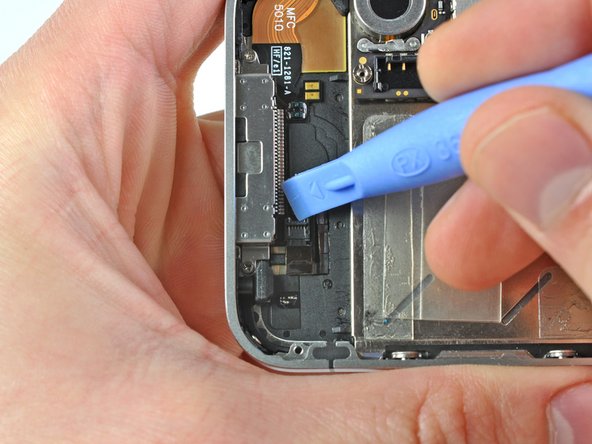
Use the edge of a plastic opening tool to pry the Wi-Fi antenna cable up from its socket on the logic board.
-
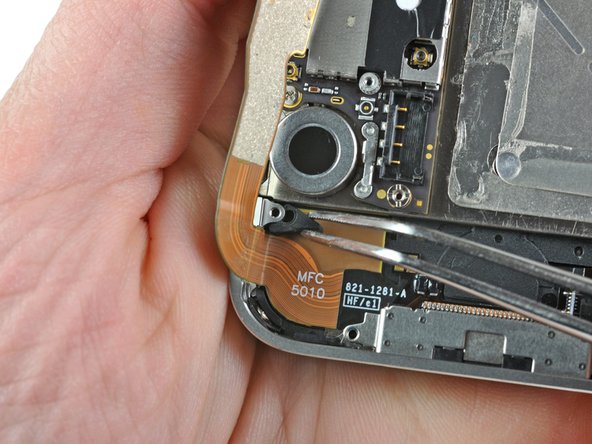
De-route the Wi-Fi antenna cable out from under the metal fingers attached to the logic board.
-
-
Dieser Schritt ist noch nicht übersetzt. Hilf mit, ihn zu übersetzen!
-
Remove the two 2.4 mm Phillips screws securing the speaker enclosure assembly to the outer case.
-
-
Dieser Schritt ist noch nicht übersetzt. Hilf mit, ihn zu übersetzen!
-
Remove the small black spacer that was under the Phillips screw near the vibrator.
-
-
Dieser Schritt ist noch nicht übersetzt. Hilf mit, ihn zu übersetzen!
-
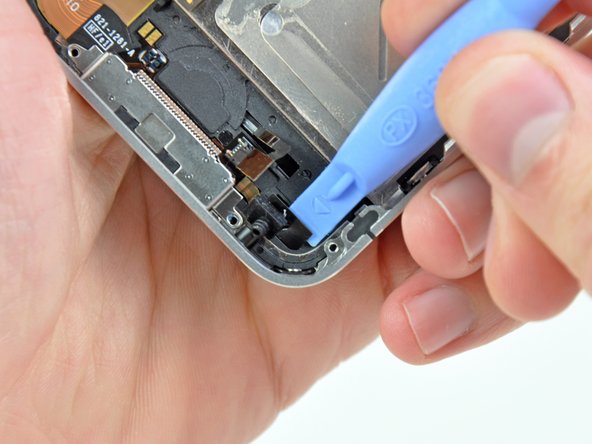
Use a plastic opening tool to lift the speaker enclosure assembly out of the case, being sure not to damage the EMI fingers on the attached Wi-Fi antenna.
-
Remove the speaker enclosure assembly.
-
-
Dieser Schritt ist noch nicht übersetzt. Hilf mit, ihn zu übersetzen!
-
If present, remove the small strip of tape covering one of the dock connector screws.
-
-
Dieser Schritt ist noch nicht übersetzt. Hilf mit, ihn zu übersetzen!
-
Use a plastic opening tool to flip up the retaining flap on the home button ribbon cable ZIF socket.
-
-
Dieser Schritt ist noch nicht übersetzt. Hilf mit, ihn zu übersetzen!
-
Use a pair of tweezers to pull the home button ribbon cable out of its socket.
-
-
Dieser Schritt ist noch nicht übersetzt. Hilf mit, ihn zu übersetzen!
-
Carefully pull, but do not remove, the rubber microphone holder out of its tube in the bottom edge of the iPhone.
-
-
Dieser Schritt ist noch nicht übersetzt. Hilf mit, ihn zu übersetzen!
-
Remove the two 1.3 mm Phillips screws securing the dock connector to the case of the iPhone.
-
-
Dieser Schritt ist noch nicht übersetzt. Hilf mit, ihn zu übersetzen!
-
Use a pair of tweezers to remove the small rubber spacer beneath the speaker enclosure mounting ear near the vibrator.
-
-
Dieser Schritt ist noch nicht übersetzt. Hilf mit, ihn zu übersetzen!
-
Remove the tiny rubber spacer near the dock connector.
-
-
Dieser Schritt ist noch nicht übersetzt. Hilf mit, ihn zu übersetzen!
-
Use the edge of a plastic opening tool to peel the dock connector and its cable off the black plastic case of the iPhone.
-
-
Dieser Schritt ist noch nicht übersetzt. Hilf mit, ihn zu übersetzen!
-
Pry the dock connector away from its opening at the bottom of the iPhone.
-
Remove the dock connector.
-


Rückgängig: Ich habe diese Anleitung nicht absolviert.
117 weitere Nutzer:innen haben diese Anleitung absolviert.

5 Kommentare
So I attempted once to fix the dock connector and failed. A month later I took the phone apart again. The first thing I noticed when taking off the dock connector from the logic board is that it wasn't seated properly. I attached it properly and now the iPhone charges and home button works perfectly!
What about it was not seated properly? any specific contact point? was it not screwed in well if it wasn't seated properly? I just replaced on a friends 4, but it has not turned on yet, and I can't figure it out. It just stopped charging one day so I figured it was a bad port from corrosion or something and replaced it. The swap was easy enough so I'm confused as to why it isn't turning on yet.
Matthew -
New part from IFixit works great. Some tips from my installation:
- PH000 screwdriver works well, but takes some finesse. A little pressure to get the screw going, and don't try to over tighten on the way back in. If you happen to round one out, a 00 or 0 PH screwdriver might get enough bite to get it going.
- Plastic pieces are covering the adhesive on numerous parts of the new dock connector. These are to be removed prior to installation.
- Battery does not have to be removed, so I avoided the risk of breaking something else.
I completed this guide, but unfortunately my phone is in no better shape than it was before the dock replacement. Apparently, this was not the problem. The device won't restore in iTunes. It just sits with the Apple logo and an empty status bar on the screen. Now when I unplug it from the computer, I get a black screen, with just a touch of backlight, but no display otherwise. Before the dock replacement, it always said "Connect to iTunes" but would not restore either. Any thoughts on what else I could try now?