Zum Hauptinhalt wechseln

iPhone 4S - Charging Dock Connector & Loud Speaker and WiFi Antenna Replacement

Archivierte Anleitung
Diese Anleitung wurde ausschließlich für historische Zwecke erhalten. Verwende die aktualisierte Version dieser Anleitung, um deine Reparatur durchzuführen.

Was du brauchst

Einführungsvideo

  1. iPhone 4S - Charging Dock Connector & Loud Speaker and WiFi Antenna Replacement, Dock Connector: Schritt 1, Bild 1 von 1
    • If present, remove the small strip of tape covering one of the dock connector screws.

  2. iPhone 4S - Charging Dock Connector & Loud Speaker and WiFi Antenna Replacement: Schritt 2, Bild 1 von 2 iPhone 4S - Charging Dock Connector & Loud Speaker and WiFi Antenna Replacement: Schritt 2, Bild 2 von 2
    • Use a plastic opening tool to flip up the retaining flap on the home button ribbon cable ZIF socket.

    • Be sure you are prying up on the hinged retaining flap, not the socket itself.

  3. iPhone 4S - Charging Dock Connector & Loud Speaker and WiFi Antenna Replacement: Schritt 3, Bild 1 von 1
    • Use a pair of tweezers to pull the home button ribbon cable out of its socket.

    • There are tiny components on the back side of the ribbon, so be careful not to damage them upon ribbon removal.

  4. iPhone 4S - Charging Dock Connector & Loud Speaker and WiFi Antenna Replacement: Schritt 4, Bild 1 von 1
    • Carefully pull the rubber microphone holder out of its tube in the bottom edge of the iPhone.

  5. iPhone 4S - Charging Dock Connector & Loud Speaker and WiFi Antenna Replacement: Schritt 5, Bild 1 von 1
    • Remove the two 1.3 mm Phillips screws securing the dock connector to the case of the iPhone.

  6. iPhone 4S - Charging Dock Connector & Loud Speaker and WiFi Antenna Replacement: Schritt 6, Bild 1 von 1
    • Remove the tiny rubber spacer near the dock connector.

  7. iPhone 4S - Charging Dock Connector & Loud Speaker and WiFi Antenna Replacement: Schritt 7, Bild 1 von 2 iPhone 4S - Charging Dock Connector & Loud Speaker and WiFi Antenna Replacement: Schritt 7, Bild 2 von 2
    • Use the edge of a plastic opening tool to peel the dock connector and its cable off the black plastic case of the iPhone.

    • If you are replacing the dock connector with a new part, make sure to transfer the rubber casing around the microphone. You can do this using a spudger.

  8. iPhone 4S - Charging Dock Connector & Loud Speaker and WiFi Antenna Replacement: Schritt 8, Bild 1 von 2 iPhone 4S - Charging Dock Connector & Loud Speaker and WiFi Antenna Replacement: Schritt 8, Bild 2 von 2
    • Pry the dock connector away from its opening at the bottom of the iPhone.

    • Remove the dock connector.

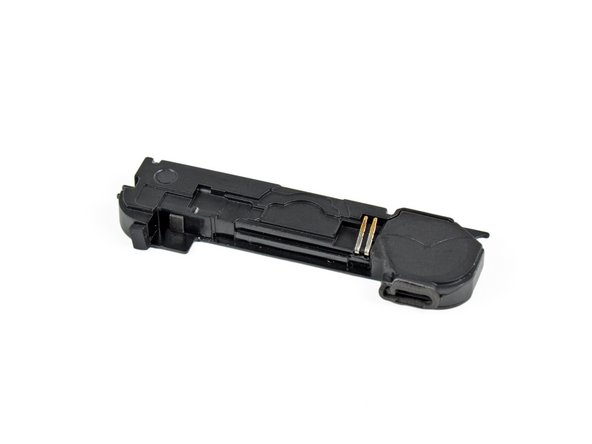
  9. iPhone 4S - Charging Dock Connector & Loud Speaker and WiFi Antenna Replacement, Speaker Enclosure: Schritt 9, Bild 1 von 1
    • Speaker enclosure remains.

Abschluss

To reassemble your device, follow these instructions in reverse order.

19 weitere Nutzer:innen haben diese Anleitung absolviert.

ZFix

Mitglied seit: 12/09/13

191.278 Reputation

330 Anleitungen geschrieben

Team

Master Techs Mitglied von Master Techs

Community

322 Mitglieder

2.528 Anleitungen geschrieben

0 Kommentare

Kommentar hinzufügen

Seitenaufrufe:

Letzte 24 Stunden: 0

Letzte 7 Tage: 0

Letzte 30 Tage: 0

Insgesamt: 10,623