Einleitung
Für eine leichtere Reparatur kannst du unseren Reparatursatz benutzen. Folge dazu dieser kürzeren Anleitung, um den kompletten Bildschirm auszutauschen.
Wenn du mehr Erfahrung hast, hilft dir diese Anleitung "nur" die LCD und Touchscreen Einheit des iPhone 5c auszutauschen (d.h. das reine Frontpanel). Du musst dazu verschiedene Bauteile vom alten Bildschirm auf das Neuteil übertragen, bevor du es einbaust, inklusive der Frontkamera, dem Ohrhörer-Lautsprecher, der LCD Abschirmung und der Home Button Einheit.
Außerdem kannst du dieser Anleitung folgen, um die Kabelhalterung der Frontpaneleinheit auszutauschen.
Was du brauchst
Einführungsvideo
-
-
Falls dein Displayglas gesprungen ist, halte die Bruchstelle zusammen und vermeide Verletzungen, indem du das Glas mit Tape versiehst.
-
Lege sich überlagernde Streifen von durchsichtigem Paketband über das iPhone Display, bis die gesamte Vorderseite bedeckt ist.
-
-
-
Schalte dein iPhone aus, bevor du mit der Demontage beginnst.
-
Entferne die zwei 3,8 mm P2 Pentalobe Schrauben auf beiden Seiten des Lightning Connectors.
to keep screws in order, buy some double sided tape and then affix the tape in small pieces to a sheet of paper. As you take the screws out, you can affix them to the tape (which is on the paper) and then write a description of what they are and where they go. quick, cheap and easy.
I found that these screws did not remove easily. After turning several times and feeling the threads drop back, indicating they were loose, the heads did not extend far enough to grip with my fingernails to pull out. I had to use the tweezers and then it took a bit more force than expected to remove them.
My iPhone 5c has P1 Pentalobe screws, not P2. This guide caused me to buy wrong tools so I thought I would share my experience. Perhaps they vary.
@codycraven01 These guides are created using iFixit tools, and P2 is definitely the correct driver. If you’re using tools you bought somewhere else, then yes, results may vary.
-
-
-
Schließe den Handgriff des iSclacks, wodurch sich die Saugnäpfehalter öffnen.
-
Platziere das Unterteil deines iPhone zwischen den Saugnäpfen gegen den Tiefenbegrenzer aus Kunststoff.
-
Der obere Saugnapf sollte sich gerade über dem Home Button befinden.
-
Öffne den Handgriff, um die Halter des iSclacks zu schließen. Platziere die Saugnäpfe mittig und drücke sie fest gegen die Ober- und Unterseite des iPhones.
I just replaced my iPhone 5C battery today and only used the I fix it repair kit that came with the suction cup. Getting the glass screen out was not too difficult as I used a little bit of upward motion on the suction cup while at the same time prying gently with the flat end of the opening tool at the same time. If you have two people it makes it a little easier as someone can hold the phone. After getting the end open, I was able to go around the perimeter and gently pry up the edges with very little trouble.
Experienced immediate problem: there is s strap going from the home button to the screen, about 1-1/2 inch long. After removing 3-4 screws I saw no way to disconnect it from either end. My daughter came to help get the screws back (my 70 years have problems with very tiny screws). Slid a piece back and the strap came free of the home button ares. Screen could only open then 75-80 degrees. Tapr tore. Pried battery out. Replaced on original sticky tape. Restarted fine and about to recycle the charge. Thanks for the kit and all. But 6 demos and 3 inatructions never mentioned this strip! So careful opening it up, please!!
@mikamazn What you’re describing sounds like an iPhone 5s. This guide is for the 5c. Glad to hear things worked out for you.
-
-
-
Umfasse dein iPhone mit festem Griff und schließe den Handgriff deines iSclacks, um die Saugnäpfe auseinanderzubringen und dadurch die Display Einheit vom hinteren Gehäuse zu lösen.
-
Der iSclack ist dazu entwickelt, dein iPhone sicher zu öffnen und zwar gerade soweit, um die Teile voneinander zu trennen, aber nicht weit genug, um das Home Button Kabel zu beschädigen.
-
Überspringe die nächsten drei Schritte und fahre mit Schritt 8 fort.
-
-
-
Presse einen Saugnapf auf das Display, direkt über dem Home Button.
cool i diden't now
very, very difficult to get a tight seal on tape. I removed the tape and still can't get a tight seal.
-
-
-
Während du das iPhone mit einer Hand unten hältst, ziehe an dem Saugnapf, um das Display etwas vom hinteren Gehäuse zu lösen.
-
Heble mithilfe eines Plastik Opening Tools die Kanten des hinteren Gehäuses vorsichtig nach unten, weg von der Display Einheit, während du mit dem Saugnapf nach oben ziehst.
Be sure not to use metal pry tools as they may crack the plastic.
-
-
-
Ziehe an an der Kunststoffnoppe, um das Vakuum des Saugnapfs zu lösen.
-
Entferne den Saugnapf von der Display Einheit.
-
-
-
Hebe das Ende der Display Einheit mit dem Home Button nach oben, um Zugang zu den Steckverbindungen nahe dem oberen Teil des Gerätes zu bekommen.
-
Öffne das Display bis zu einem 90°-Winkel und lehne es gegen einen festen Gegenstand, um es beim Arbeiten in dieser Position zu halten.
-
Als Trick kannst du eine ungeöffnete Getränkedose als Halterung verwenden.
-
Ein Gummiband könnte hilfreich sein, um es in dieser Position zu halten und sicherzustellen, dass die Displaykabel nicht beschädigt werden.
I use an old iPhone box to support the open phone. Set the box up on its end, and rubber band the screen side to the box. It works perfectly!
What do I do if it’s a little sticky and dirty inside?
-
-
-
Entferne die beiden 1,6 mm Kreuzschlitz #000 Schrauben, die die Metallabdeckung über dem Akkuanschluss auf dem Logic Board befestigen.
These screws are very tiny and hard to manipulate. The screwdriver is magnetic; which is great to take them out, but makes it hard to put the screws back in, as the screwdriver pulls them from the hole. I solved this problem by using the pointed end of the spudger to put a tiny drop of Elmer's glue in the hole and then insert the screw. You can do this before putting the bracket in place if you want. Then the screw wont pull out by the magnetic driver and make lining up and fastening the screws much easier; at least for me!
I found that you don't need to disconnect the battery... why bother doing more fiddling with annoyingly tiny screws and obstinate cable connectors when you don't actually have to? Especially when you could only end up causing more damage. As a matter of fact, the original iFixit video didn't bother to disconnect the battery either, but they've since updated the video to include battery disconnection, I guess as a "belt and braces" approach in case the repair-hero forgets to power down the phone first?
Disconnecting the battery is a safety precaution, and yes it's worth doing. Even with the phone powered off, there is some danger of blowing the backlight filter fuse if you disconnect the display while the battery is connected. At that point you're no longer looking at a simple DIY repair. Even though it's possible to skip this step and still come out okay, my advice is not to risk it.
It’s a relatively junky phone, so if it breaks, what the heck. I’m not going to disconnect the battery.
-
-
-
Heble den Akkustecker mit dem flachen Ende eines Spudgers vorsichtig von seinem Anschluss auf dem Logic Board.
Instead of using a spudger, you can use your fingernails too. This is quicker and enables you to feel if you're not accidentally putting on too much pressure or lifting the connector instead of the cable.
Accidentally pulling out the logic board socket is no idle warning - exactly what I did without much effort. I think this shouldn’t be described as ‘prying’ up because it implies needing to use force - but these things actually pop off quite easily with a nudge, which you discover at later steps.
-
-
-
-
Entferne die folgenden Kreuzschlitz #000 Schrauben, die die Abdeckung der Displaykabel am Logic Board befestigen:
-
Zwei 1,3 mm Schrauben
-
Eine 1,7 mm Schraube
-
Eine 3,25 mm Schraube
I didn't need to remove the front panel to replace the lightning connector. Just prop it up like in Step 8, then skip steps 12-16.
I always put my screws in a magnet tray and place the screws in the exact position they were taken out. The magnet tray holds the screws tight in the position I put them in. No chasing on the floor looking for small screws that you brushed off the table.
I always take a picture of the phone, print it out, then use scotch tape to tape the screws onto the picture in the location where they go. You don't lose the screws and you always know where they go for re-assembly
good tip! but instead of taking & printing a picture of your own phone, you probably could just print the color coded pic from this step (assuming everything on your phone is exactly the same).
When reassembling, the screw holder that the screws screw into came off the board. Is there a way to superglue that back in?
no, do not use super-glue. Quite some of these ‘screw-holders’ are screws themselves with e hollow tread in the head (didn’t find the correct naming for it) - just like the things you screw into a PC case and fasten the mainboard on.
did NOT remove the front entirely. its not necessary to do this to remove the battery. these are only precautionary steps in case your clumsy or you feel you might not be able to manage it without. as always, be cautious.
Agree. Step 12 is unnecessary if one is extremely careful.
*warning* … this connector assembly is very messy to re-build. Next time I change such a battery, I’ll try to get it out carefully *without* detaching the display unit. My resumée: *never* unscrew more things than necessary. These things are not M five (5 mm bolt diameter) like on a bike, these are M zero-point-five. Even for a smirf, this is tiny stuff.
Hi Ali,
You can choose to not remove those screws and still be able to take the battery out. Be very careful supporting the display, or you may tear the display cables and damage your screen.
-
-
-
Benutze ein Plastiköffnungswerkzeug oder deinen Fingernagel, um die Frontkamera und das Sensorkabel zu trennen.
-
Achte darauf, nur an dem Anschluss zu hebeln und nicht an der Fassung auf dem Logic Board.
You might get a more “modernised” part from eBay (for this very model, iPhone 5c) which has an ENTIRE CABLE missing… if you look closely, it’s been re-directed into the middle cable. And it all works perfectly, touch screen, and display. So it’s a optimisation.
In summary - if you get this version of the screen, you only need to deal with 2 cables, not 3. The rightmost socket will remain empty.
-
-
-
Trenne das Digitizer Kabel mit einem Plastik Opening Tool oder dem Fingernagel.
I replaced the broken front panel of the iPhone 5c and got the "famous white stripes" on the new screen. Reading about all kind of problems that the lcd/digitizer cable contacts may cause, I compared the cable connectors of the original Apple and the replacement part I bought online with a 35x magnifying glass. The quality difference was visible: The white description on the original part on the cable next to the connector is: 821-1784-A, while the inferior replacement part is: 821-1784-02. Check out the two numbers online and insist getting the "A" to avoid future troubles !!!
This person above is not knowledgeable. That number is a camera proxy part number, not the lcd or digitizer number. It changes with production date, both for original and aftermarket ones. A, B, D, 02, 04, 08 etc. Can all be either or.
vince -
Apple uses numerical revisions (-02) for pre-production parts, and alpha revisions (-A) for production revisions. It looks like you got a preproduction assembly, or a knock-off.
There are, in fact, three connectors in this step, not two. The front-facing camera and digitizer connector (Step 11) is really difficult to align when you put it back. Took me about 15 minutes before I succeeded.
Now I have a different problem. Everything works just dandy, EXCEPT:
Towards the bottom of the screen (in portrait) there is a horizontal line that is dead to the touch. For example, on the keyboard, I can use the spacebar, but not C V B N M, etcetera.
Three possibilities in my mind: One, when I dropped it, something else besides the glass and digitizer, etc, was damaged.
Two: I did not replace the cables correctly. This seems unlikely. They all "clicked" into place and stayed there.
Three: The digitizer supplied is faulty.
Comments? Which cable/connector could be causing this -- if it is that?
Take apart, Clean Connections, Put back together.... If same problem sounds like a fault part...
duston -
When reassembling the iPhone 5c, I used the flat end of the spudger to press on the connectors and maintain them while replacing the front panel on the body of the iPhone.
The third and "deepest" connector no longer slips out of its socket, which it did before holding the whole lot with the spudger.
If the ESD plate covering the connectors is properly re-attached to the phone, you should not have to do this. The cover holds all the connectors in place just fine.
iBroke -
I replaced the display assembly to resolve an issue with the phone not responding to any touch input. I assumed it was a bad digitizer. However, I have the same problem with the new display assembly—no touch response at all. The phone starts up fine and the screen works, I just can’t “slide to unlock”. This is also preventing me from downloading photos from the phone since I can’t enter the passcode. I have cleaned the connections and reseated the cables. Is it possible this is a problem on the logic board? If so, is there any way to get the photos off the phone since I can’t enter the passcode on the screen?
-
-
-
Entferne die Display Einheit vom hinteren Gehäuse.
-
-
-
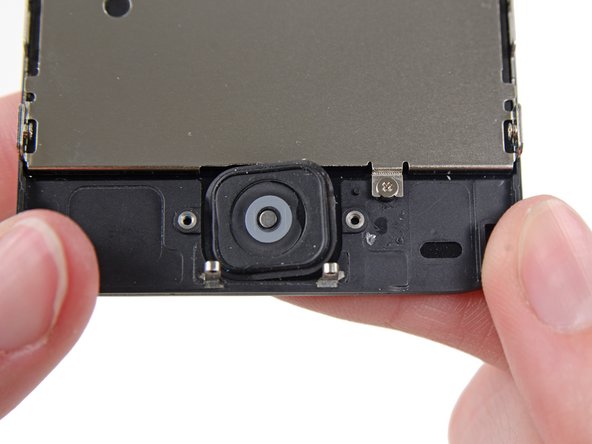
Entferne die beiden 1,3 mm Kreuzschlitz Schrauben, welche die Home Button Abdeckung am Display befestigen.
Ok the screw are just the 2 highlighted in red. Note that if you fix them too tight the button will lose some space. I suggest to fix them tight and then to unscrew them of 180° just to remove some pressure. Then try the home button movement: if it’s ok go ahead otherwise if it has no freedom to move unscrew again a little bit
-
-
-
Heble mit einem Plastik Opening Tool den Rand des Home Button Flachbandkabels weg vom Display.
-
Beginne rechts im Bereich des Flachbandkabels zwischen den goldenen Kontaktpunkten und arbeite dich nach links vor.
If you have an iOpener, I STRONGLY suggest placing it on top to loosen the glue. Once I heated the surface, it came off with little difficulty.
-
-
-
Entferne das Home Button Flachbandkabel vom Display.
Wenn der Home Button nach dem Austausch immer noch nicht funktioniert, sollte man sich die beiden kleinen Kontakte anschauen, die auf der Platine an einem Flachbandkabel sind und auf die in dieser Anleitung zu sehenden messingfarbenen Kontakte drücken. Ist einer dieser beiden Kontakte defekt, muss man den Lightning Anschluss ersetzen. Kostet zwar unter 5€, ist aber ziemlich aufwändig, da der Akku ausgebaut werden muss.
-
-
-
Löse den Home Button mit Hilfe eines Spudgers vollständig vom Display.
Note that under the home button is a very thin adhesive “gasket” that attaches the button to the screen. The home button can easily separate from this adhesive band. If you are not careful you stretch or break it. I used heat fron a hair dryer to loosen it and get it off with the home button.
-
-
-
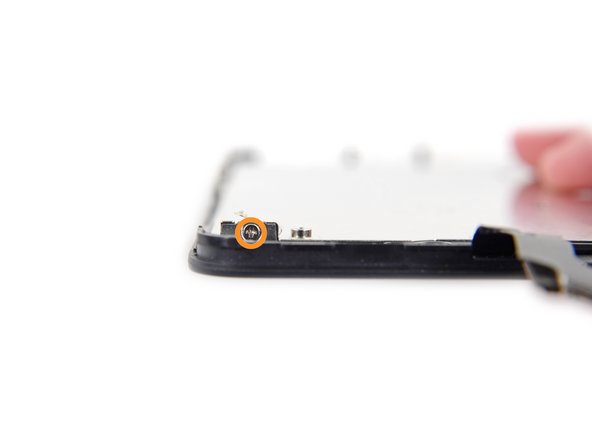
Entferne die beiden Kreuzschlitzschrauben #000, mit denen die Halterungen der oberen Komponenten am Display befestigt ist:
-
Eine 4,2 mm Schraube
-
Eine 2,3 mm Schraube
When putting the 4.2mm screw back in don't screw until it gets to tight to screw any more otherwise you will strip the screw and put a hole in the screen probably cracking it screw it in just enough so that the microphone is held in
I purchased the complete screen so I stopped at this point but with my surprise the part from Ifixit was slightly different from the original: just on the left of the square microphone there was an added contact for grounding which does not exist in the original screen. I was afraid this could avoid the screen to bw put in place but at the end I was successfull in any case so… don’t panic: if the screen from Ifixit has this small little finger for grounding it can be mounted with no problem!
-
-
-
Benutze das flache Ende eines Spudgers, um die Halterung des Ohrhörer-Lautsprechers von der Displayeinheit zu entfernen.
It's hooked at the top so slide the bracket straight to the right before lifting up.
What’s not mentioned is there is a little arm on that bracket - so as you should slide it to the right to remove it, you also have to slide it left as you put it back in. If you don’t, it doesn’t sit properly, and when you screw in the 4.2mm screw, the bracket will buckle inwards. That’s how you know it’s not inserted properly.
-
-
-
Entferne den Ohrhörer-Lautsprecher vom iPhone.
-
-
-
Die vordere Kamera und das Sensorkabel sind leicht am Display festgeklebt.
-
Zwar ist dieser Schritt nicht erforderlich, jedoch verringert es die Gefahr, die empfindliche Kabeleinheit zu beschädigen.
-
-
-
Heble das Kabel des Ohrhörer-Lautsprechers mit dem spitzen Ende eines Spudgers nach oben, um diesen Teil der Kamera und des Sensorkabels von dem Kleber darunter zu trennen.
How do I fix proximity sensor problems? The screen I am replacing already has everything on it full assembly but the sensor doesn't work?
Double-check the connectors and make sure they are securely connected, and try again. If you think the new proximity sensor is faulty, you can try returning the display to where ever you bought it. If that's not an option, you could use this guide to remove the entire cable assembly (including the proximity sensor) from the old display and swap it over to the new one—assuming that the old cable assembly is still in good shape.
-
-
-
Gehe mit der Spitze eines Spudgers unter das Mikrofon, um es aus seiner Vertiefung im Display zu hebeln.
I feel that this guide is missing a step to show you what it looks like with the piece actually removed from the iPhone. I do not know what I'm actually to remove or not remove. @bobdownes says that I don't need to remove the big square, but, in the overview photo it shows that the square sticker is removed.
Shouldn't the overview picture be used in the guide? And a step to show how the cable is properly remounted? thx.
Hey Skip—it sounds like you may have been looking at a prerequisite rather than the complete guide. Click here and see if that answers your question. You can also check out the product page for a photo of the part all by itself. The big square sticker must be removed if you're replacing the camera/sensor assembly. Folks who are transplanting both the camera/sensor assembly and the attached LCD shield plate to a new display can leave the square sticker in place. Hope this helps!
-
-
-
Entferne zwei 1,2 mm Kreuzschlitz Schrauben von jeder Seite des LCD Rahmens (vier insgesamt).
-
-
-
Entferne die 1,6 mm Kreuzschlitz Schrauben vom LCD Abschirmblech:
-
Eine an der Oberkante der Displayeinheit, bei der Home Button Öffnung
-
Eine an der Oberkante des Displays bei den Kabeln
-
-
-
Entferne das LCD Abschirmblech vom Display.
Note: Transfer clear plastic camera locator ring to the new screen assembly
Thanks, Matt, would have missed it otherwise.
Ahmad -
What is the best way to do this?
The guide could definitely use more details about the proximity housing as well as the camera ring. I used a magnifying glass to pick at the corners and they each popped off. To keep them in place I used a very small piece of double sided tape. I figure they would stay in place once it's all reassembled.
As for completely pulling the camera off the LCD shield like in the picture, if you're going to transfer the shield to a new LCD screen I don't think it is necessary to remove.
A fairly good account of how to carry out this procedure HOWEVER you seem to have forgotten one VERY IMPORTANT step!
You mention it is important to work in a static safe environement which is good but you have not mentioned the importance of disconnecting the battery so that work is not carried out with the device being live!
Not carrying out this seemingly minor task (two screws to remove a panel and disconnect the battery connector) could easily brick the phone or, worse, cause a fire or even an explosion that may result in serious injury as well as a costly visit to the phone shop.
So, I should ask that you please edit your video to incorporate this procedure.
I should add that I am a retired, extremely well qualified and experienced electro-optical design engineer with over 50 years of experience in engineering and college teaching.
AND, my daughter followed your instructions to the letter on my Static-safe workstation and destroyed her replacement screen.
Sincerely,
john_bartonwood@ntlworld.com
I'm not sure if you followed the step by step picture guide or not but thats what i use so i don't have to stop n start the video all the time. The point i'm getting at is that the step that you believe is missing is done straight after the screen is opened on the phone. Next step take the screws out of the battery connector bracket, remove the bracket, and disconnect the battery.
Hope this helps John.
Cheers Wayne
Note the picture with step 31 shows the shield plate with the cable assembly having been removed just like the linked YouTube shows. Yet these step-by-step instructions don't show that removal. You DO NOT want to remove the cable from the shield as you are going to be using the shield and cables when you transfer it to the new screen.
marry me .....
-


Arbeite die Schritte in umgekehrter Reihenfolge ab, um dein Gerät wieder zusammenzubauen.
Arbeite die Schritte in umgekehrter Reihenfolge ab, um dein Gerät wieder zusammenzubauen.
Rückgängig: Ich habe diese Anleitung nicht absolviert.
737 weitere Nutzer:innen haben diese Anleitung absolviert.
Besonderer Dank geht an diese Übersetzer:innen:
100%


Diese Übersetzer:innen helfen uns, die Welt zu reparieren! Wie kann ich mithelfen?
Hier starten ›


43 Kommentare
I found that I also needed some very fine pointed tweezers for handling those tiny screws.
Yes,but be careful,if you squeeze too hard that tiny screw will launch itself god knows where and you may not find it.
John P -
Success! Definitely recommend another person to help holding the screen up. Also, tweezers are very handy to have as well.
Surprised not to be advised to disconnect the battery, that's normally a given with these guides.
Step 11 Use the flat edge of a spudger to pry the battery connector up off the logic board.
Max -
I've replaced my cracked screen with the one I ordered but now am unable to slide to unlock or anything. I've checked what I did twice and followed the instructions step by step but still nothing. What did I do wrong? How can I fix it?
I’m having the same problem :( help!!
Instructions easy to follow but on putting back together the home button and top button work fine but the screen isn't responding to touch. Any ideas?
Instructions followed okay I think, all clicked in etc but whilst the home button and top button work I get no response from the touch screen. Any ideas?
Use tape, doubled up on itself and put into the box, to keep track of the small screws.The green screwdriver seems to be the one to use.
The guide is very clear and I was able to complete the fix in less than 15 minutes, including reading the instruction guide first. I replaced the iPhone 5c Display Assembly with Home Button and Front Camera using the ProTech Toolkit. Thank you iFixit for making it so easy and affordable!
I just performed the replacement of the digitizer and LCD display with a swap of the camera and home button. This went well following the directions. About 30 minutes of my time including a short break in the middle to rest my eyes and take a few deep breathes. :)
BTW, I did not disconnect the battery but made the sure the device was off. "Power button and slide to off across the top of the display" I then put the hold switch on so nothing was accidentally powered back on.
Those of you having digitizer issues after completing the replacement are more than likely not getting the digitizer connector properly seated. It's very important you feel them snap into place. If you don't get that little click, it's probably not connected correctly. It's also possible you pinched a cable when closing it back up. This has happened to me before and it never did completely recover until I bought another replacement and installed it correctly.
Hi
I Follow all the steps but now my phone isn´t work.
Dont turn on any more.
Please help!!
Awesome Instructions. Worked perfectly on all the instructions I used for replacing both the screen and battery. One suggestion for DIYers , Use something to hold the screen tilted properly while you take out and put in the screws. I just adjusted my Isclack so that it held the screen close enough to maintain the ribbon connection, but out of the way enough to be able to install the screws. Thanks for putting up this site. I'll be getting all my iPhone fixit stuff from you guys..
i have just finished this repair (first one) but when i close it up it just comes up with little squares and the lock screen doesnt move
I bought the iPhone 5C front panel connector cover for $6.95. It was exactly what I needed as I bought my phone used and the previous owner lost this part. My only suggestion for iFixit would be to include the 4 screws you need for the cover. I had to buy a separate screw set, adding on cost. Then, it took me forever to figure out which screws I needed from the set. Telling a 1.6 mm screw from a 1.7 mm screw is nearly impossible. I would've paid an extra couple bucks just to have the necessary screws included with the cable cover.
Thanks iFixit.
I have found this site to be very helpful! I was able to change the battery in my iphone 5c. I was so shocked that it actually turned on, that i rushed to enter the screws for the screen and i found that the image was distorted. I was wondering why and thought may i damaged something. So i took the
phone back apart, and found that one of the 3 connectors for the screen, wasnt properly plugged in to its slot. Hold and be hold, once i put the phone back together, everything is responsive (touch, home screen etc) and the image become crystal clear as it first was when i got the phone back in december 2014.
Very helpful video. i followed it thourouly and found it worked for me!
(I had purchased a new battery and the kit with the screw drivers etc.)
Yay!
awsome step by step that really helped me with replacing the battery in my Iphone 5c. I had to re open the phone once i reassembled it, as i didnt
plug in one of the screen connectors correctly. ( there are 3 before you put the metal plate over the screen connector.)
very happy
Excellent guide, as usual. The only difficulty I had was that my replacement LCD/Glass was missing the fronmt camera bezel, and the proximity sensor bezel. I had to remove these from the old screen and glue them to the new one. I used a contact adhesive for this.
A while ago i dropped my phone and shattered the screen, the LCD was destroyed and the screen was unresponsive. I had known about i fixit, iIordered a screen and it came in fast. One huge tip Is keep all screws seperate, I ended up using a 10 glasses and put sticky notes on them labeling the size and step the screw is.
There is one step missing from this diagram. There is one screw at the very top right of the metal plate that is screwed in vertically from the top that has to be removed along with both side screws.
Its there, just in one of the pictures you have to click on...
thanks so much - 1st time completed, and successfully..!! For a non Diy 55 yr old bloke who never thought it would work when the last screws went in, I thank you..!!
Finished the job in about 20 mins. The instructions and pictures were superb. One of the things I always do when working with a bunch of small screws is to use a magnetic tray to hold the screws tight into place after disassembly. As I disassemble I put the screws in the same exact position I took them out in and go right to left in the magnet tray so that assembly is left to right. That way I don't have to fret about dropping tiny screws on the floor and the different sizes of the screws as my assembly is positional. Use multiple trays if the job won't fit into one. You can buy them dirt cheap at Harbor Freight in both round bowl and square bowl formats.
Really helped to put a magnet on the screwdriver to manage those tiny screws.
Thanks so much for the instructions and pictures - perfect :)
Thank you for putting this guide together, very helpful
I received my new screen from ifixit.com this week. After following these directions and successfully replacing my screen, the screen now displays great. But the touch screen barely works. I'm not able to enter my passcode. Why doesn't the touch control on the new screen work correctly?
It sounds like the digitizer connector may not be fully seated. I'd suggest opening your phone back up, disconnecting the battery, and checking all the connectors in step 14-15. Then reconnect the battery and perform a hard reset. If you still have the same issue, get in touch with us via our help page.
Thank you ifixit! First attempt worked well. All back together and working. Very clear instructions and images. Took my time, no rush. I used the pointy end of a cable tie (flat) in lieu of the pointy end of a spudger in step 27 to lift the earphone speaker. Very helpful outline and instructions.
i want to fix my iphone
for my sprint iPhone there is a screw at the top of the display on the inside facing up on the LCD shield
if any person use the iphone if he/ she face the problem of date and time updating problem after LCD change of iphone 5c. if any person face this problem plzzz tell me i purchase from my pocket money but i face to much problem and i am in very tension plzzz reply on this email id : farrukhrehman903@gmail.com. kindly reply plz
regards
I’ve replaced a display on an iphone 5c and when I turned it back on the phone was stuck on the apple logo so take the old display, hook it up to the phone then the phone should boot up, and then you connect the new display while the phone is running then it should work fine.
HELP
Diese Anleitung ist nicht up to date oder ähnliches. Ich habe mit der Seite schon so manches gerät ohne Probleme repariert. Hab Ein MacBook Pro (2015 A1502 )komplett Auseinander genommen und wieder zusammen gesetzt. halte mich also mittlerweile für recht versiert und benutze ausschließlich iFixit-Tools da wo es drauf ankommt. Ich wollte nur mal ins Gerät schauen und kam nur bis Schritt 7-8 gekommen… Was soll das mit. dem Homebutton Kabel warum wird das nicht erwähnt wo und wie das da zu Problemen führen kann. Mein Display bleibt jetzt schwarz. Ich bin begeistert. Es ist auch kein sichtbarer schaden Entstanden. Aktion Abgebrochen und in weiser Voraussicht schon mal ein neues Display bestellt… Und warum muss ich verschiedene Anleitungen Durchsuchen um etwas über den button zu erfahren?? jetzt hier bei Display unter Punkt 13… und ich sehe auch hier stimmt es nicht. keine richtigen Bilder und GRAVIERENDE FEHLER… weitermachen geht auch nicht weil das Display an zwei punkten verbunden ist!!!