Einleitung
Use this guide to replace a malfunctioning power and volume button cable—this includes the switches responsible for volume up and down, the ring/silent control and the power switch, as well as a microphone and the dual-LED flash. Follow this guide if you are looking to replace the exterior power button cover and this guide for the exterior volume control button cover.
Was du brauchst
-
-
Power off your iPhone before beginning disassembly.
-
Remove the two 3.4 mm pentalobe screws on the bottom edge of the iPhone.
-
-
-
Use a hairdryer or prepare an iOpener and apply it to the lower edge of the iPhone for about a minute in order to soften up the adhesive underneath.
-
-
-
Attach a suction cup to the lower half of the display assembly, just above the home button.
-
-
-
Pull up on the suction cup to create a small gap between the display assembly and the rear case.
-
Insert the flat end of a spudger into the gap.
-
-
-
Slide the spudger to the left along the lower edge of the iPhone.
-
Twist the spudger to widen the gap between the display and rear case.
-
-
-
Slide the spudger up the left side of the iPhone, starting at the lower edge and moving towards the volume control buttons and silent switch.
-
-
-
Insert the flat edge of a spudger into the bottom right corner of the device.
-
Twist the spudger to widen the gap between the display assembly and the rear case.
-
Slide the flat end of the spudger up the right side of the phone to break up the adhesive holding the display in place.
-
-
-
Slide an opening pick along the top edge of the iPhone, between the rear case and front panel, to break up the remaining adhesive holding the screen in place.
-
-
-
Pull the display assembly slightly away from the top edge of the phone to disengage the clips holding it to the rear case.
-
Open the iPhone by swinging the display up from the left side, like the back cover of a book.
-
-
-
Remove four tri-point Y000 screws securing the lower connector bracket, of the following lengths:
-
Three 1.2 mm screws
-
One 2.4 mm screw
-
-
-
Use the point of a spudger to lift the battery connector out of its socket on the logic board.
-
-
-
Use a spudger or a fingernail to disconnect the two lower display connectors by prying them straight up from their sockets on the logic board.
-
-
-
Remove the two 1.3 mm Phillips #000 screws securing the bracket over the front panel sensor assembly connector.
-
-
-
Disconnect the front panel sensor assembly connector from its socket on the logic board.
-
-
-
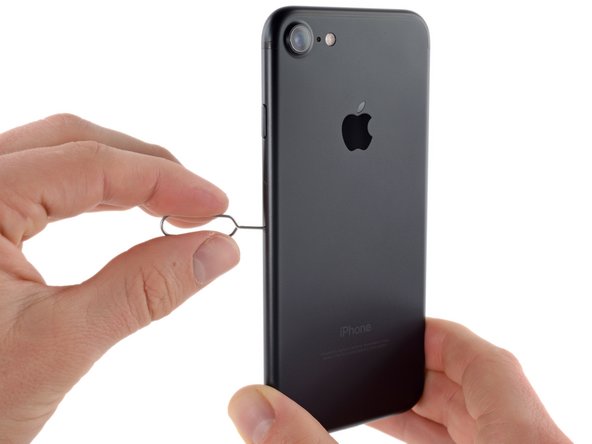
Insert a SIM card eject tool or a paperclip into the small hole in the SIM card tray.
-
Press to eject the tray.
-
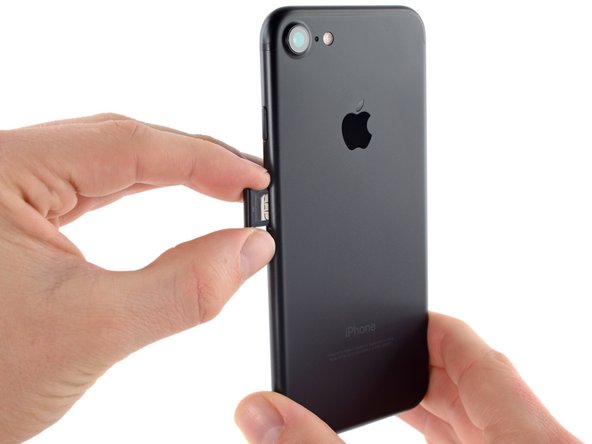
Remove the SIM card tray assembly from the iPhone.
-
-
-
Use the flat end of a spudger to disconnect the rear-facing camera connector.
-
-
-
Remove the following Phillips screws securing the rear camera bracket to the rear case:
-
One 1.3 mm screw
-
One 2.5 mm screw
-
-
-
-
Use the pointed end of a spudger to pry up and disconnect the antenna bus connector, just left of the rear camera module.
-
-
-
Remove the four Phillips screws securing the Wi-Fi antenna:
-
Three 1.2 mm screws
-
One 1.7 mm screw
-
-
-
Remove the 2.2 mm standoff screw from the grounding bracket.
-
-
-
Use the point of a spudger to lift the two antenna cable connectors up off of the sockets on the logic board.
-
-
-
Use tweezers to gently derout the antenna cables from the metal bracket on the logic board.
-
-
-
Remove the following screws:
-
One 1.4 mm Phillips screw
-
Three 2.2 mm standoff screws
-
-
-
Use the point of a spudger to move the SIM card eject plunger out of the logic board's way.
-
-
-
Use the flat end of a spudger to gently lift the battery connector end of the logic board up.
-
-
-
Lift the battery connector end of the logic board and pull it up and out of the rear case.
-
-
-
Remove the two 1.9 mm Phillips screws securing the barometric vent to the rear case.
-
-
-
Use the flat end of a spudger to disconnect the Taptic Engine connector from its socket on the logic board.
-
-
-
Remove the three 1.6 mm Phillips screws securing the Taptic Engine to the rear case.
-
-
-
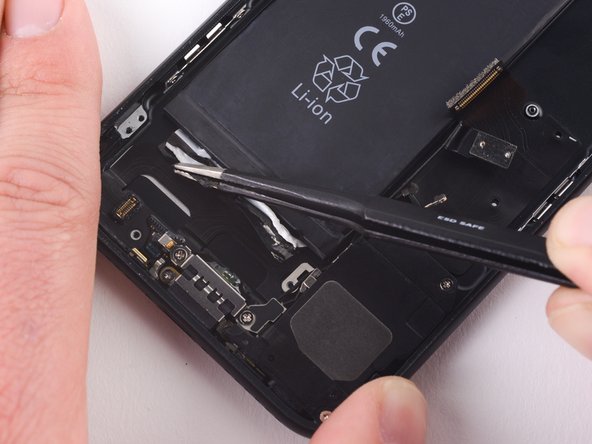
Use a pair of tweezers with blunt tips to peel back one of the adhesive strips on the lower edge of the battery.
-
-
-
Use a pair of tweezers with blunt tips to peel back the other adhesive strip on the lower edge of the battery.
-
-
-
Slowly pull one battery adhesive tab away from the battery, toward the bottom of the iPhone.
-
Pull steadily, maintaining constant tension on the strip until it slips out from between the battery and the rear case. For best results, pull the strip at a 60º angle or less.
-
-
-
Repeat the previous step for the second strip.
-
If you removed both adhesive strips successfully, skip the next step.
-
Otherwise, if either of the adhesive strips broke off underneath the battery and could not be retrieved, continue with the next step below.
-
-
-
Prepare an iOpener and apply it to the back of the rear case, directly over the battery. Alternatively, you can apply heat using a heat gun or hair dryer.
-
After about a minute, remove the iOpener, flip the phone over and use a plastic card to break up any remaining adhesive behind the battery.
-
-
-
Remove the following Phillips screws:
-
Two 1.9 mm screws securing the power button.
-
Three 2.3 mm screws securing the volume buttons.
-
-
-
Remove the following 1.3 mm Phillips screws:
-
One screw beside the rear-facing camera
-
One screw on the rear case
-
-
-
From the outside of the phone, push the hold switch into the rear case with the point of a spudger.
-
This action will free the hold switch and gasket from the rear case.
-
-
-
Moving from power button side of the phone, use an opening pick to separate the adhesive holding the antenna flex cable to the rear case.
-
-
-
Slide the point of an opening pick underneath the antenna flex cable towards the top of the phone, separating the remaining adhesive.
-
-
-
Use tweezers to move the antenna flex cable away from the edge of the phone, freeing the screw bracket from the rear case.
-
Remove the antenna flex cable.
-
-
-
Use the blade of a Halberd spudger to separate the adhesive holding the microphone to the rear case.
-
-
-
Slide the blade of a halberd spudger under the power button end of the button cable to separate it from the adhesive on the rear case.
-
Continue to separate the adhesive by moving the blade towards the top of the phone.
-
-
-
Continue to move the blade of the halberd spudger underneath the power and volume control cable.
-
-
-
Slide the halberd spudger under the volume control portion of the button cable.
-
Gently slide the blade underneath the cable towards the bottom of the phone, separating the remaining adhesive.
-


To reassemble your device, follow these instructions in reverse order.
To reassemble your device, follow these instructions in reverse order.
Rückgängig: Ich habe diese Anleitung nicht absolviert.
34 weitere Nutzer:innen haben diese Anleitung absolviert.

8 Kommentare
Hello,
how can I disassemble and assemble the mute button from the flex cable. because most spare part cables are without mute button…
thanks
the mute button can slide out. there is space on the side that is not marked red. it looks like three clips hold it in but simply grab hold of the button nob thing with tweezers and slide or wedge it out from underneath that bar that goes around the side with the red line and then once it’s out you can slip that button into the new flex
hahaha aqint that the truth LOL
After reinstalling the volume and power buttons and brackets & clips, my power button won’t turn phone off/on; my volume control seems possessed and does what it wants, lol. Help!