Zum Hauptinhalt wechseln

iPhone 7 Wi-Fi Diversity Antenna Replacement

Was du brauchst

  1. iPhone 7 Wi-Fi Diversity Antenna Replacement, Pentalobe Screws: Schritt 1, Bild 1 von 1
    • Before you begin, discharge your iPhone battery below 25%. A charged lithium-ion battery can catch fire and/or explode if accidentally punctured.

    • Power off your iPhone before beginning disassembly.

    • Remove the two 3.4 mm pentalobe screws on the bottom edge of the iPhone.

    • Opening the iPhone's display will compromise its waterproof seals. Have replacement seals ready before you proceed past this step, or take care to avoid liquid exposure if you reassemble your iPhone without replacing the seals.

  2. iPhone 7 Wi-Fi Diversity Antenna Replacement, iPhone 7 Opening Procedure: Schritt 2, Bild 1 von 1
    • Heating the lower edge of the iPhone will help soften the adhesive securing the display, making it easier to open.

    • Use a hairdryer or prepare an iOpener and apply it to the lower edge of the iPhone for about a minute in order to soften up the adhesive underneath.

  3. iPhone 7 Wi-Fi Diversity Antenna Replacement: Schritt 3, Bild 1 von 2 iPhone 7 Wi-Fi Diversity Antenna Replacement: Schritt 3, Bild 2 von 2
    • Attach a suction cup to the lower half of the display assembly, just above the home button.

    • Be sure the suction cup does not overlap with the home button, as this will prevent a seal from forming between the suction cup and front glass.

    • If your display is badly cracked, covering it with a layer of clear packing tape may allow the suction cup to adhere. Alternatively, very strong tape may be used instead of the suction cup. If all else fails, you can superglue the suction cup to the broken screen.

  4. iPhone 7 Wi-Fi Diversity Antenna Replacement: Schritt 4, Bild 1 von 3 iPhone 7 Wi-Fi Diversity Antenna Replacement: Schritt 4, Bild 2 von 3 iPhone 7 Wi-Fi Diversity Antenna Replacement: Schritt 4, Bild 3 von 3
    • Pull up on the suction cup to create a small gap between the display assembly and the rear case.

    • Insert the flat end of a spudger into the gap.

    • The watertight adhesive holding the display in place is very strong, and creating this initial gap takes a significant amount of force. If you're having a hard time opening a gap, rock the screen up and down to weaken the adhesive until you can fit a spudger inside.

  5. iPhone 7 Wi-Fi Diversity Antenna Replacement: Schritt 5, Bild 1 von 3 iPhone 7 Wi-Fi Diversity Antenna Replacement: Schritt 5, Bild 2 von 3 iPhone 7 Wi-Fi Diversity Antenna Replacement: Schritt 5, Bild 3 von 3
    • Slide the spudger to the left along the lower edge of the iPhone.

    • Twist the spudger to widen the gap between the display and rear case.

  6. iPhone 7 Wi-Fi Diversity Antenna Replacement: Schritt 6, Bild 1 von 3 iPhone 7 Wi-Fi Diversity Antenna Replacement: Schritt 6, Bild 2 von 3 iPhone 7 Wi-Fi Diversity Antenna Replacement: Schritt 6, Bild 3 von 3
    • Slide the spudger up the left side of the iPhone, starting at the lower edge and moving towards the volume control buttons and silent switch.

    • Do not pry along the top edge of the phone, you risk damaging the plastic clips securing the display.

  7. iPhone 7 Wi-Fi Diversity Antenna Replacement: Schritt 7, Bild 1 von 3 iPhone 7 Wi-Fi Diversity Antenna Replacement: Schritt 7, Bild 2 von 3 iPhone 7 Wi-Fi Diversity Antenna Replacement: Schritt 7, Bild 3 von 3
    • Insert the flat edge of a spudger into the bottom right corner of the device.

    • Twist the spudger to widen the gap between the display assembly and the rear case.

    • Slide the flat end of the spudger up the right side of the phone to break up the adhesive holding the display in place.

    • Do not insert the spudger further than the adhesive to avoid damaging delicate ribbon cables along the right edge.

  8. iPhone 7 Wi-Fi Diversity Antenna Replacement: Schritt 8, Bild 1 von 2 iPhone 7 Wi-Fi Diversity Antenna Replacement: Schritt 8, Bild 2 von 2
    • Pull up on the suction cup to lift up the display and open the iPhone.

    • Do not raise the display more than 10º as there are ribbon cables along the right edge of the device connecting the display to the logic board.

  9. iPhone 7 Wi-Fi Diversity Antenna Replacement: Schritt 9, Bild 1 von 1
    • Pull up on the small nub on the suction cup to remove it from the front panel.

  10. iPhone 7 Wi-Fi Diversity Antenna Replacement: Schritt 10, Bild 1 von 2 iPhone 7 Wi-Fi Diversity Antenna Replacement: Schritt 10, Bild 2 von 2
    • Slide an opening pick along the top edge of the iPhone, between the rear case and front panel, to break up the remaining adhesive holding the screen in place.

    • Be careful not to damage the plastic clips on the top edge of the phone.

  11. iPhone 7 Wi-Fi Diversity Antenna Replacement: Schritt 11, Bild 1 von 3 iPhone 7 Wi-Fi Diversity Antenna Replacement: Schritt 11, Bild 2 von 3 iPhone 7 Wi-Fi Diversity Antenna Replacement: Schritt 11, Bild 3 von 3
    • Pull the display assembly slightly away from the top edge of the phone to disengage the clips holding it to the rear case.

    • Open the iPhone by swinging the display up from the left side, like the back cover of a book.

    • Don't try to fully separate the display yet, as several fragile ribbon cables still connect it to the iPhone's logic board.

  12. iPhone 7 Wi-Fi Diversity Antenna Replacement, Battery Disconnection: Schritt 12, Bild 1 von 1
    In diesem Schritt verwendetes Werkzeug:
    Tri-point Y000 Screwdriver
    $5.99
    Kaufen
  13. iPhone 7 Wi-Fi Diversity Antenna Replacement: Schritt 13, Bild 1 von 1
    • Remove the lower connector bracket.

  14. iPhone 7 Wi-Fi Diversity Antenna Replacement: Schritt 14, Bild 1 von 3 iPhone 7 Wi-Fi Diversity Antenna Replacement: Schritt 14, Bild 2 von 3 iPhone 7 Wi-Fi Diversity Antenna Replacement: Schritt 14, Bild 3 von 3
    • Use the point of a spudger to lift the battery connector out of its socket on the logic board.

    • Bend the connector cable up slightly to prevent it from making contact with the socket and providing power to the phone.

  15. iPhone 7 Wi-Fi Diversity Antenna Replacement, Display Assembly: Schritt 15, Bild 1 von 3 iPhone 7 Wi-Fi Diversity Antenna Replacement, Display Assembly: Schritt 15, Bild 2 von 3 iPhone 7 Wi-Fi Diversity Antenna Replacement, Display Assembly: Schritt 15, Bild 3 von 3
    • Make sure the battery is disconnected before you disconnect or reconnect the cables in this step.

    • Use a spudger or a fingernail to disconnect the two lower display connectors by prying them straight up from their sockets on the logic board.

    • To reconnect these cables, press down on one end until it clicks into place, then repeat on the opposite end. Do not press down on the middle. If the connector is even slightly misaligned, the connector can bend, causing permanent damage.

    • If you have a blank screen, white lines on the display, or partial or complete lack of touch response after reassembling your phone, try disconnecting and carefully reconnecting both of these cables and make sure they are fully seated.

  16. iPhone 7 Wi-Fi Diversity Antenna Replacement: Schritt 16, Bild 1 von 3 iPhone 7 Wi-Fi Diversity Antenna Replacement: Schritt 16, Bild 2 von 3 iPhone 7 Wi-Fi Diversity Antenna Replacement: Schritt 16, Bild 3 von 3
    • Remove the two 1.3 mm Phillips #000 screws securing the bracket over the front panel sensor assembly connector.

    • Some phones could be Y000. Apple started using Y000 for these at some point in the middle of the product's lifecycle.

  17. iPhone 7 Wi-Fi Diversity Antenna Replacement: Schritt 17, Bild 1 von 2 iPhone 7 Wi-Fi Diversity Antenna Replacement: Schritt 17, Bild 2 von 2
    • Disconnect the front panel sensor assembly connector from its socket on the logic board.

    • This press connector should also be reconnected one end at a time to minimize the risk of bending.

  18. iPhone 7 Wi-Fi Diversity Antenna Replacement: Schritt 18, Bild 1 von 1
  19. iPhone 7 Wi-Fi Diversity Antenna Replacement, Barometric Vent: Schritt 19, Bild 1 von 1
    • Remove the two 1.9 mm Phillips screws securing the barometric vent to the rear case.

  20. iPhone 7 Wi-Fi Diversity Antenna Replacement: Schritt 20, Bild 1 von 2 iPhone 7 Wi-Fi Diversity Antenna Replacement: Schritt 20, Bild 2 von 2
    • Remove the vent.

  21. iPhone 7 Wi-Fi Diversity Antenna Replacement, Taptic Engine: Schritt 21, Bild 1 von 2 iPhone 7 Wi-Fi Diversity Antenna Replacement, Taptic Engine: Schritt 21, Bild 2 von 2
    • Use the flat end of a spudger to disconnect the Taptic Engine connector from its socket on the logic board.

  22. iPhone 7 Wi-Fi Diversity Antenna Replacement: Schritt 22, Bild 1 von 1
    • Remove the three 1.6 mm Phillips screws securing the Taptic Engine to the rear case.

  23. iPhone 7 Wi-Fi Diversity Antenna Replacement: Schritt 23, Bild 1 von 2 iPhone 7 Wi-Fi Diversity Antenna Replacement: Schritt 23, Bild 2 von 2
    • Remove the Taptic Engine.

  24. iPhone 7 Wi-Fi Diversity Antenna Replacement, Speaker Assembly: Schritt 24, Bild 1 von 1
    • Remove the Phillips screw securing the Wi-Fi diversity antenna to the rear case:

    • One 3.2 mm screw

  25. iPhone 7 Wi-Fi Diversity Antenna Replacement: Schritt 25, Bild 1 von 1
    • Remove the following three Phillips screws securing the speaker to the rear case:

    • Two 1.3 mm screws

    • One 2.0 mm screw

  26. iPhone 7 Wi-Fi Diversity Antenna Replacement: Schritt 26, Bild 1 von 3 iPhone 7 Wi-Fi Diversity Antenna Replacement: Schritt 26, Bild 2 von 3 iPhone 7 Wi-Fi Diversity Antenna Replacement: Schritt 26, Bild 3 von 3
    • Use the point of a spudger to lift the two antenna cable connectors up off of the sockets on the logic board.

  27. iPhone 7 Wi-Fi Diversity Antenna Replacement: Schritt 27, Bild 1 von 2 iPhone 7 Wi-Fi Diversity Antenna Replacement: Schritt 27, Bild 2 von 2
    • Use tweezers to derout the antenna cables from their bracket on the logic board.

  28. iPhone 7 Wi-Fi Diversity Antenna Replacement: Schritt 28, Bild 1 von 2 iPhone 7 Wi-Fi Diversity Antenna Replacement: Schritt 28, Bild 2 von 2
    • Use tweezers to remove the antenna cables from the clip on the speaker.

    • Make sure to grasp the cable near the clip in order to avoid damaging the cable.

  29. iPhone 7 Wi-Fi Diversity Antenna Replacement: Schritt 29, Bild 1 von 2 iPhone 7 Wi-Fi Diversity Antenna Replacement: Schritt 29, Bild 2 von 2
    • Use the tip of a spudger to slide the speaker assembly towards the logic board and off of the rear case.

  30. iPhone 7 Wi-Fi Diversity Antenna Replacement: Schritt 30, Bild 1 von 1
    • Remove the speaker.

  31. iPhone 7 Wi-Fi Diversity Antenna Replacement, Wi-Fi Diversity Antenna: Schritt 31, Bild 1 von 2 iPhone 7 Wi-Fi Diversity Antenna Replacement, Wi-Fi Diversity Antenna: Schritt 31, Bild 2 von 2
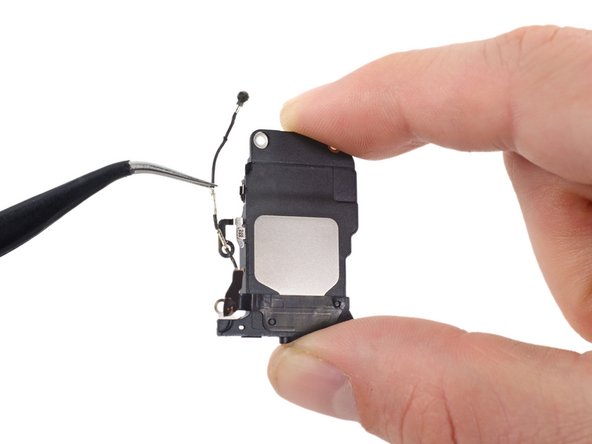
    • Gently remove the antenna from the clip on the speaker.

  32. iPhone 7 Wi-Fi Diversity Antenna Replacement: Schritt 32, Bild 1 von 2 iPhone 7 Wi-Fi Diversity Antenna Replacement: Schritt 32, Bild 2 von 2
    • Gently remove the tab by lifting up with tweezers and separate the tab from the speaker.

  33. iPhone 7 Wi-Fi Diversity Antenna Replacement: Schritt 33, Bild 1 von 1
    • Remove the Wi-Fi diversity antenna.

Abschluss

To reassemble your device, follow these instructions in reverse order.

34 weitere Nutzer:innen haben diese Anleitung absolviert.

Scott Havard

Mitglied seit: 06/27/16

49.627 Reputation

31 Anleitungen geschrieben

5 Kommentare

Qual’è e dove si trova l’antenna dei dati cellulare? Non quello del Wi-Fi

Nicola Canato - Antwort

questa guida risolve il problema del wifi grigio?

Nino Galletta - Antwort

vyřešili jste problém?

Lukáš Netečný -

Is this a potential fix for an iPhone that won’t allow the wi-fi to be turned on? The phone has been fully restored to factory but still won’t allow the wi-fi to be turned on. It is crossed out in the Control Center, and won’t allow it to be toggled on in the Settings.

bluebee_technology - Antwort

Hey i have same issue with wifi did you get any solutions?

Yash fixs -

Kommentar hinzufügen

Seitenaufrufe:

Letzte 24 Stunden: 10

Letzte 7 Tage: 48

Letzte 30 Tage: 257

Insgesamt: 73,167