Einleitung
Der iPhone 8 Plus Home "Button" ist eigentlich ein statischer Sensor, der auch die Touch ID (Fingerabdruckerkennung) Funktion enthält.
Die meisten Ersatz-Home Buttons werden nicht funktionieren, kontrolliere das genau, bevor du mit der Reparatur anfängst. Der originale Home Button deines iPhones ist ab Werk mit dem Logic Board gekoppelt, und ohne den Apple-eigenen Kalibrierungsvorgang, wird selbst eine echte Ersatztaste von einem anderen iPhone nicht funktionieren. Um einen kaputten Home Button zu reparieren, solltest du einen speziell angefertigten universellen Home Button einbauen. Beachte, dass diese Ersatzteile nur als Taste funktionieren, die Touch ID wird nicht funktionieren.
Wenn du nur ein gebrochenes Display ersetzt, kannst du diese Anleitung benutzen, um deinen originalen, funktionsfähigen Home Button sorgfältig auszubauen und auf das neue Display zu übertragen, und so alle Funktionen, inklusive Touch ID beizubehalten.
Um versehentliche Schäden an den Displaykabeln zu vermeiden, ist es bei diesem Vorgang am Besten, die Displayeinheit komplett zu entfernen, bevor du mit der Reparatur am Home/Touch ID Sensor anfängst. Wenn du dich allerdings sicher genug fühlst, kannst du den Teil mit dem Display-Ausbau überspringen und direkt zum Home/Touch ID Sensor Abschnitt übergehen.
Was du brauchst
-
-
Schalte dein iPhone aus, bevor du daran arbeitest.
-
Drehe die beiden 3,5 mm Pentalobe Schrauben an der unteren Kante heraus.
-
-
-
Lege überlappende Streifen durchsichtigen Packbands über das Display des iPhones, bis die gesamte Oberfläche bedeckt ist.
-
Wenn du den Saugheber in den nächsten Schritten nicht befestigen kannst, falte ein starkes Stück Klebeband (z.B. Paketband) zu einem Griff und hebe das Display stattdessen damit an.
-
-
-
Wir haben die Anti-Clamp entwickelt, um das Öffnen von Geräten zu erleichtern. Die nächsten drei Schritte zeigen, wie sie verwendet wird. Wenn du sie nicht benutzen willst, überspringe die nächsten drei Schritte und folge einer anderen Methode.
-
Ziehe den blauen Griff nach hinten, um die Arme der Anti-Clamp zu entriegeln.
-
Schiebe die Arme entweder über die rechte oder die linke Kante deines iPhones.
-
Bringe die Saugheber nahe an der Unterkante des iPhones an, einen auf der Vorderseite, den anderen auf der Rückseite.
-
Drücke die Saugheber auf den Oberflächen fest.
-
-
-
Ziehe den blauen Griff nach vorne, um die Arme zu arretieren.
-
Drehe den Griff 360° im Uhrzeigersinn, oder soweit, bis du merkst, dass sich die Saugheber dehnen.
-
Achte darauf, dass sich die Saugheber weiterhin gegenüber stehen. Wenn sie sich nicht mehr gegenüber stehen, dann löse die Saugheber ein wenig ab und schiebe sie in die richtige Position.
-
-
-
Erhitze eine iOpener und führe ihn durch die Arme der Anti-Clamp hindurch.
-
Falte den iOpener so, dass er auf der Unterkante des iPhones liegt.
-
Warte eine Minute, damit sich der Kleber lösen kann und ein Spalt entsteht.
-
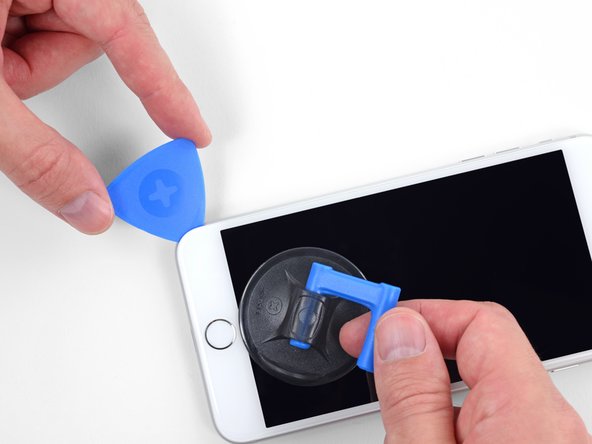
Setze ein Plektrum unter das Display ein, sobald die Anti-Clamp einen ausreichend großen Spalt geschaffen hat.
-
Überspringe die nächsten drei Schritte .
-
-
-
Es ist leichter das iPhone zu öffnen, wenn du das untere Ende erwärmst. Du weichst so die Verklebungen auf.
-
Du kannst das untere Ende des iPhones mit einem Haartrockner oder einem iOpener erwärmen. Wende die Wärme 90 Sekunden lang an, um den Kleber aufzuweichen.
6/14/23 I did this repair but used a heat gun on low for 60 seconds. This allowed me to open the case as the instructions say, but in the end the Home button failed. I probably over heated it. I used this "go around" for a virtual Home button. I don't care about touch ID:
-
-
-
Setze einen Saugnapf auf die untere Hälfte der Vorderseite , direkt über dem Home Button.
Using just the single suction cup that is included in the battery replacement kit probably wouldn’t open the device. An iOpener and an iSlack should be the recommended method. However, you can get it open with just the single suction cup and iOpener, but does take a lot of time.
Get an iOpener and iSlack with the battery replacement kit.
I used a flat x-acto (#18) blade knife tool to gently pry back the screen enough to allow me to insert the pick near the bottom corner. I then worked the pick under the screen as mentioned in steps 5 & 6 below then. This worked really well for me.
I used the suction cup without heating the phone - the adhesive came away quite easily without applying any heat. Maybe due to age of phone (nearly 4 years old). Worth trying.
My screen was very shattered, and was quite hard to get suction, as my tape was very low quality. However, after pulling it up a little bit, I was able to insert a regular razor blade into the very small gap and used that as a lever.
Oh my goodness! Don't do that again. You can definitely damage something in the phone if you use a sharp metal razor blade..
cytur -
-
-
-
Ziehe gleichmäßig und fest am Saugnapf. Es sollte sich ein kleiner Spalt zwischen Front Panel und Rückgehäuse bilden.
-
Setze ein Plektrum oder ein dünnes Hebelwerkzeug ein paar Millimeter in den Spalt ein.
After multiple tries and using a very hot iOpener, it will not open.
In sheer frustration, I pulled out my trusty pocket knife and managed to lift the bottom of the screen slightly, but in the process, cracked the glass from the bottom to the home button. The case is open now.
-
-
-
Schiebe das Plektrum um die Ecke und entlang der linken Kante nach oben in Richtung der Tasten für die Lautstärkeregelung und des Stummschalters. Trenne so die Klebeverbindung des Displays auf.
-
Halte vor der oberen linken Ecke an.
Do not go over the top otherwise you can crack the screen. Sadly happened to me :(
The instruction should be:
“Stop near BUT BEFORE REACHING the top left corner of the display”
-
-
-
Setze das Plektrum an der rechten unteren Ecke ein. Schiebe es um die Ecke herum, dann entlang der rechten Kante nach oben. Trenne dadurch die Verklebung.
I had really good luck using a hairdryer on some of the more stubborn portions of adhesive.
-
-
-
-
Schiebe das Plektrum unter das Display und die Oberkante entlang, um die letzte Klebeverbindung zu trennen.
Be very careful at this step. The glass at the top will break very easy when the display is lifted too much.
-
-
-
Schiebe die Displayeinheit leicht nach unten, weg von der Oberkante, um die Rasten, mit denen sie am Rückgehäuse gehalten wird, zu lösen.
-
-
-
Öffne das iPhone, indem du das Display von der linken Seite her aufklappst, so wie man die Seite eines Buches umschlägt
-
Lehne das Display an einen geeigneten Gegenstand, um es gut zu stützen, während du weiter am iPhone arbeitest.
Das “links” ist auf dem Foto rechts.
-
-
-
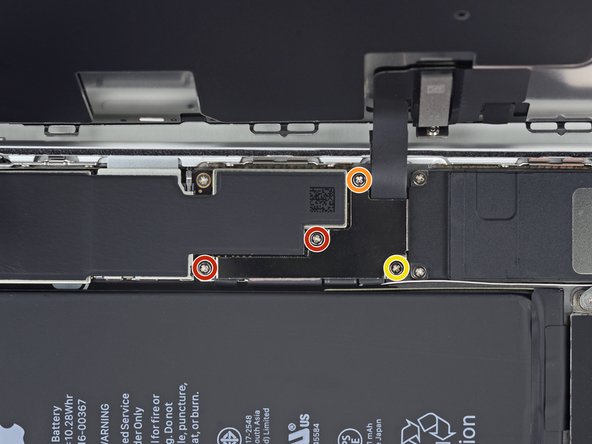
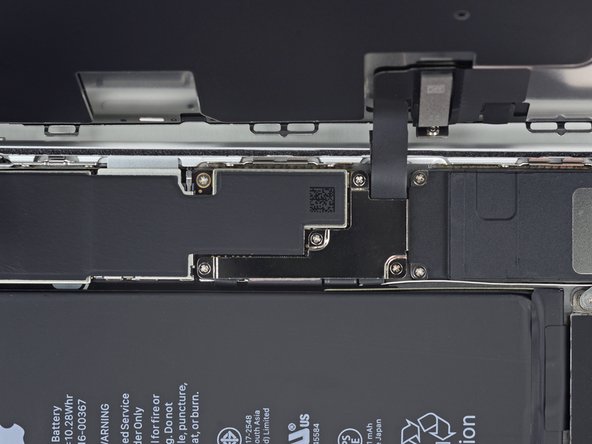
Entferne die vier Kreuzschlitzschrauben (JIS) mit denen die untere Display Kabel Halterung auf auf der Platine angeschlossen ist:
-
Zwei 1,3 mm Schrauben
-
Eine 1,4 mm Schraube
-
Eine 2,7 mm Schraube
The Phillips screwdriver bit is the PH000. The measurement refers to the screw length.
-
-
-
Hebele den Akkuanschluss mit der Spudgerspitze aus seinem Sockel auf dem Logic Board.
-
Biege das Akku Anschlusskabel etwas weg vom Logic Board, um zu verhindern, dass es sich versehentlich wieder mit dem Akku verbindet und das iPhone während der Reparatur unter Spannung setzt.
When I reassembled the iPhone 8 Plus, I had to plug it into a Lightning cable to wake it up (just pushing power button wasn’t sufficient).
-
-
-
Hebele den breiten unteren Displayverbinder mit der Spudgerspitze oder mit dem Fingernagel gerade aus seinem Sockel.
I got hold of a iPhone 8 Plus with cracked screen that I am planning to fix.
Here is my problem:
When I tried to take out the screen from my phone, (step 15-18) I was curious about the new screen, so I tried to connect it. It was completely dead! Then I tried the old cracked one, and suddenly that was dead to! This is a phone that some fool has been inside earlier and changed battery, but I suspect he has done some more really stupid things. The Taptic Engine is living its own life and vibrating every time I slightly touch the home button. (I have a new Taptic Engine) The phone is also full of dust and small particles that does not belong there. One tri-point Y000 screw (step 18) is even missing! Now the biggest problem is that both screens are black! I know the phone is on, because I hear voice command speak when I turn on the power. The screen worked before I tried to change it? And one last thing: My new LCD screen came with new flex cables. Is it possible to switch over, so I can use the old ones?
Hi,
Is your problem solved?
Be careful of damaging MOSFETs by the LH side of the large lower display cable. After replacing the battery and turning the device on, the phone showed low charge and didn't have a charging symbol even after plugging into multiple cables and chargers. Turns out I had damaged the logic board attempting to disconnect the connector.
-
-
-
Löse den Verbinder am zweiten unteren Displaykabel mit der Spudgerspitze. Er ist direkt hinter dem eben gelösten.
I used the other end of the spudger on this connector and it seemed to work a little better for me. I came in from underneath the top-right edge instead of the bottom right.
-
-
-
Entferne die beiden TriPoint Y000 Schrauben, welche die Halterung über dem Verbinder der Sensoreinheit am Front Panel befestigen:
-
Eine 1,0 mm Schraube
-
Eine 1,2 mm Schraube
una vite da 1mm e due viti da 1.2 mm???
Ciao Matteo! Grazie per l’osservazione. Ho appena modificato il testo :) La traduzione è aperta a tutti. Hai quindi la possibilità di fare le tue suggestione direttamente nel testo e sei il benvenuto se vuoi usare di questa possibilità nel futuro. Grazie ancora per la vigilanza! Saluti, Claire
The tool kit does include a 1.0 or1.2mm screwdriver! How am I supposed to remove those screws?
Bought the screwdriver that supposedly fits these screws and it still doesn’t work.
My bracket looks different. Can’t get these screws out.
kit came with wrong bit. i received 2x P02 (penta tips) and no tri point y000.
-
-
-
Entferne die Halterung, welche den Verbinder der Front Panel Sensoreinheit bedeckt.
-
-
-
Löse den Verbinder der Front Panel Sensoreinheit mit der Spudgerspitze oder dem Fingernagel von seinem Sockel.
-
-
-
Entferne die Displayeinheit.
Should there be a step somewhere in here to point out when to remove the blue plastic from the new iFixit screen?
-
-
-
Entferne die vier Y000 Schrauben an der Halterung über dem Home/Touch ID Sensor:
-
Eine 1,2 mm Schraube
-
Drei 1,3 mm Schrauben
The 1.2mm screw on the home button stripped for me. I ended up bending the bracket on each side in order to remove the home button. I then bent it back as best I could during reassembly and screwing it down.
-
-
-
Hebele mit einem Plastiköffnungswerkzeug unter der linken Kante des Verbinders am Home Button Kabel, um ihn so zu lösen.
I accidentally severed the cable, now my sensor is disabled. So far this was the most delicate cable I encountered because it was so small.
-
-
-
Drehe die Displayeinheit herum. Benutze einen Haartrockner oder erwärme einen iOpener, um die untere Kante des Displays für 90 Sekunden zu erwärmen. So wird der Kleber darunter weich.
-
-
-
Trenne die Klebeverbindung des Home/Touch ID Sensorkabels mit einem Plektrum von der Rückseite des Displays.
This did not work for me…. ended up breaking the connector from the home button. Most likely messed up the customer’s iPhone… the adhesive would not pry up with just pick… does iFixit offer a home button replacement?
did not work for me either, also ended up breaking the connector, just use the tweezer to separate it. do not use opening pick!!!!! it’s too thick for it!!
Isopropanol and heat will loosen the adhesive and its possible to gently remove with plastic pick, metal tweezers risk damaging the Home button cable and disabling the Touch facility.
Pretty easy to follow instructions if you have patience and careful hands. If you have clumsy hands you will not succeed in fixing any small electronics. There are some small things you should use to help you succeed at fixing small electronics, like some scotch tape or other clear tape to hold some of the cables in place while you work on small electronics items, also a small heavy bottle or object to propped the iPhones cases against to hold them from falling over so that your hands can be free to perform your tasks. Great job you are doing iFixit personel and I am with you all the way with fighting for our rights to fix our electronics equipment.
Isopropanol in conjunction with the heat really did the trick here. Heat up first, then use plenty of the alcohol to pry it up carefully using the pick.
Heat dryer on high worked for me.
I heated the tip of a thin knife with a hot air gun and slide it under the flexible cable. When I hit resistance I reheated the knife. Keeping it parallel to the board while doing this. After 4 heatings the knife moved the rest of the way and the cable lifted easily off of the iPhone back. This method left enough glue on the cable that it restuck fine when moved to the new iPhone.
Apple loves to make this the most difficult thing. I've been successful many times, and not so on other repairs. I just finished a repair and everything was in tact, but sadly it didn't work. Took a part and put back. So I turned on the assistive touch home button. They will be getting a new phone soon, so not a big issue except Pride.
-
-
-
Entferne die Home/Touch ID Sensoreinheit, indem du sie durch die Vorderseite des Displays durchziehst.
-
Wenn dein Ersatzdisplay nicht mit der Frontkamera und dem Sensorkabel ausgeliefert wurde, dann musst du sie mit Hilfe dieser Anleitung übertragen.
Vergleiche dein neues Ersatzteil mit dem originalen Teil. Du musst unter Umständen Komponenten übertragen oder Klebefolien abziehen, bevor du das neue Teil einbauen kannst.
Um dein Gerät wieder zusammenzubauen, folge den Schritten in umgekehrter Reihenfolge.
Entsorge deinen Elektromüll sachgerecht.
Hat die Reparatur nicht ganz geklappt? Versuche es mit ein paar grundständigen Lösungen, ansonsten findest du in unserem Forum Hilfe bei der Fehlersuche.
Rückgängig: Ich habe diese Anleitung nicht absolviert.
54 weitere Nutzer:innen haben diese Anleitung absolviert.
Besonderer Dank geht an diese Übersetzer:innen:
100%
Diese Übersetzer:innen helfen uns, die Welt zu reparieren! Wie kann ich mithelfen?
Hier starten ›
7 Kommentare
aiuto mi son cadute e quindi perso
sensore home/Touch ID Una vite da 1,2 mm Tre viti da 1,3 mm
dove le trovo?
Every time I have tried to transfer the home button from the broken screen to the replacement LCD - the home button has not worked. No tears in the cable. The connector is attached. Screw isn’t too tight. What could I be missing?
ATTENTION: Don’t screw in that one screw over the home button too much, or the button breaks! I just found one proper explanation for it in this YouTube video (https://www.youtube.com/watch?v=rDVnp90a...). Basically, that one screw that goes over the Home button should not be tightened too much, so that the metal plate doesn't bend (which it did for me).
This was truely helpful.
Anybody have the issue where the button works when the phone is in 2 pieces, but when you assemble the screen onto the phone body, the button no longer responds after a restart??
Power on phone while in 2 pieces -> home button is working
Attach screen to phone body -> home button is still working
Restart phone with phone assembled -> home button not responding
Hallo Zusammen
Wird bei diesen Mikroschrauben nur das Gewinde gemessen oder die gesammte Schraube inkl. Schraubenkopf? Ich frage, weil mir die Schrauben des Homebutton weggespickt sind 1.2 und 1.3mm...
Danke
LG
Hallo Alex!
We measure the entire screw for our guides.


what do I do about super stripped screws?
Ean Palacios - Antwort
I’m sorry, your comment slipped past my radar earlier. For future fixers that might see this and ask the same question, you can check out our stripped screw guide for some detailed advice.
Adam O'Camb -
Do you need a toolkit like the essential toolkit
Adam Palmer - Antwort
Hi Adam. Having a tool kit with all of the listed parts above is best. The screw heads are very small and each set of screws needs a very specific type of driver to remove them without stripping any of them.
Kyle Luksa -