Einleitung
Wenn das Display deines iPhone XS Max einen Sprung hat, nicht mehr auf Touch reagiert oder nach dem Einschalten kein Bild mehr anzeigt, dann kannst du anhand dieser Anleitung, ein neues Display einbauen, damit dein iPhone wieder richtig funktioniert.
Die kombinierte Baugruppe aus Ohrhörer-Lautsprecher und Sensoreinheit, die auf der Rückseite des Displays angebracht ist, ist ab Werk mit deinem individuellen iPhone gekoppelt. Daher musst du sie bei allen Display-Reparaturen vom alten Display auf das neue übertragen. Sie enthält auch den Flood-Illuminator, der Teil des biometrischen Face ID Sicherheits-Features ist. Falls er beschädigt oder ersetzt wird, funktioniert Face ID nicht mehr, sei also besonders vorsichtig, um keine dieser Komponenten während der Reparatur zu beschädigen. Bei einer Beschädigung kann nur Apple die Face ID Funktion wiederherstellen.
Hinweis: Die True Tone Funktion ist nach einem Displaytausch deaktiviert, selbst wenn ein originales Apple Display benutzt wird.
Was du brauchst
Einführungsvideo
-
-
Schalte dein iPhone aus, bevor du mit der Demontage beginnst.
-
Entferne die beiden 6,9 mm langen Pentalobe Schrauben an der Unterkante des iPhones.
-
Durch das Öffnen des iPhone Displays werden die wasserfesten Dichtungen beschädigt. Du solltest also Ersatzdichtungen zur Hand haben, bevor du weitermachst. Falls du dein iPhone wieder zusammenbaust, ohne die Dichtungen zu erneuern, dann achte darauf, dass dein iPhone nicht mit Flüssigkeiten in Kontakt kommt.
-
-
-
Wenn das Display deines iPhones gesprungen ist, kannst du es mit Klebeband abkleben, damit es nicht weiter zersplittert und du dich nicht daran verletzt.
-
Platziere Klebestreifen überlappend über die gesamte Oberfläche des Displays.
-
Falls der Saugheber in den nächsten Schritten durch das gesplitterte Glas nicht gut anhaftet, empfiehlt es sich, ein Stück starkes Klebeband so zu falten, dass es als Griff benutzt werden kann, um das Display anzuheben.
-
-
-
Überdecke die Glasscheibe des Displays komplett mit überlappenden Streifen von durchsichtigem Paketband.
-
Wenn das Glas so stark zerbrochen ist, dass der Saugheber in den nächsten Schritten nicht gut haftet, dann versuche ein starkes Klebeband ("Panzerband") zu einem Griff zu falten und so auf die Scheibe zu kleben, dass du sie damit hochziehen kannst.
-
-
-
Drücke den blauen Griff zurück, damit die Arme der Anti-Clamp frei beweglich werden.
-
Schiebe die Arme entweder über die linke oder die rechte Kante des iPhones.
-
Bringe die Saugheber nahe an der Unterkante des Displays an, einen auf der Vorderseite, den anderen auf der Rückseite.
-
Drücke die Saugheber zusammen, so dass sie auf den Oberflächen haften.
-
-
-
Drücke den blauen Griff vorwärts, um die Arme wieder zu verriegeln.
-
Drehe den Griff eine volle Umdrehung im Uhrzeigersinn, oder bis du merkst, dass sich die Saugheber dehnen.
-
Achte darauf, dass sich die Saugheber weiterhin gegenüber stehen. Wenn sie sich nicht mehr gegenüber stehen, dann löse die Saugheber ein wenig ab und schiebe sie in die richtige Position.
-
-
-
Führe einen erwärmten iOpener durch die Arme der Anti-Clamp.
-
Forme den iOpener so, dass er auf der Unterkante des iPhones liegt.
-
Warte eine Minute, damit sich der Kleber lösen und ein Spalt entstehen kann.
-
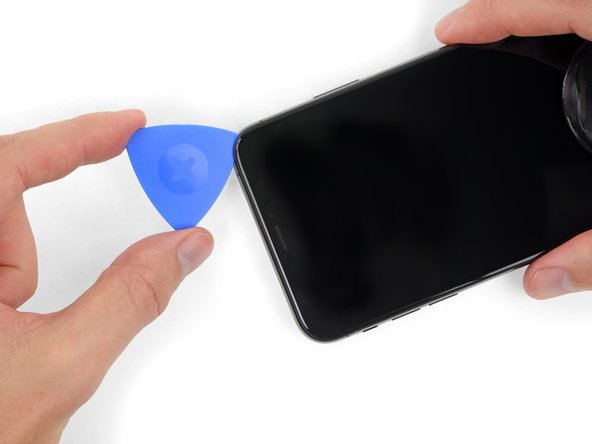
Setze ein Plektrum in den Spalt unter das Display und der Kunstoffblende ein, nicht unter das Display selbst.
-
Überspringe die nächsten drei Schritte.
-
-
-
Benutze einen Fön, eine Heißluftpistole oder bereite einen iOpener vor und lege ihn etwa eine Minute lang auf die Unterkante des iPhones, um den Kleber darunter aufzuweichen.
besteht da die Gefahr das sich das Displayglas vom lcd löst?
Besteht da die Gefahr das sich der Kleber vom Displayglas löst?
-
-
-
Wenn du einen einzelnen Saugheber benutzt, dann setzte ihn an der Unterkante des iPhones auf und vermeide dabei den gebogenen Teil des Glases.
-
-
-
Ziehe fest und konstant am Saugheber, sodass ein kleiner Spalt zwischen dem Front Panel und dem Rückgehäuse entsteht.
-
Setze ein Plektrum in den Spalt unter dem Display und der Kunstoffblende ein, nicht am Display selbst.
-
-
-
Schiebe das Plektrum um die untere linke Ecke und die linke Seite des iPhones nach oben und zerschneide so den Kleber, mit dem das Display verklebt ist.
-
-
-
-
Setze erneut dein Plektrum an der Unterkante ein und schiebe es die rechte Seite nach oben, um so weiterhin den Kleber zu durchtrennen.
-
-
-
Schiebe das Plektrum um die obere Ecke des Displays herum und ziehe das Display gleichzeitig vorsichtig nach unten in Richtung des Lightning Connectors. Eine leichte Wackelbewegung kann hilfreich sein.
-
Schiebe das Plektrum zur gegenüberliegenden Ecke und durchtrenne jegliche Klebereste, mit denen das Display noch befestigt ist.
-
-
-
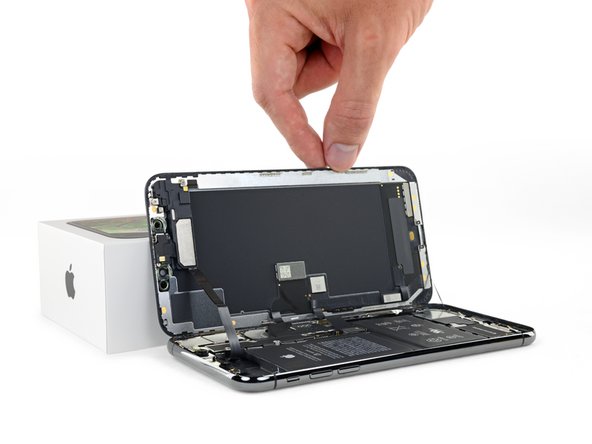
Öffne das iPhone, indem du das Display von der linken Seite her hochklappst wie einen Buchrücken.
-
Lehne das Display gegen etwas Stabiles, damit es offen bleibt, während du daran arbeitest.
-
-
-
Entferne die vier Y000 Schrauben, mit denen die Halterung der Logic Board Abdeckung befestigt ist. Sie haben folgende Längen:
-
Zwei 1,1 mm Schrauben
-
Eine 1,5 mm Schraube
-
Eine 3,7 mm Schraube
-
-
-
Benutze einen Spudger oder einen sauberen Fingernagel, um den Akkustecker aus seinem Anschluss auf dem Logic Board hochzuhebeln.
-
Biege den Stecker etwas vom Logic Board weg, um zu vermeiden, dass er sich versehentlich wieder mit dem Anschluss verbindet und dein iPhone während der Reparatur mit Strom versorgt.
-
-
-
Entferne die drei Y000 Schrauben, mit denen die Halterung des Displaysteckers befestigt ist:
-
Zwei 1,5 mm Schrauben
-
Eine 1,1 mm Schraube
I am replacing the screen for the 2nd time - the first repair was done by someone else, and the first 2 screws are 1.5mm and the last screw is 1.1mm… If I put the screw back in am I risking Long Screw Damage?
Thanks for all your comments! I'll amend this step.
Hi, I just changed the screen on my XS Max and for this bracket I used 2 x 1.1 mm and 1 x 1.5 mm.
Starting from left to right:
- left 1.1 mm (I tried with 1.5 mm like in the above picture but I felt that it didn't wanted to go deeper so I didn't forced and I tried it in the middle and it fit perfectly)
- middle 1.5 mm
- right 1.1 mm
For the two brackets I had 7 screws, I aligned them on the desk by length and I had 2 x 1.5 mm, 4 x 1.1 mm and 1 x 3.7 mm.
Good luck and I hope it will help someone!
-
-
-
Heble den Stecker der Front Panel Sensor Einheit mit der Spudgerspitze oder einem Fingernagel hoch und trenne ihn.
-
-
-
Trenne den Kabelstecker des OLED Panels mit einem Spudger oder einem Fingernagel.
-
-
-
Heble den Stecker des Touchscreen Kabels mit einem Spudger oder einem Fingernagel aus seiner Buchse.
-
-
-
Hebe das Kabel vorsichtig an, bis es sich vom Kleber löst.
-
-
-
Entferne die Displayeinheit.
-
-
-
Entferne folgende drei Y000 Schrauben, welche die Lautsprecher/Sensoreinheit festhalten:
-
Eine 1,4 mm Schraube
-
Zwei 1,5 mm Schrauben
Ciao @max94949 Quale lunghezza stai cercando? Il passo menziona che si tratta di una vite Y000 da 1,4 mm e di due vite Y000 da 1,5 mm.
-
-
-
Heble vorsichtig mit einem Spudger unter der Oberkante der Lautsprechereinheit und drehe sie nach unten herum, weg vom oberen Displayrand.
If you are using a refurbished display, check for dirt in the earpiece speaker cutout.
If you have poor quality or low sound after changing the display, use a cotton bud and isopropyl alcohol to clean the earpiece cutout.
-
-
-
Benutze einen Haartrockner, ein Heißluftgebläse oder einen iOpener, um die Vorderseite des Displays etwa eine Minute lang zu erwärmen, damit der Klebstoff, mit dem die Sensoren befestigt sind, weich wird.
-
-
-
Schiebe vorsichtig die Kante eines Plektrums unter das Flachbandkabel unterhalb des Mikrofons.
-
Verdrehe es vorsichtig, um das Mikrofon abzulösen. Achte darauf, das Kabel nicht zu stark zu belasten oder zu beschädigen.
-
Falls nötig, kannst du mit der Spudgerspitze nachhelfen, das Mikrofon aus seiner Einkerbung im Frontpanel zu lösen.
-
-
-
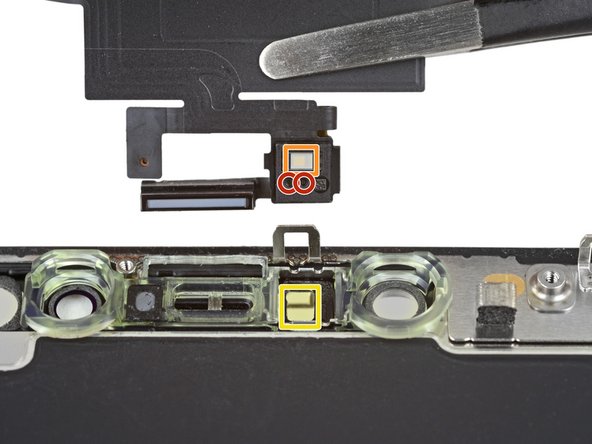
Schiebe ein Plektrum von links nach rechts unter dem Flachbandkabel und unter dem Modul des Näherungssensors/ Flood-Illuminators entlang.
-
Wackle vorsichtig ein bisschen und löse das Modul aus seiner Einkerbung im Frontpanel.
-
-
-
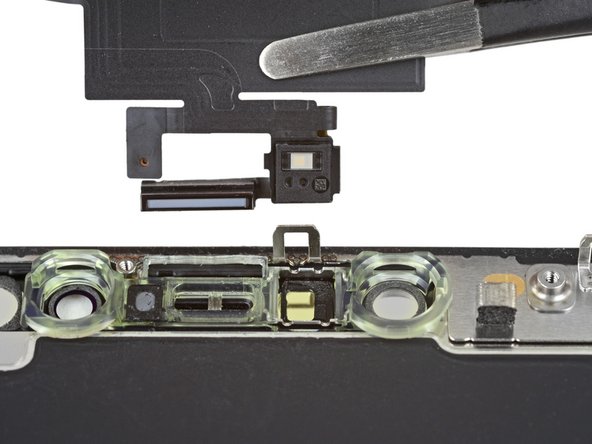
Nimm eine Pinzette und hebe mit wackelnden Bewegungen den Umgebungslichtsensor aus seiner Einkerbung im Display.
This was the most difficult part for me so i erred on the side of caution. I reheated the display in the oven at 85 degrees celsius. Like in the third picture in the next step, i got a razor into the slot below, to get the diffuser a little loose before wiggling the sensor out. I didn't understand the wiggling until i simply rocked it like a boat would side to side like to the top of the display to the bottom on the display, and voila, all came out easy and in one piece with the diffuser still attached.
-
-
-
Wenn du den gesamtenUmgebungslichtsensor wie im ersten Bild entfernt hast, dann fahre mit dem Schritt weiter unten fort.
-
Wenn aber der weiße Diffussionsstreifen wie im zweiten Bild eingebettet im Display verbleibt, musst du ihn sorgfältig an der Oberkante mit einer Rasierklinge oder einem geeigneten Hebelwerkzeug herausheben. Es ist hilfreich, zuerst erneut diesen Bereich zu erwärmen, um diese Arbeit zu erleichtern.
I have accidentally damaged flood illuminator will it affect the face id also or if I just replace the Earpiece Speaker and Sensor Assembly it will get fixed.
-
-
-
Entferne die Ohrhörer-Lautsprecher/Frontsensor Einheit.
-
Näherungssensor
-
Flood-Illuminator
-
Das Modul muss so eingesetzt werden, dass diese Komponenten nicht durch Klebstoff behindert werden.
Do you have to remove the earpiece speaker and front sensor assembly. If you are taking a screen from another Xs max with it already attached?
The front sensor assembly is part of Face ID, so you must transfer the original assembly to the replacement screen in order to maintain Face ID functionality.
No, you just take the whole unit. Warm it up and remove the glued sensors like described. Handle it carefully, the speaker cable is quite thin. If damaged, you might loose your face-ID functionality.
Does the screen need a reprogamation onto the new screen?
if the pentalope screws are rusted and the driver can’t fit in it to remove them is there any other way to remove them to replace screen?
-


Vergleiche dein neues Ersatzteil mit dem originalen Teil, unter Umständen musst du vor dem Einbau einige Komponenten übertragen oder Schutzfolien vom neuen Teil abziehen.
Um dein Gerät wieder zusammenzubauen, folge dieser Anleitung in umgekehrter Reihenfolge.
Entsorge deinen Elektromüll fachgerecht.
Hat die Reparatur nicht so geklappt wie erhofft? Auf unserem Antwortenforum findest du Hilfe bei der Fehlersuche.
Rückgängig: Ich habe diese Anleitung nicht absolviert.
175 weitere Nutzer:innen haben diese Anleitung absolviert.
Besonderer Dank geht an diese Übersetzer:innen:
100%


Diese Übersetzer:innen helfen uns, die Welt zu reparieren! Wie kann ich mithelfen?
Hier starten ›


37 Kommentare
Nice guide. I could be wrong but for the first time in a while, changing a display on an Apple phone looks like it’s not anymore difficult than previous models.
John K
the-screen-savers.com
If you remove the screen but then apply the same screen back on the phone, will True Tone still be disabled?
@onslivion Nope! It'll continue to work fine, so long as you didn’t damage anything.
Hi i broke the Flex cable of the Part.
what i can do now.
is their some Parts for sale?
I just switched the screens from 2 phones and both are unresponsive, if put them back to its original logic board the work again, any idea why they dont work? both are original.
Why is True Tone disabled afterwards? Even with an Original Screen how is that possible?
That's normal. There's a chip in the screen that has info that is specific to the original logic board so unless you have a special machine to read/write to that chip, truetone will not work.
This was perfect. It definitely helped me replace the screen on a friend IPhone XS Max!
Every authoritative source (such as Apple Support, Wikipedia) that I read about the iPhone XS Max display states that it has an OLED display - not an AMOLED display, and not an LCD display (such as on the XR model). Yet the parts associated with this guide are LCD (website quirk?) and the written text for XS Max mention AMOLED. Isn’t this important to get right when replacing? The model I have is A1921.
Hi Mark,
The iPhone XS Max uses an AMOLED display. Active Matrix OLED (AMOLED) is a subcategory of the general OLED tech—AMOLED displays contain circuitry which allows them to switch each OLED pixel on or off. Compared to Passive Matrix OLED, AMOLED displays have a higher refresh rate and are more energy efficient . However AMOLED displays are complex, difficult to source, and very expensive to replace (think $200-400 for the part!) Hardware manufacturers sought to resolve this problem by producing LCD replacement screens. These screens are made to be completely compatible with the iPhone XS Max, but are significantly cheaper to replace. They do look slightly different compared to the original screen. Check this link out for a more in-depth review of the differences.
Where is the INSTALL GUIDE this is just removal? And don’t tell me it’s the reverse. I have a small gasket that’s not mentioned in this and it doesn’t explain how to remove the main old gasket or install the new gasket
Where is the installation guide? This is just a removal guide. Don’t tell me that it’s the opposite of removal to install because I have a small gasket that is not mentioned in the YouTube video or on this site in my package
I would like to echo this comment. It is extremely disappointing to see a guide this comprehensive and detailed stop short of reassembly. Especially because some parts need to be transferred from the original display to the replacement one.
Completed the Repair with the more Expensive alternative - the OLED display.
The guide is very comprehensive and covered all the points including looking out for bits left behind!
- I noticed a tiny piece of conductive foam on the old display which i moved to the new one.
The OLED display is top quality, but a little darker due to losing the “True Tone” no doubt.
The Adhesive kit is very good, but separating the two films was a little difficult and messed up the alignment slightly, however I managed to recover!
One more addition I had to make after undertaking this repair.
I had noted that after swapping the display the earpiece was very quiet. I thought that I had missed a gasket, misaligned the earpiece speaker or not plugged in the leads correctly.
Nope. Much simpler than that. CLEAN THE EAR PIECE CUTOUT! *Eeeewwww* After putting up with this for about 4 weeks, I happened to get out the Cotton Buds. A quick wipe revealed someone elses EAR GUNK was clogging up the ear piece cutout !
Disgusted, I got out the Isopropyl and cleaned it (carefully) about 10 times, the audio is now crystal clear.
@ifixit - Please ensure your “Refurbished displays” have a clean earhole. It was pretty gross that it was clogged to the point that I could not HEAR!
Great guide, completely worked for me!
This guide worked perfectly for my iPhone Max XS screen replacement. This is only my second “project” from iFixit (the first was a replacement display screen for my Canon 6D) and both times, miraculously, everything worked. I’m really not sure if it is my skills or the details in the guides (it’s definitely the latter and a tiny bit of the former). The replacement parts are reasonably priced and the toolkits are VERY GOOD in quality.
For this iPhone screen fix, I used a previously purchased toolkit and “borrowed” suction handles (yes, definitely makes a difference and better than the tape alternative—I tried both) from a bathroom rack.
It took me about 3 hours to get this done. I rushed on step one and stripped the first pentalobe screw. Luckily, one stripped pentalobe screw is still OK. I managed to pull it apart by wiggling the screen around (without too much force). I used a hair dryer to heat the frame/adhesive.
Follow the instructions closely and don’t lose the tiny screws. A magnetic screwdriver helped.
I have accidentally damaged flood illuminator will it affect the face id also or if I just replace the Earpiece Speaker and Sensor Assembly it will get fixed.
Step 1: Remove pentalobe screws…is very careful to NOT STRIP THE SCREW…tools provided/metal is not hard enough and is unable to take out the screw in Step 1 and am now currently going out to buy better pentalobe screw driver. THANKS. Why don’t you just provide better tools and increase the cost……………………………………………
for me at least once you get use to repairing this it can take around 30 min too an hour but i also repair all devices even phones for living so i do have experience with repairing these
Changing just the glass screen on my iphone xs max and the black part behind the screen is cracked what do I do ?
Executed this repair almost flawlessly. The FaceID flex cable is very fragile and glued down very well. I advise you be careful when removing is as not much pressure at all can cause it to break (Speaking from experience). Other than that the guide was very easy to follow.
This was an incredible guide! With the video, it was the perfect guide and I managed to complete the fix in less than 2 hours.
Can water damaged iphone be restored by replacing screen?
Hey Team iFixit, vielen dank für diese ausführliche Anleitung. Einfach richtig lesen dann macht man auch keine Fehler haha
Last month I ordered and received a new screen/digitizer for my iPhone XS max. Installation was easy and the phone was back on-line in half ah hour. Not for long unfortunately. A week after the replacement, the digitizer became irresponsive. I had to let the battery die and subsequently reboot my phone.
It fixed the problem for one day. Then the digitizer froze up again. I decided I was going to open the phone to check the ribbon cables for faulty connection. Alas, when opening the iPhone,one of the cables between the screen and the main board tore.
I resorted to re-installing my old cracked screen that now has been working flawlessly for one week.
Is there a fix for the broken ribbon cable, or can I return the screen for credit or repair?
Hey, I'm thinking on fixing up my Iphone Xsmax screen will the Face Id still function after replacement
Hello oguntayo tosin, as mentioned in the introduction, for Face ID to work you have to transfer the earpiece speaker + sensor assembly as they are paired to your individual iPhone.
I cant put the display on the iPhone and I dont know why.It just doesn't fit right and rises about 2mm higher than it should.What can I do?
Hello Robin, did you already go through the recommended troubleshooting steps? It sounds like it could be a bracket or elements of the earpiece speaker and front sensor assembly that are not seated correctly or that there is some issue with the clips holding the display. You could also try checking whether your replacement part deviates from the original screen as discussed here. Hope this helps!
If purchasing the OLED option from here, would I be able to use a programmer to enable back True Tone?
There's a couple extra chips near the bottom of the original screen that aren't on the replacement. Are they surplus to requirement?
after re assembly the screen is loose I attempted to open it and re sitting but still loose!!! why???
PLEASE HELP! I have an IPhone XS Max with a cracked screen. It has loads of irreplaceable information on it. I can’t afford to buy a screen right now but I have a brand new screen for a IPhone 6 Plus, I don’t want to install it onto the XS but I was wondering if it could be hooked up long enough to type the passcode and trust a computer so I can download the phone’s contents? Pretty much I just need to know if the cables for the display are compatible.
This is the only thing I could think of that might possibly work and not cost me a bunch of money. I was recently attacked, robbed and assaulted. The IPhone XS Max was recording during the assault but couldn’t back up because I didn’t have any Icloud storage available. If anyone has any other suggestions please help me out. P.s. I have went to the police and they couldn’t care less, I live in a small town and my abuser is a prominent member of the community so I am on my own.