Einleitung
Das Motherboard in deinem iPod kontrolliert alles im iPod.
Was du brauchst
-
-
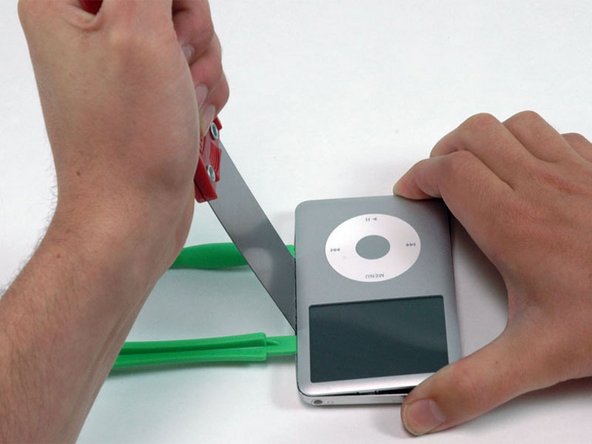
Stecke ein Plastiköffnungswerkzeug in die Naht zwischen Vorder- und Rückseite des iPods.
right here, you should insert a picture of the little clips on the rails inside the back of the ipod, so that we can visualise what we're trying to undo, & get a better idea of which way to bend, which way NOT to bend the tools.
Good point! There is such a picture showing the location of at least four (4) clips on each side of the case here:
https://d3nevzfk7ii3be.cloudfront.net/ig...
in the Step 4 of the “iPod Classic Teardown”: iPod Classic Teardown
As mentioned below by Kevin M there are 3 more (1 on top and 2 on the bottom sides).
LDS -
Actually it’s a wayyyyyyy easier using the iFlash opening tool and following the pdf of this guy (youtube link)
Actually it’s wayyyyyy easier using this tool as mentioned by this awesome guy on his video.
That video is excellent. He has a PDF you print which is the same size as the iPod so you know exactly where the 11 clips are (1 on top, 2 on bottom, and 4 more along each side).
Appreciated the earlier comment about using guitar picks. It is very easy to open the iPod with guitar picks. It still requires patience sometimes, but no noticeable damage to the iPod. Went to the local music store, they stocked Fender picks. Fender "Thin" work best for me for starters, but sometimes Fender "Medium" are needed. (Go to your local music store-- very cheap!) I have opened (and repaired successfully!) four different iPods just using guitar picks.
-
-
-
Schiebe ein anderes Plastiköffnungswerkzeug in die Naht zwischen der Vorder- und Rückseite des iPods und lasse zwischen den beiden Werkzeugen mindestens 3,8 cm Abstand.
-
-
-
In einem Winkel vorsichtig ein Spachtel etwa 3,1 mm in die Naht zwischen den beiden Öffnungswerkzeugen einsetzen.
-
Sobald der Spachtel die Lippe der Rückwand hinüber ist, schwenkst du den Spachtel senkrecht und drückst ihn vorsichtig (aber fest) in die Lücke zwischen den Öffnungswerkzeugen, indem du ihn etwas hin und her bewegst.
I tried this on the first iPod I was trying to fix. This method really messes up the sides of the iPod. Go back and read earlier comments about using guitar picks or other tools!
I tried this on the first iPod I was trying to fix. This method really messes up the sides of the iPod. Go back and read earlier comments about using guitar picks or other tools!
-
-
-
Drücke mit den Fingern auf die Rückwand hinter dem Spachtel, um die Biegung zu minimieren. Biege den Spachtel wie in der Abbildung gezeigt langsam, um sicherzustellen, dass die meisten metallenen Laschen auf dieser Seite des iPods gelöst sind.
I tried this on the first iPod I was trying to fix. This method really messes up the sides of the iPod. Go back and read earlier comments about using guitar picks or other tools!
-
-
-
Entferne den Spachtel vom iPod und setze es mit der gleichen "Wackel-Methode" wie zuvor näher an die Ecke des iPods ein.
-
-
-
Setze in der Nähe der Kopfhörerbuchse ein Kunststofföffnungswerkzeug in die Naht zwischen Vorder- und Rückseite des iPods ein.
-
-
-
Führe nahe der Mitte des Displays vorsichtig einen Metallspudger in die Lücke ein, die durch das Kunststofföffnungswerkzeug erzeugt wurde.
-
Löse mit dem Metallspudger den einzelnen Clip oben am iPod.
-
-
-
Setze nahe der anderen oberen Ecke den Plastiköffner in die Naht zwischen Vorder- und Rückteil des iPod.
-
-
-
Setze auch an der anderen Seite einen Plastiköffner in die Naht zwischen Vorder- und Rückteil
-
-
-
Entferne den Plastiköffner von der oberen Ecke und setze ihn in den Spalt zwischen Vorder- und Rückteil. Lasse einen Abstand von etwa 3,8 cm zwischen den beiden Werkzeugen ( so wie an der anderen Seite auch schon).
-
-
-
Setze unter einem Winkel sorgfältig einen Spachtel ungefähr 3,1 mm tief in den Spalt zwischen den beiden Plastiköffnern.
-
Der Spachtel hat auch hier wieder die Verzahnung mit dem Rückteil gelöst. Hebe ihn bis er senkrecht steht und zwinge ihn dann sorgfältig (aber kräftig) in den Spalt zwischen den beiden Plastiköffnern.
-
Drücke mit den Fingern auf die Rückseite des iPod hinter dem Spachtel, um sie möglichst wenig zu verbiegen. Bewege den Spachtel leicht und versicherte dich, dass die meisten der Metallklammern an dieser Seite geöffnet sind.
-
-
-
Setze vorsichtig einen Metallspatel in die Nähe der widerspenstigen Klammer ein.
-
-
-
-
Fahre fort das Front Panel mit dem Spatel hochzuheben bis sich die Metallklammer löst.
-
-
-
Fasse die Front Panel Einheit mit einer Hand und das Rückteil mit der anderen.
-
Löse vorsichtig (VORSICHTIG) die restlichen Klammern am Rückteil, indem du die Oberkante beider Gehäusehälften voneinander weg ziehst. Verstehe dabei die Unterkante als Achse eines Scharniers. Achte sehr darauf dass Flachbandkabel die beiden Hälften verbinden.
-
-
-
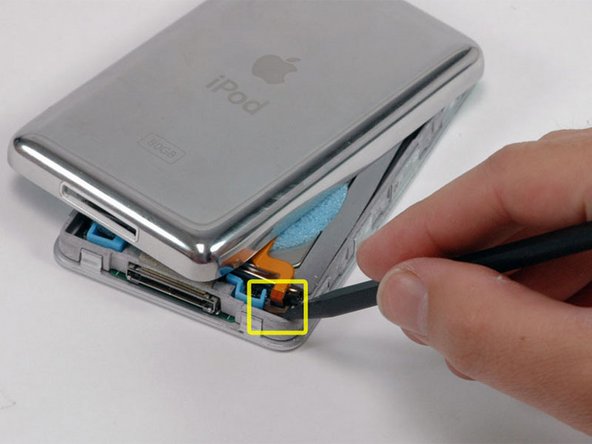
Schiebe den Verbinder, der das orangene Akkukabel befestigt, mit einem Spudger weg. Du musst nur etwa 2 mm hochheben, um das Kabel zu befreien.
-
Schiebe das orangene Akkukabel aus seinem Verbinder.
If the small battery black/white connector pumps out of the ipod when you are trying to unplug the cable...REMEMBER the "U" black shape is meant to be just in the same direction as the blue plastic "U" beside it. If you plug it back in the wrong way it will display "Charging please wait..." forever!.
:)
How did you get the black battery piece to stay in after it popped out?
I knocked this little bit out too! Any tips to get it back in? Soldering?
This step is what ultimately destroyed my iPod. A caution to be very careful would be good.
I got the whole black white thing disconnected from the pins. After a lot of struggle I was able to get it back in, but I couldn’t get the black locking part to go up on its own. after many tries and some tries to get it in when the black thing is closed, i tore out the pins that were connected to the panel. can’t get it back on so it isn’t connected to the battery…
Now i have a perfect iPod with a new harddrive but I can’t use it.
Please add a red caution sentence because I’m pretty sure that if i had known what I had to do I would’ve been more careful and I would now have a functioning iPod.
Nonetheless, great guide! without this I wouldn’t even have tried and the harddisk came from another broken down iPod classic so it’s not that I lost money.
I got the whole battery clamp connector (black and white) all out too… So angry about it! I thought that the white part should be disconnected too, like former iPod models. Be careful, you only have to release the BLACK locking bar! One more photo with a zoom on the battery connector could have been useful… Great guide anyway :-)!
battery connector fix
Hello! Trying to identify the problem on my Ipod. I think I'm not qualified to open it and do the fixing. Do you know a shop or someone in Paris that would try it? Apple says they are not qualified anymore.
Thanks in advance!
OK, you have to be really careful with this step! If you pry too hard, the little plastic clamp that holds the cable will come up too far and break, and then you are ****ed. It only needs to be raised millimeter or two, but at first, it doesn't move at aIl, so it is easy to pry upwards too hard. I have found that using angled tweezers while VERY GENTLY prying upwards on both sides works best. But still, BE VERY CAREFUL AND GENTLE! It's also easy not to even know that it is up all the way! So every now and then try gently lifting the ribbon cable to see if it is already released.
-
-
-
Lege das Rückteil neben den iPod, spanne dabei aber nicht das orangene Kabel zur Kopfhörerbuchse.
-
-
-
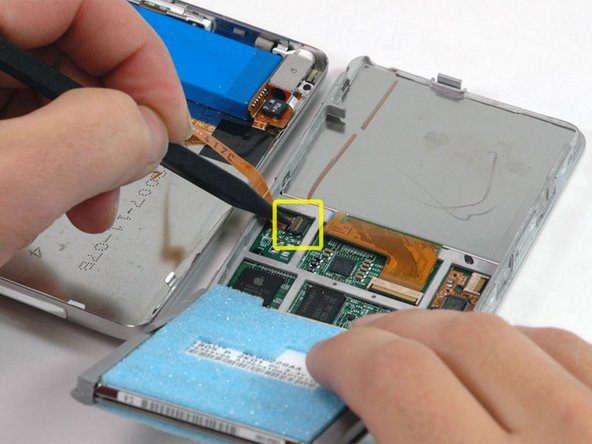
Hebe die Festplatte mit einer Hand hoch, so dass du an das Flachbandkabel zur Kopfhörerbuchse herankommst.
-
Klappe den Plastikhalter der das Kopfhörerkabel festhält mit einem Spudger auf. Er wird etwa 90° kippen und dabei das Kabel freigeben.
-
Ziehe das orangene Kopfhörerkabel aus seinem Sockel.
-
Nun ist das Rückteil vom iPod frei.
-
-
-
Du musst jetzt eventuelle Schäden reparieren, die durch das Entfernen der internen Komponenten des iPod Classic entstanden sind! Sicher ist mindestens eine der Metallklammern am Rückteil nach oben verbogen. Sie müssen alle wieder nach unten zeigen, bevor du das Rückteil wieder einbauen kannst.
-
-
-
Drücke die Klammer mit der breiten Klinge des Spatels nach unten, achte darauf nicht die dünne Metallschiene von der Rückseite zu reißen.
-
-
-
Lege das Rückteil mit der Seitenkanten auf eine ebene harte Oberfläche. Drücke kräftig aber sorgfältig nach unten und bringe so wieder die Seite mit der Rille in Form.
-
-
-
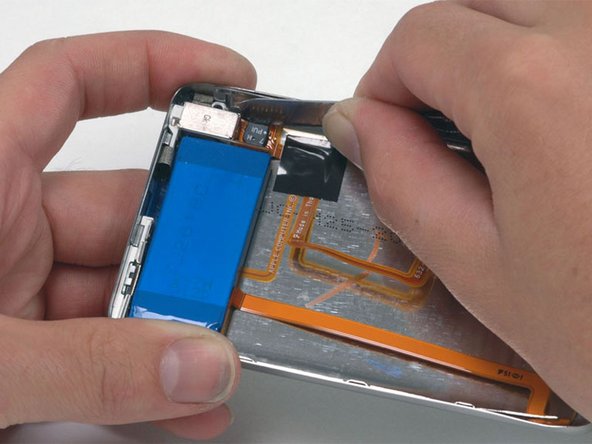
Drehe die Festplatte aus dem Rahmen und lege sie so, dass der Verbinder nach oben zeigt.
-
Kippe den Plastikhalter, der das Flachbandkabel zur Festplatte befestigt, mit einem Spudger hoch. Er wird sich um 90° drehen und dann das Kabel freigeben.
To be clear, the plastic tab to be flipped up is the SMALL BLACK piece shown vertically in the photo above. The spudger is pointing directly to it. The tab flips TOWARDS the ribbon. While the picture is correct, this wasn’t obvious to me.
Thanks for the feedback! I will adjust the wording to clarify this.
-
-
-
Ziehe das orangene Flachbandkabel zur Festplatte aus seinem Sockel.
-
Wenn du die Festplatte austauschst und die neue Platte ohne Gummihalterung und Schaumstoffpolsterung geliefert wurde, musst du diese von der alten auf die neue Festplatte übertragen.
-
-
-
Entferne die drei Kreuzschlitzschrauben, mit denen das Frontpanel am Metallrahmen befestigt ist.
See here, it’s a PH00.
-
-
-
Drehe den iPod um 180 Grad und entferne die drei Kreuzschlitzschrauben, mit denen das Frontpanel von der anderen Seite her am Metallrahmen befestigt ist.
-
-
-
Arbeite dich vorsichtig um den Rand des iPods herum und trenne das Frontpanel vom grauen Metallrahmen ab.
I would suggest prying with a tool on one of the lips that holds the front place on, but do NOT pry on one near the LCD screen or you may damage the screen. Also, don't forget there is an extra small latch on the top of the LCD that has to be loosened too.
I pressed gently on the click wheel on the play botton side first to help unlock the glue. Keep away from the screen side best you can.
After reading all your warnings and how risky it is to damage my IPOD I don’t dare to replace the display which got out of light and I no longer see the text. I planned to send for a new but it seems like the possibility to succeed without damaging the IPOD is less than succeeding. It is really a pity since I love it snd have so much good music saved to it. I usually fix my damaged apparatus but this seems more orf ess impossible after reading the text. I am really sad/devastated!! :
-
-
-
Hebe die komplette Rahmenbaugruppe (inklusive des daran angebrachten Bildschirms, dem Logic Board und dem Klickrad) vom Frontpanel weg.
-
-
-
Klappe mit einem Spudger die Kunststofflasche hoch, mit der das orangene Display-Flachbandkabel befestigt ist. Die Lasche dreht sich um 90 Grad zum Display hin und gibt das Displaykabel frei.
-
-
-
Hebe die Rahmenbaugruppe hoch und schiebe das Display und die Metallrückplatte des LCD aus der Rahmenbaugruppe heraus.
-
-
-
Entferne die beiden Kreuzschlitzschrauben, mit denen das Logic Board am Rahmen befestigt ist.
-
-
-
Hole das Klickrad unter dem Logic Board hervor, so dass der Aufdruck darauf sichtbar wird.
-
Klappe mit einem Spudger die Kunststofflasche hoch, welche das orangene Flachbandkabel des Klickrads festhält. Die Lasche dreht sich um 90 Grad und gibt das Flachbandkabel frei.
-
-
-
Hebe mit einem Spudger das Kabel zum Klickrad vom Logic Board weg. Sei vorsichtig und verbiege das Kabel nicht zu stark, die Elektronik am Kabel könnte beschädigt werden.
-
-
-
Schiebe das Kabel des Klickrads aus seinem Anschluss heraus.
-
Hebe die Klickradeinheit vom Logic Board weg.
-
-
-
Klappe mit einem Spudger die Kunststofflasche hoch, mit der das orangene Flachbandkabel zur Festplatte befestigt ist. Die Lasche dreht sich um 90 Grad und gibt das Flachbandkabel frei.
-
-
-
Schiebe das orangene Flachbandkabel der Festplatte aus seinem Anschluss heraus. Das Kabel kann mit dem Logic Board verklebt sein. Wenn sich das Kabel nicht gleich ablösen lässt, dann ziehe das Kabel vorsichtig hoch, um die Klebeverbindung zu lösen.
-
-
-
Das Logic Board bleibt übrig.
-


Bevor du das Gehäuse zuschnappen lässt, solltest du erst alle Funktionen überprüfen.
Um dein Gerät wieder zusammenzusetzen, folge den Schritten in umgekehrter Reihenfolge.
Bevor du das Gehäuse zuschnappen lässt, solltest du erst alle Funktionen überprüfen.
Um dein Gerät wieder zusammenzusetzen, folge den Schritten in umgekehrter Reihenfolge.
Rückgängig: Ich habe diese Anleitung nicht absolviert.
83 weitere Nutzer:innen haben diese Anleitung absolviert.
Besonderer Dank geht an diese Übersetzer:innen:
100%

Diese Übersetzer:innen helfen uns, die Welt zu reparieren! Wie kann ich mithelfen?
Hier starten ›

10 Kommentare
I was able to open my 160 GB skinny classic with out too much trouble. I used a utility knife blade to get the initial toehold between the back and front panels, once that was accomplished, I used the thin metal leaves of a disassembled automotive feeler gauge to release the latches and keep it open while I worked, better and safer than xacto knives.
So I followed this guide (and a bunch of others) for tearing down and replacing parts of my iPod. I finished everything, and I'm sure I got the right parts, but now it won't turn on. It says "The iPod software update server could not be contacted. The server does not support this version of iTunes." While I understand that iFixIt is not an Apple company, I feel like my iPod should be fixed? I'm pretty sure I did everything correctly.... Why won't it turn on?
I often do things like this at my work but this day all goes wrong. With Step 7 at this “How to”, I damaged my Display and with Step 18 I damaged the Power suply connector. Nice day!!! &&^&
Are the boards tied to the original harddrive? I had a customer come in that needed the charge port replaced so I soldered on a new one. It won’t charge (Bounces between 50 and 70ma), and I tried replacing the charge IC to no avail. We did have an old iPod lying around so I decided to take the logic board from that and swap it. The problem is that the iPod is asking to be connected to iTunes to restore. The customer is trying to save their music as it’s quite extensive and not backed up.
Any idea what I can do here? If I had a boardview/schematic for this thing maybe I could try and troubleshoot the charge circuit but I don’t and have no real knowledge on these boards. Thanks guys!
I’m pretty sure they are not board tied, however every iPod has a different version of the OS and it’s going to work only on motherboards of the same generation. So if you take the hard drive from a 5th gen and install it in a 7th gen it’s going to tell you to restore it, but if you take the hard drive from a 5th gen and install it in another 5th it should boot up normal. I hope that was helpful.
Vielen Dank für diese sehr gute Anleitung!
Damit, mit starken Nerven und ruhiger Hand, gelingt es!
Ich bin Glücklich!
Lasst uns die Welt reparieren!
Thank you for these very good instructions!
With that, with strong nerves and a steady hand, it works!
I am happy!
Let's fix the world!
So, I followed these steps, but when testing the iPod following the logic board change, the screen stays white it the device is not recognized. All connections are correct, but the computer does not recognize the device, and also, I am unable to reset or place the device into disk mode.
What could be the issue?
I replaced my logic board using this guide, but now nothing shows in the screen. any idea what i did wrong or missed?
If you're meticulous, the job can perfectly be done, without any of the recommended tools. I hadn't the time to order them, so I opened my iPod with the large blade of my Victorinox swiss army knife. By just following the instruction I succeeded in releasing all of the metal tabs all around the iPod, and didn't damage any of them. You can clearly hear them "declipsing". I think the blade of the Victorinox is thiner than the putty knife, the only thing you have to take care of, is not to cut the black or silver painting of the front of the case, but if you are used to cut with a knife, you should succeed. Just be aware that it is however a difficult job !
jcfsystems - Antwort
Thank you for these instructions - my dead iPod classic (that died whilst attached to an ipod dock during a heavy thunderstorm which took out the dock too) is now working again. Opening the case took me 40 minutes and 7 plastic case openers not to mention very sore hands but the rest of the process worked fine. thanks again
Stuart Hutchesson - Antwort
Opened it up with MANY super thin nylon guitar picks in less than a minute starting from the two tabs on the bottom - I used the putty knife in my shop for wood filler and patching walls :)
cmguitar - Antwort
Appreciated the earlier comment about using guitar picks. It is waaaaaay easier to open the iPod with guitar picks. It still requires patience sometimes, but no noticeable damage to the iPod. Went to the local music store, they stocked Fender picks. Fender "Thin" work best for me for starters, but sometimes Fender "Medium" are needed. (Go to your local music store-- very cheap!) I have opened (and repaired successfully!) four different iPods just using guitar picks.
Novice iPod Repair Guy - Antwort