Einleitung
Hält der Akku nicht mehr? Tausche ihn aus. (Erfordert Kenntnisse im Löten).
Was du brauchst
-
-
Damit die Darstellung klarer wird, sind die beiden Klammern nahe an der Kopfkörperbuchse rot markiert.
i don't know what genoration my ipod is...but it looks exactly like that on and it doesnt have the clips......what do i do?
https://www.ifixit.com/info/ID-your-iPod
Try that first to find what you have
Given the inherited risks of damaging the components, it would also be important to mention that the area where there are no clips is where the flat cable to the screen resides. So NO deep sticking tools in that area. It’s attractive to do because at that right side the back panel is intruded the easiest way - but dont do it.
-
-
-
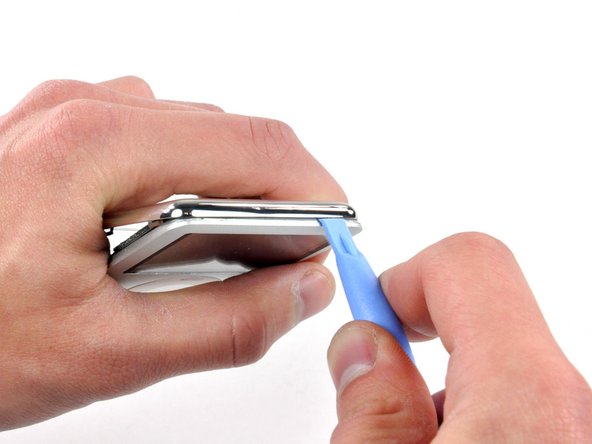
Setze das große iPod-Öffnungswerkzeug in die Naht zwischen Vorder- und Rückseite des iPods über den Dock-Anschluss ein. Die Kante des Werkzeugs muss zur Rückseite hin zeigen, um Schäden an der Vorderseite aus eloxierten Aluminium zu vermeiden.
-
-
-
Setze ein kleines iPod-Öffnungswerkzeug in die Naht an der Seite mit der Kopfhörerbuchse ein, wobei die Kante wieder zur Rückseite hin zeigen muss.
-
Vergrößere den vorhandenen kleinen Spalt durch Wackeln/Drücken des Öffnungswerkzeugs nahe bei den beiden Klammern der Rückseite. Drücke die Klammern zur Mitte des Nanos hin, bis sie sich lösen.
the tool i bought because you suggested it to me got inevitably broken like it was butter made, thanks
This is virtually impossible! I have already cut myself when the stupid tool slipped trying to push in on the clips. Why on earth would anyone design something to impossible to open when they know the battery would need to be replaced at some point?
Forget the iFixit plastic tools. You need to use steel on steel. I used a heavy duty engravers knife I happened to have, to get it started. Then, a fine chisel and jeweler’s screwdrivers and LOTS of force to pry it off. I messed up the aluminum front case a bit, but I cleaned that up with sandpaper. The back case was bent a bit, but I straightened that, and after replacing the battery I fastened it back on with black electricians tape. It looks quite well, and good enough for me. I will cancel my order for a replacement back. Joe M 2/3/2018
i never needed the large tool i just needed i little flat head screwdriver
-
-
-
Wiederhole das im vorigen Schritt beschriebene Verfahren zum Öffnen der drei Klammern an der Seite mit dem "Hold"-Schalter.
-
-
-
Setze ein iPod-Öffnungswerkzeug in die Lücke an der linken oberen Ecke des iPods ein und löse die drei Klammern an der Oberkante der Rückseite.
-
Wenn du sicher bist, dass alle Klammern gelöst sind, kannst du die beiden Hälften des iPods voneinander trennen.
-
Die Rückseite des iPods ist damit frei.
-
-
-
Wenn die Rückseite entfernt ist, sieht dein iPod Nano so aus.
At this stage an alternative (and more simple) procedure is to cut the battery wires between the battery and the logic board (one at a time to avoid shorts), remove the old battery, fit the new battery, strip and prepare the ends of the old cut wires, then solder the new battery to these wires again being careful not to short connections. Then sleeve or encapsulate these soldered joints (wax or blu tack will do). This makes it an easier and quicker job.
Sounds a much better idea to me.
I was just given some old parts in a box. Scored a decent router, laptop power supply and 2 ipods. Unfortunately, the newer one has half it's power connector snapped off and the other (4GB/A1236), I successfully reset via iTunes but it doesn't hold a charge! %#*@. I might just scout for an old speaker dock at a garage sale or such and put it in the bathroom or something.
-
-
-
Entferne folgende sechs Schrauben:
-
Eine 1,8 mm Kreuzschlitzschraube
-
Drei 1,9 mm Kreuzschlitzschrauben
-
Eine 2,4 mm Kreuzschlitzschraube
-
Eine 2,6 mm Kreuzschlitzschraube
If your headphone jack isn't working, note that it is possible to replace just the headphone jack here:
There are just 4 soldering points that need to be loosened, and then you can put on the new one.
I was able to remove the back cover using two think plastic guitar picks and my red cross donor card
I read some steps further back and it was recommended to NOT remove all the screws and the boards indicated in the following steps, but to go directly to replace the battery. It is no more difficult to go directly to cut the battery leads, or unsolder them. I tried to splice the new battery wires to the cut leads from the board, but it was hard working with the fine wire. I ended up clearing the top of the three battery solder-through holes, but I did not clear the holes. I soldered the battery leads directly to the top of the small round solder dots…first the white, then the black, and finally the red. I fastened the battery in-place with a piece of two-sided carpet tape. I straightened up the back and taped into place with black electricians tape. It is very delicate work, and not for a beginner…I repair family jewelry, which is valuable practice. Joe M 2/3/2018
-
-
-
-
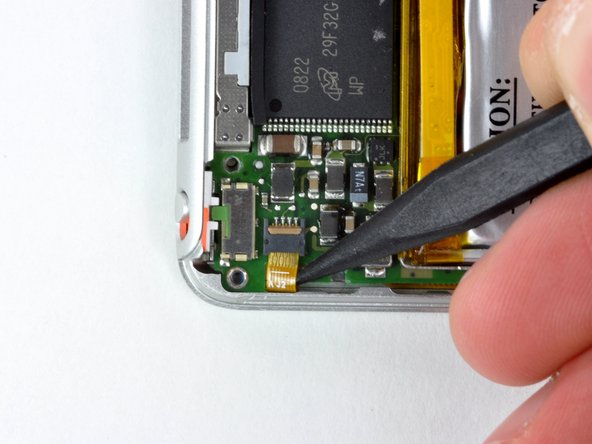
Schiebe das Flachbandkabel zum Klickrad mit der Spudgerspitze aus dem Anschluss heraus.
-
-
-
Hebe die Logic-Board-Einheit an der Seite mit dem Klickrad-Anschluss hoch (das Kabel hast du gerade entfernt). Drehe die Logic-Board-Einheit um das Display-Flachbandkabel herum und lege es am vorderen Gehäuseteil ab.
When reassembling the logic board into the case, watch out for the tiny nose of the audio jack that's facing towards the center of the device. This nose has to be inserted first, then the rest of the audio jack followed by the logic board itself.
-
-
-
Bevor du das Akkukabel anlöten kannst, musst du etwas schwarze Gummiklebemasse entfernen, mit der sie am Logic Board festgeklebt sind.
-
-
-
Schiebe die Spudgerspitze unter den schwarzen Gummikleber und schiebe sie zum Akku hin, so dass sie sich vom Logic Board ablöst.
-
Entferne die Masse zuerst von einer der äußeren Leitungen, dann aus den Zwischenräumen zwischen den beiden Leitungen. Schiebe dann den Spudger an den Rückseiten der Leitungen entlang, um die Masse ganz von den Leitungen/dem Logic Board zu entfernen.
It’s actually much easier to remove the rubber adhesive if the battery is taken out and laid upside down.
-
-
-
Fasse die Leitung mit einer Pinzette an der weißen Isolierung an. Erwärme dann das Ende der weißen Akkuleitung mit der Lötspitze und ziehe die Leitung gleichzeitig heraus.
When you clamp the logic board in a small vice for electronic work, the battery hangs down and with the soldering iron in one hand it’s easy to pull the leads with the tweezers. For anyone with soldering experience this soldering is actually easy to do as long as you have the right soldering tool: sharp point, low wattage.
-
-
-
Entlöte die restlichen Leitungen mit der im vorigen Schritt beschriebenen Methode.
-
-
-
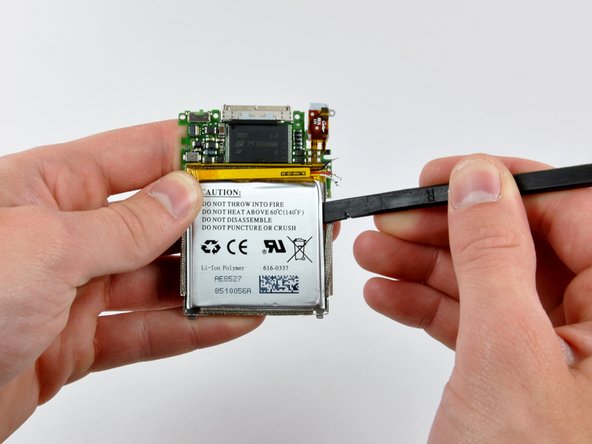
Heble den Akku mit dem Spudger aus der Klebeverbindung zur Akkuabschirmung.
-
Beginne mit dem Abhebeln in der oberen rechten Ecke des Akkus und arbeite dich dann ganz um den Akku herum, bis er soweit angehoben ist, dass du ihn mit den Fingern fassen kannst.
-
Entferne den Akku von der Abschirmung.
-
-
-
Um die Löcher zu öffnen, kannst du eine Heftklammer aufbiegen und auf die Lötstelle drücken, während du sie gleichzeitig von der anderen Seite des Logic Boards erwärmst.
In the shopping list of this page is the ‘desoldering braid’ which, if done quickly, is the easy way of taking the solder out.
-
-
-
Lege den neuen Akku in den metallenen Akkuhalter und drücke ihn im Kleber fest.
-
-
-
Setze die abisolierten Kabelenden mit einer Pinzette in die zugehörigen Löcher ein.
-
Setze das schwarze Kabel in das Loch ganz rechts ein.
-
Setze das rote Kabel in das mittlere Loch ein.
-
Setze das weiße Kabel in das Loch ganz links ein.
-
-
-
Setze die Lötspitze kurz auf die Lötstelle und drücke das Lötzinn darauf (es schmilzt dann) und entferne dann schnell die Spitze und das Lötzinn von der Lötstelle. Das Lötzinn fließt dann um den neuen Akkuanschluss und verbindet die Lötstelle und das Kabel.
-
Löte die anderen zwei Leitungen in gleicher Weise fest, achte dabei darauf, dass du keine Lötbrücke zwischen ihnen herstellst.
-


Um dein Gerät wieder zusammenbauen, folge den Schritten in umgekehrter Reihenfolge.
Um dein Gerät wieder zusammenbauen, folge den Schritten in umgekehrter Reihenfolge.
Rückgängig: Ich habe diese Anleitung nicht absolviert.
117 weitere Nutzer:innen haben diese Anleitung absolviert.
Besonderer Dank geht an diese Übersetzer:innen:
100%

Diese Übersetzer:innen helfen uns, die Welt zu reparieren! Wie kann ich mithelfen?
Hier starten ›

18 Kommentare
I have one suggestion about replacing the back cover after you are all done (If you did not purchase a new replacement cover). I noticed that in the process of removing the back cover, the metal clips get bent up. This causes the cover to be very loose when you replace it (this is the "considerable damage" I presume the article talks about. In order to get a tight fit, you must press down the clips very gently. One of the tack welds came off of mine, and I had to remove one of the metal tabs because it was useless, so be careful. Anyway, keep this in mind and you won't have to buy a new back cover. Thanks for the article, it really helped!
This is NO EASY TASK. Much HARDER than the steps shown here. There is no way in !@#$ the plastic tool will separate the case...but I am sure someone will say there is.
Not I though.
I will be purchasing the back case now since it is obvious to me after receiving the replacement battery in the mail that I am going to butcher this thing up and the clips.
Peace.
I totally agree, the plastic tool broke the tangs right away. I had to use a small flat blade jewelers screwdriver to pry around. And yes, I bought a new cover
Bud -
I successfully opened the ipod with a walmart brand set that contained a large and small plastic tool. You gotta work it.
quick tip for opening the case, I found guitar picks worked nicely alongside a metal butter knife to pry the clips open. Got the case open within 5 minutes. Would definitely recommend getting a replacement back plate as mine has become slightly bent from the removal.
There is no *(#$ing way the flimsy plastic tools provided could open the tightly assembled iPod case!!!! Don't bother to buy them as they are not sharp enough to separate the case and one even broke after being inserted between the two case halves, leaving its broken pieces between the two case halves. I had to use Xacto knives, utility knives, and jewelers screwdrivers to work the case apart and release the clips. (The instructions here were a GREAT HELP!) Have not yet bought a new cover as first I will try straightening out the old cover and its clips. Or that failing, I am hoping I can epoxy the whole thing back together and this will be the last battery replacement.
Removing the back is by far the hardest part of this process.
After this stage an alternative (and more simple) procedure is to cut the battery wires between the battery and the logic board (one at a time to avoid shorts), remove the old battery, fit the new battery, strip and prepare the ends of the old cut wires, then solder the new battery to these wires again being careful not to short connections. Then sleeve or encapsulate these soldered joints ( wax or blu tack will do).
This makes it an easier and quicker job.
NOTE: Don’t drink half a pot of coffee and two RedBulls before starting this!!! I had the leads for the battery in-and-out of the holes 22 times in three seconds!! Wow!! Other than my stupidity….I was able to complete this in about 45 minutes.
I’m not at all good with repairing technology. I have two iPod 3 nanos that simply need new batteries. Could anyone repair them for a good price, or buy them if they’d like?
I was thinking i could never do this but I did !!! You will HAVE to order a new back it gets bent up while opening. i had to use a razor blade to get in between the front and back THEN i used a plastic wedge to get it open it. Its definitely possible to do. just have to take your time and RELAX..
Using a thin stainless spudger like the iSesamo press straight down at clip points to release them first before using the plastic spudgers to pry case off.
Excellent instructions. Best I have seen for iPod or iPhone. Would agree you must have some experience soldering small electrical components. I would recommend you purchase a de-soldering bulb instead of using a staple to clear holes of the battery leads on the circuit board.
I gotta say, yes, this was pretty darn difficult. The plastic tools were useful, but truthfully, I was able to open the back better with the 'flat-blade' screwdriver than anything wide. The plastic tool was good to open the seam at the charge port.
I think my iPod must be a refurb 'cause the 'black rubbery adhesive' around the battery wires was already mostly gone. So this must be it's 3rd battery!
If you take it very slow, take deep breaths occasionally, it'll work.
I managed to do this. But my iPod is now giving 2 beeps with a white screen. iTunes sees it though, and restore/sync works. I can even hear the clickwheel working. There is just no image on the screen. I guess screen might be ok, since backlight is working? I have tried all force reset tricks there are. Does anybody have any ideas? Thanks!
that screen is bad, the two beeps means the LCD is damaged. I have the same issue, replacing the screen worked for me.
I found removing the back to be very difficult and had to use a mini screwdriver to complete it. While removing the back to replace the clickwheel, I not only destroyed the back, I inadvertently mangled the video cable and so I then had to replace that too.
gruntso - Antwort