Einleitung
Displaytausch im iPod Nano der 3. Generation
Was du brauchst
-
-
Damit die Darstellung klarer wird, sind die beiden Klammern nahe an der Kopfkörperbuchse rot markiert.
i don't know what genoration my ipod is...but it looks exactly like that on and it doesnt have the clips......what do i do?
https://www.ifixit.com/info/ID-your-iPod
Try that first to find what you have
Given the inherited risks of damaging the components, it would also be important to mention that the area where there are no clips is where the flat cable to the screen resides. So NO deep sticking tools in that area. It’s attractive to do because at that right side the back panel is intruded the easiest way - but dont do it.
-
-
-
Setze das große iPod-Öffnungswerkzeug in die Naht zwischen Vorder- und Rückseite des iPods über den Dock-Anschluss ein. Die Kante des Werkzeugs muss zur Rückseite hin zeigen, um Schäden an der Vorderseite aus eloxierten Aluminium zu vermeiden.
-
-
-
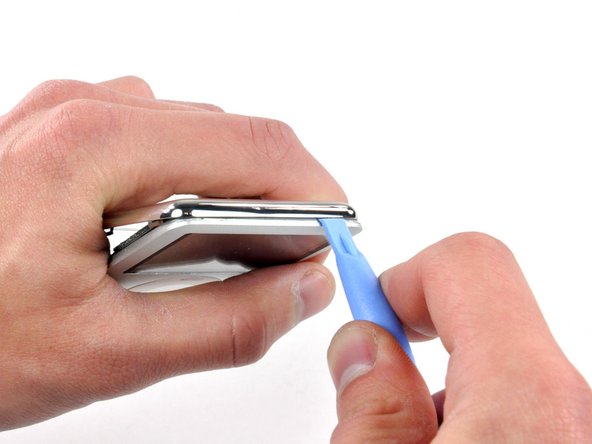
Setze ein kleines iPod-Öffnungswerkzeug in die Naht an der Seite mit der Kopfhörerbuchse ein, wobei die Kante wieder zur Rückseite hin zeigen muss.
-
Vergrößere den vorhandenen kleinen Spalt durch Wackeln/Drücken des Öffnungswerkzeugs nahe bei den beiden Klammern der Rückseite. Drücke die Klammern zur Mitte des Nanos hin, bis sie sich lösen.
the tool i bought because you suggested it to me got inevitably broken like it was butter made, thanks
This is virtually impossible! I have already cut myself when the stupid tool slipped trying to push in on the clips. Why on earth would anyone design something to impossible to open when they know the battery would need to be replaced at some point?
Forget the iFixit plastic tools. You need to use steel on steel. I used a heavy duty engravers knife I happened to have, to get it started. Then, a fine chisel and jeweler’s screwdrivers and LOTS of force to pry it off. I messed up the aluminum front case a bit, but I cleaned that up with sandpaper. The back case was bent a bit, but I straightened that, and after replacing the battery I fastened it back on with black electricians tape. It looks quite well, and good enough for me. I will cancel my order for a replacement back. Joe M 2/3/2018
i never needed the large tool i just needed i little flat head screwdriver
-
-
-
Wiederhole das im vorigen Schritt beschriebene Verfahren zum Öffnen der drei Klammern an der Seite mit dem "Hold"-Schalter.
-
-
-
Setze ein iPod-Öffnungswerkzeug in die Lücke an der linken oberen Ecke des iPods ein und löse die drei Klammern an der Oberkante der Rückseite.
-
Wenn du sicher bist, dass alle Klammern gelöst sind, kannst du die beiden Hälften des iPods voneinander trennen.
-
Die Rückseite des iPods ist damit frei.
-
-
-
-
Wenn die Rückseite entfernt ist, sieht dein iPod Nano so aus.
At this stage an alternative (and more simple) procedure is to cut the battery wires between the battery and the logic board (one at a time to avoid shorts), remove the old battery, fit the new battery, strip and prepare the ends of the old cut wires, then solder the new battery to these wires again being careful not to short connections. Then sleeve or encapsulate these soldered joints (wax or blu tack will do). This makes it an easier and quicker job.
Sounds a much better idea to me.
I was just given some old parts in a box. Scored a decent router, laptop power supply and 2 ipods. Unfortunately, the newer one has half it's power connector snapped off and the other (4GB/A1236), I successfully reset via iTunes but it doesn't hold a charge! %#*@. I might just scout for an old speaker dock at a garage sale or such and put it in the bathroom or something.
-
-
-
Entferne folgende sechs Schrauben:
-
Eine 1,8 mm Kreuzschlitzschraube
-
Drei 1,9 mm Kreuzschlitzschrauben
-
Eine 2,4 mm Kreuzschlitzschraube
-
Eine 2,6 mm Kreuzschlitzschraube
If your headphone jack isn't working, note that it is possible to replace just the headphone jack here:
There are just 4 soldering points that need to be loosened, and then you can put on the new one.
I was able to remove the back cover using two think plastic guitar picks and my red cross donor card
I read some steps further back and it was recommended to NOT remove all the screws and the boards indicated in the following steps, but to go directly to replace the battery. It is no more difficult to go directly to cut the battery leads, or unsolder them. I tried to splice the new battery wires to the cut leads from the board, but it was hard working with the fine wire. I ended up clearing the top of the three battery solder-through holes, but I did not clear the holes. I soldered the battery leads directly to the top of the small round solder dots…first the white, then the black, and finally the red. I fastened the battery in-place with a piece of two-sided carpet tape. I straightened up the back and taped into place with black electricians tape. It is very delicate work, and not for a beginner…I repair family jewelry, which is valuable practice. Joe M 2/3/2018
-
-
-
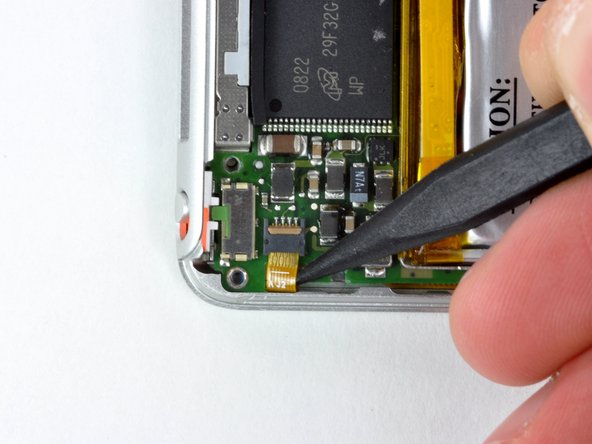
Schiebe das Flachbandkabel zum Klickrad mit der Spudgerspitze aus dem Anschluss heraus.
-
-
-
Hebe die Logic-Board-Einheit an der Seite mit dem Klickrad-Anschluss hoch (das Kabel hast du gerade entfernt). Drehe die Logic-Board-Einheit um das Display-Flachbandkabel herum und lege es am vorderen Gehäuseteil ab.
When reassembling the logic board into the case, watch out for the tiny nose of the audio jack that's facing towards the center of the device. This nose has to be inserted first, then the rest of the audio jack followed by the logic board itself.
-
-
-
Setze einen Spudger in den Spalt zwischen dem vorderen Gehäuseteil und dem Display in der Nähe der oberen rechten Ecke ein. Heble das Display langsam und vorsichtig an mehreren Stellen am oberen Rand des Displays nach oben in Richtung der linken Ecke.
-
-
-
Heble das Display langsam und vorsichtig weiter auf, diesmal beginnend in der oberen rechten Ecke an der rechten Seite nach unten.
-
Wiederhole das Ganze für die linke Seite, diesmal beginnend in der oberen linken Ecke an der linken Seite nach unten.
-
-
-
Wenn der Spalt groß genug geworden ist, um die Finger zwischen Display und vorderem Gehäuseteil einzusetzen, dann hebe das Display behutsam hoch und löse es aus der Klebeverbindung zum vorderen Gehäuseteil.
-
Nur das Display bleibt übrig.
Hi,
I've got an problem with replacing this screen. And i dont know if it's faulty part or i'm doing something wrong. When i connect new display it's just showing white screen, sometimes with black horizontal lines. also, iPod beeps 2or 3 times. When i reconnect old, broken one, everything is ok.
I'll be thankful for any suggestions
Zitat von Michal:
Hi, I've got an problem with replacing this screen. And i dont know if it's faulty part or i'm doing something wrong. When i connect new display it's just showing white screen, sometimes with black horizontal lines. also, iPod beeps 2or 3 times. When i reconnect old, broken one, everything is ok. I'll be thankful for any suggestions
Zitat von christianihrens:
Hi, please try to reset iPod after relpacing Display by holding center and menu buttons a few seconds. It should appear the apple
-logo.
I had the same fault, after resetting everything works fine
I have the same issue and your solution does not fix it. My screen still shows blank white. Any other ideas?
scott -
Hi, I've replacing the new one. But the clickwheel now won't work. Can you help me?
-


Um dein Gerät wieder zusammenbauen, folge den Schritten in umgekehrter Reihenfolge.
Um dein Gerät wieder zusammenbauen, folge den Schritten in umgekehrter Reihenfolge.
Rückgängig: Ich habe diese Anleitung nicht absolviert.
80 weitere Nutzer:innen haben diese Anleitung absolviert.
Besonderer Dank geht an diese Übersetzer:innen:
100%

Diese Übersetzer:innen helfen uns, die Welt zu reparieren! Wie kann ich mithelfen?
Hier starten ›

5 Kommentare
Hi, i recently purchased a repair kit consisting of a new display and the requred tools to do the job Order #383628 only to find that you sent a PH00 torx driver instead of the required Phillips screwdriver , also after replacing the screen because the backlight had failed i find that the replacement screen backlight does not work either , i would welcom your comments on this please !
Never have I seen such ridiculous design. Despite what this blog claims there is no way the blue plastic tool or guitar picks will remove the back cover. The only way I was able to even slightly part the side seam was with a sharp flat bladed screw driver driven in by a clamp - which bent up the aluminum frame. Now using to the blue plastic "tool" (junk) I pretty much destroyed it working it around. The sharp metal back cover just cuts right into it shreds it. Back to metal flat bladed screwdrivers.
Got back over off - but frame no longer straight. Carefully straightened, Replace the battery & re-assembled. Unit beeped - Screen came on and shows cracks and stress marks but no menu.
Because of awful design I destroyed the screen just trying to get the back cover off to simply replace battery.
So - since Apple was so determined not to let me perform a simple battery replacement I am now equally determined NEVER to buy any Apple product again. So much for being a good design company - Total crap.
It’s funny that Chinese companies that make ipod nano clones managed to attach the back case with 2 or 4 tiny screws. Apple also refuses to sell any parts to repair older electronics. Their agenda seems to be” Why would you want to repair an older product when you can just buy a new one?”.
Because adding screws is much cheaper. Plus these were made more then a decade ago. That’s like asking Samsung to sell pieces for a Note 5 or Nokia to sell parts for their Nokia 3310 phone. Devices have advanced more then 8 gigabytes and there’s a lot of places that scrap and sell parts.
I found removing the back to be very difficult and had to use a mini screwdriver to complete it. While removing the back to replace the clickwheel, I not only destroyed the back, I inadvertently mangled the video cable and so I then had to replace that too.
gruntso - Antwort