Einleitung
Diese Anleitung zeigt, wie die glänzenden Rückseite des iPod-Gehäuses ausgetauscht werden kann.
Was du brauchst
-
-
Damit die Darstellung klarer wird, sind die beiden Klammern nahe an der Kopfkörperbuchse rot markiert.
i don't know what genoration my ipod is...but it looks exactly like that on and it doesnt have the clips......what do i do?
https://www.ifixit.com/info/ID-your-iPod
Try that first to find what you have
Given the inherited risks of damaging the components, it would also be important to mention that the area where there are no clips is where the flat cable to the screen resides. So NO deep sticking tools in that area. It’s attractive to do because at that right side the back panel is intruded the easiest way - but dont do it.
-
-
-
-
Setze das große iPod-Öffnungswerkzeug in die Naht zwischen Vorder- und Rückseite des iPods über den Dock-Anschluss ein. Die Kante des Werkzeugs muss zur Rückseite hin zeigen, um Schäden an der Vorderseite aus eloxierten Aluminium zu vermeiden.
-
-
-
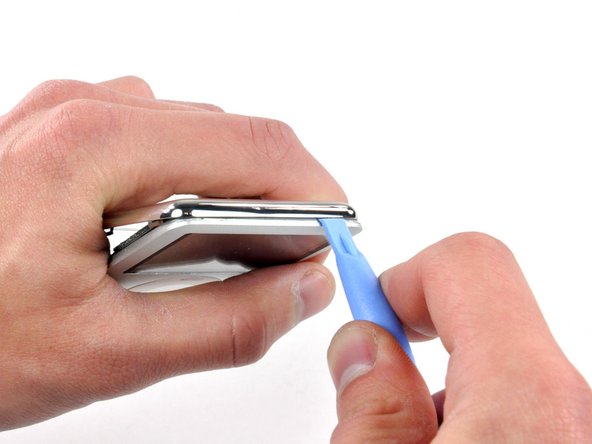
Setze ein kleines iPod-Öffnungswerkzeug in die Naht an der Seite mit der Kopfhörerbuchse ein, wobei die Kante wieder zur Rückseite hin zeigen muss.
-
Vergrößere den vorhandenen kleinen Spalt durch Wackeln/Drücken des Öffnungswerkzeugs nahe bei den beiden Klammern der Rückseite. Drücke die Klammern zur Mitte des Nanos hin, bis sie sich lösen.
the tool i bought because you suggested it to me got inevitably broken like it was butter made, thanks
This is virtually impossible! I have already cut myself when the stupid tool slipped trying to push in on the clips. Why on earth would anyone design something to impossible to open when they know the battery would need to be replaced at some point?
Forget the iFixit plastic tools. You need to use steel on steel. I used a heavy duty engravers knife I happened to have, to get it started. Then, a fine chisel and jeweler’s screwdrivers and LOTS of force to pry it off. I messed up the aluminum front case a bit, but I cleaned that up with sandpaper. The back case was bent a bit, but I straightened that, and after replacing the battery I fastened it back on with black electricians tape. It looks quite well, and good enough for me. I will cancel my order for a replacement back. Joe M 2/3/2018
i never needed the large tool i just needed i little flat head screwdriver
-
-
-
Wiederhole das im vorigen Schritt beschriebene Verfahren zum Öffnen der drei Klammern an der Seite mit dem "Hold"-Schalter.
-
-
-
Setze ein iPod-Öffnungswerkzeug in die Lücke an der linken oberen Ecke des iPods ein und löse die drei Klammern an der Oberkante der Rückseite.
-
Wenn du sicher bist, dass alle Klammern gelöst sind, kannst du die beiden Hälften des iPods voneinander trennen.
-
Die Rückseite des iPods ist damit frei.
-


Um dein Gerät wieder zusammenbauen, folge den Schritten in umgekehrter Reihenfolge.
Um dein Gerät wieder zusammenbauen, folge den Schritten in umgekehrter Reihenfolge.
Rückgängig: Ich habe diese Anleitung nicht absolviert.
36 weitere Nutzer:innen haben diese Anleitung absolviert.
Besonderer Dank geht an diese Übersetzer:innen:
100%

Diese Übersetzer:innen helfen uns, die Welt zu reparieren! Wie kann ich mithelfen?
Hier starten ›

2 Kommentare
but what about the model no.
its just a third-gen ipod nano they all have the same design
I found removing the back to be very difficult and had to use a mini screwdriver to complete it. While removing the back to replace the clickwheel, I not only destroyed the back, I inadvertently mangled the video cable and so I then had to replace that too.
gruntso - Antwort