Einleitung
Das Motherboard des iPods steuert alles im iPod.
Was du brauchst
-
-
Verwende einen Spudger, um den weißen Hold-Schalter aus Kunststoff hochzuhebeln.
-
-
-
Der folgende Schritt kann kompliziert und zeitaufwändig sein. Bitte habe Geduld und nimm dir Zeit, um deinen iPod nicht zu beschädigen.
-
Benutze einen Cutter, um den Kleber, mit dem der USB-Anschluss am iPod befestigt ist, zu lösen. Fahre mit dem Cutter entlang der Klebekante, um den Kleber zu trennen. Du musst das Messer zwischen 20 und 30 Mal an der Kanten entlangziehen, um den Kleber komplett durchzutrennen.
I'm curious if anyone has ever tried soaking this send of the shuffle in 99% isopropyl alcohol to disolve the adhesive and allow the USB to pop off more easily. Might give it a try, but I'm guessing the lettering might also come off from that.
-
-
-
Ziehe das Messer entlang der vier Kanten des USB-Anschlusses, bis der Kleber komplett gelöst ist. Du kannst versuchen das Messer ein wenig hin und her zu bewegen, um den Kleber einfacher zu lösen.
-
-
-
Verwende einen Spudger, um die Kopfhörerbuchse hineinzudrücken und somit den USB-Anschluss aus seinem Gehäuse herauszuschieben.
-
-
-
-
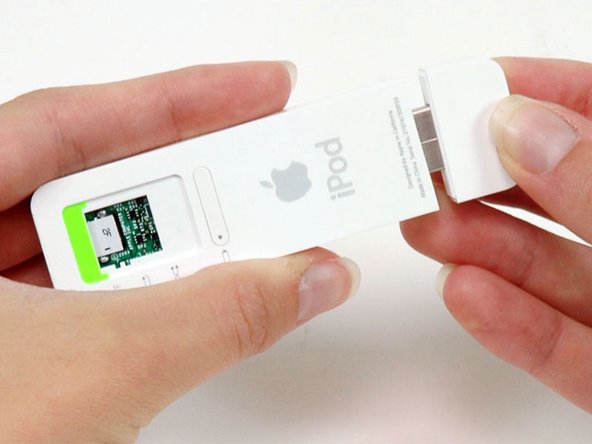
Nachdem der USB-Anschluss gelöst ist, ziehe ihn vorsichtig aus dem Gehäuse. Ziehe ihn nicht zu weit heraus, da der USB-Anschluss weiterhin mit einem Flachbandkabel am Logic Board befestigt ist.
-
-
-
Schiebe den iPod weiter aus dem Gehäuse, indem du das Logic Board nahe bei der Kopfhörerbuchse mit einem Spudger weiter hineindrückst.
You can place a piece of tape over the battery indicator in this step to prevent it from falling out in Step 9. :)
-
-
-
Drehe den iPod so, dass das Click Wheel nach oben zeigt. Das verhindert das die Akkuanzeige aus dem Gehäuse fällt.
-
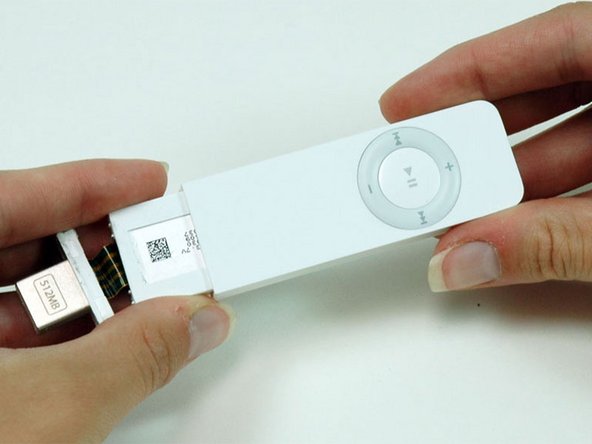
Ziehe den iPod aus seinem Gehäuse.
-
-
-
Verwende einen Spudger, um den schwarzen Kunststoffbügel, mit dem das USB-Flachbandkabel befestigt ist, nach oben zu drücken. Der schwarze Bügel lässt sich 90° nach oben klappen, um das Flachbandkabel zu lösen.
-
-
-
Löse das gelbe USB-Flachbandkabel vorsichtig vom Akku ab.
Start by lifting from the port end of the ribbon; the tape is strongest and easiest to pull up from there. I pulled up from the corner shown in the picture and ended up ripping the tape. :'(
-
-
-
Ziehe das USB-Flachbandkabel vorsichtig aus seinem Stecker.
-
Hebe den USB-Anschluss und das abgelöste Flachbandkabel aus dem iPod.
If you are only replacing the battery there is no need to remove the memory board. Cut the wires from the old battery as close to the battery as you can. Then cut the black wire from the new battery so that it is about 1/2 inch long. Strip the ends about 1/8 inch and solder. Slip a piece of 3/32 heat shrink tubing over the joint. Now cut the red wire so that it is about 1/2 inch long and strip as above, solder and cover with heat shrink tubing. It works!
If replacing the battery in the first generation , what are the spec's on the battery in order to locat one for replacement. Thanks.
-
-
-
Ziehe den weißen Kunststoffrahmen vorsichtig nach hinten, um die linke Seite des Logic Boards freizulegen. Ziehe das Logic Board leicht heraus, um zu verhindern, dass es in den Rahmen zurück rutscht.
-
-
-
Wiederhole diesen Vorgang auf der anderen Seite, um das Logic Board vom weißen Kunststoffrahmen zu lösen.
-
-
-
Hebe das Logic Board an, um es von der Speicherplatine darunter zu lösen. Entferne das Logic Board noch nicht komplett, da es noch mit dem Akku verbunden ist.
-
-
-
Drehe den iPod um und drücke den Akku vorsichtig mit deinem Finger durch die Öffnung im Gehäuse. Der Akku ist leicht mit dem Kunststoffrahmen verklebt.
-
Hebe den Akku und das Logic Board vorsichtig aus dem Kunststoffrahmen.
Yeah, how is the battery connected to the logic board? — is it soldered, or what?
I completed everything and re-soldered in a new battery and verified everything worked. Sadly, pushing it back into the case, one of the tiny SMT parts broke off and that was the end of that. Upon re-disassembly I also discovered that the tiny flex cable had cracked where it makes a turn, severing the USB connections.
The guide was fine (although it should have included the critical actual battery replacement part), but the device really isn’t designed for service and it’s high risk to take it apart.
After reading these instructions, I have decided to send it some place for repair. do you have any idea who could replace the battery?
-


Um dein Gerät wieder zusammenzubauen, folge den Schritten dieser Anleitung in umgekehrter Reihenfolge.
Um dein Gerät wieder zusammenzubauen, folge den Schritten dieser Anleitung in umgekehrter Reihenfolge.
Rückgängig: Ich habe diese Anleitung nicht absolviert.
44 weitere Nutzer:innen haben diese Anleitung absolviert.
Besonderer Dank geht an diese Übersetzer:innen:
100%


Diese Übersetzer:innen helfen uns, die Welt zu reparieren! Wie kann ich mithelfen?
Hier starten ›

5 Kommentare
It would be helpful if the board images of the soldering process were included for these procedures. I have not tried the removal process and installation of the battery. And, why can’t we see an Ipod mini shuffle Gen 2? I can send you the one I own..
Not hard,i believe in u
Thanks, for this guide
Toll, die Anleitung erklärt nur 2/3 des Weges hin zu einer neuen Batterie.
Sehr anschaulich aber völlig wertlos. Jetzt habe ich einen säuberlich
zerlegten iPod und weiß nicht weiter.